
ProfileThread
Overview
This is a user’s guide of the internal module called ProfileThread.
Audio Weaver was designed to only support single threaded modules. In Audio Weaver terms, this means that each module is expected to operate within a single layout, which in turn means that a module operates within a single block rate and clock divider. Typically, thread control in the layout is done using modules like ChangeThread to modify the clockDivider for downstream modules.
A custom Audio Weaver module can spawn additional system threads (e.g. pthreads) internally to distribute processing as desired. The problem with this approach is that these threads are hidden from Audio Weaver so the CPU load of those threads is absent in profiling results. The ProfileThread module was created so custom module writers can add a hook to their internally spawned system threads so that they show up in Audio Weaver profiling.
Problem Statement
Consider a custom module which operates at a fixed block size of 5 msecs. In the diagram below, the processing in green is part of the custom module and captured by the Audio Weaver profiling functions. Suppose that the module leverages 2 additional internal system threads, shown in orange. The module runs all 3 threads in parallel and blocks Base Thread until all Helper threads have completed.
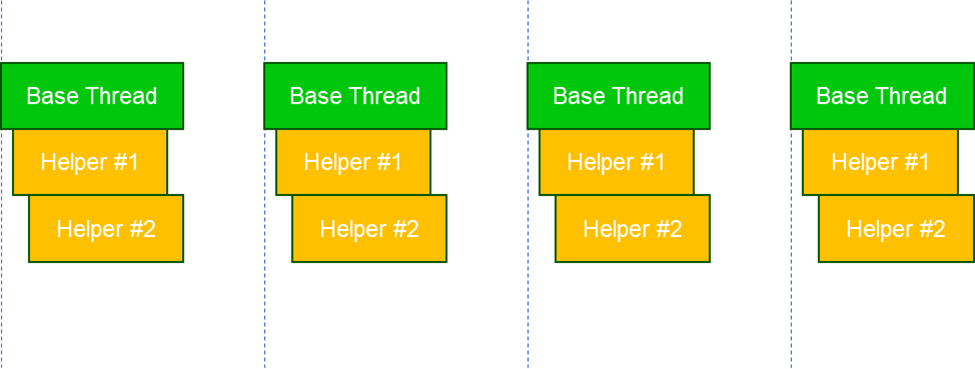
Audio Weaver will only capture the computation in the Base Thread while the computation used by the Helper Threads will be lost. Since Base Thread is blocking on the Helper threads, the CPU load of Base Thread shown in profiling results will end up being max(BaseThreadCycles, Helper1Cycles, Helper2Cycles). This makes it impossible to determine what the actual CPU load of any of the individual threads is, so profiling information can’t be used to help balance the processing load between the 3 threads.
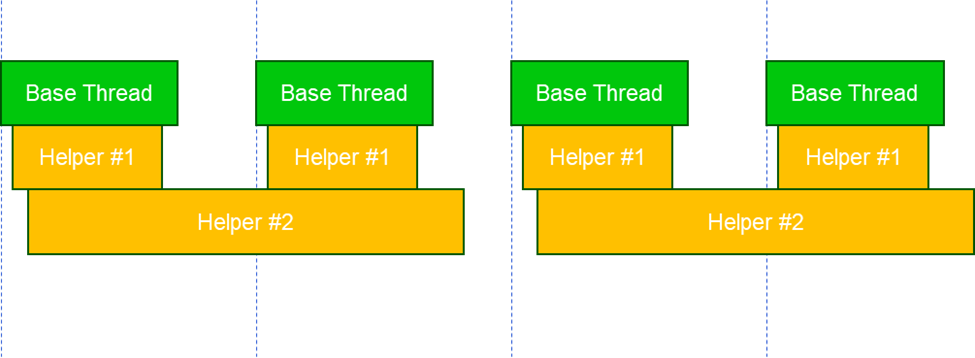
In the example above, all 3 threads operate within the context of a 5 msec block. Consider the more sophisticated system shown below. The main thread operates at 5 msec, Helper #1 operates at 5 msec and Helper #2 operates at 10 msec (the custom module would be responsible for all synchronization and buffering between the threads). The ProfileThread module must be able to capture useful profiling for both of these use cases.
The following section describes an extension which allows custom modules to report the additional processing used by hidden internal threads to the overall Audio Weaver framework. This is important for the targets like Hexagon DSP since it has multiple hardware threads which increase the computational throughput of the device.
ProfileThread Module
Since the new ProfileThread module has no standalone functionality, it is hidden from the Designer module palette and can’t be added to a layout canvas. It is only available so that users can add the ProfileThread modules to their custom modules/subsystems to capture profiling information for any internally spawned system threads.
The module expects 2 arguments in matlab, NAME and CLOCK_DIVIDER: profile_thread_module(NAME, CLOCK_DIVIDER). Thread ID in the clock divider of profile thread module should be in the range ‘Q’ to ‘Z’. i.e. to use a profile thread module in instance 0 with clock divider of 1 then the CLOCK_DIVIDER argument should be something like ‘1Q0’. The letter range Q:Z helps avoid conflicts with other AWE layouts, which reserve the range A:P.
M = profile_thread_module(NAME, CLOCK_DIVIDER)This module is used internally by custom multithreaded modules to store profiling information.
Arguments:
    NAME - name of the module.
    CLOCK_DIVIDER - clock divider of the profiling thread in the string
                     format. Default to '1Q0'. Clock divider thread ID must be from Q to
                     Z. Otherwise build will fail. Divider and instance values must be
                     propagated by the subsystem in which this module is used.
                     i.e. There values are overwritten by the parent subsystem.
                     Please look at the example subsystem,
                     "multi_thread_sys_example_subsystem.m" in Example modules.
Adding an instance of a profile_thread_module to a custom subsystem will create a unique dummy layout with the associated CLOCK_DIVIDER. This dummy layout never pumps, and only exists so that it can capture profiling information. Each internally spawned system thread in the custom module must have an associated ProfileThread module to enable profiling.
The ProfileThread module C implementation provides API’s to mark the start and end of profiling:
aweProfileThreadStartTick(void *pModInstance) – This function should be called from a custom module thread before doing any processing. Here pModInstance argument is a pointer to profile thread module added in the custom module.
aweProfileThreadStopTick(void *pModInstance) – Called at the end of the custom thread processing with the same profile thread module pointer. This function does the generation of profiling information to display in Designer profiling results.
aweProfileThreadSetOverflow(void *pModInstance) – This is a helper function to keep track of thread overruns. i.e. if the thread is taking more time than expected, custom module can call this API to indicate the overrun to the appropriate profile thread module. Overflow counts will be shown in profiling results for the associated dummy layout.
MultiThread Module Example
The Example module pack provided in Designer installations includes a sample module implementation( multi_thread_example_module.m ) to demonstrate the use of the ProfileThread module. This is the actual module running on the target which spans processing into 2 additional threads along with base processing in the module process function. The module is designed only to run on Windows.
This module provided with 2 profile thread modules and distributes the load into 2 system threads.
function M = multi_thread_example_module(NAME, THREAD1, THREAD2)Here, THREAD1 argument is the name of the first profile thread module added and THREAD2 is the name of the second profile thread module. Add as many arguments as system threads used by the custom module.
add_argument(M, 'profileThread1', 'string', THREAD1, 'const', 'Name of the external ProfileThread module used for the first thread');
add_argument(M, 'profileThread2', 'string', THREAD2, 'const', 'Name of the external ProfileThread module used for the second thread');
Add a pointer for each profile thread argument:
add_pointer(M, 'thread1', 'void *', 'parameter', 'Points to the first ProfileThread module', 1);
M.thread1.ptrExpr = ['\' THREAD1];
add_pointer(M, 'thread2', 'void *', 'parameter', 'Points to the second ProfileThread module', 1);
M.thread2.ptrExpr = ['\' THREAD2];
Note that other variables used in this example module are to demonstrate threads handling and user should use appropriate mechanisms based on the target needs.
To use profile thread functions in the C code, include the profile thread header file as:
awe_addcodemarker(M, 'srcFileInclude', '#include "ModProfileThread.h"');Add custom thread functions in “_Other.c” inner file and include it in code generated as below:
awe_addcodemarker(M, 'otherFunctions', 'Insert:\InnerMultiThreadExample_Other.c');MultiThreaded Subsystem
Now create a matlab subsystem made up of the actual custom module (MultiThread example in this case) and some profile thread modules. This is a purely virtual subsystem and does not include any C code and does not exist on the target. Note that wrapping the custom module and the profile thread modules in a subsystem allows them to be displayed as separate entities in profiling results. If this functionality is implemented in a single module rather than a subsystem, then profiling will not show the internal profiling thread information.
The Examples pack provides a subsystem module ( multi_thread_sys_example_subsystem.m ) that demonstrates how to add custom module and profile thread modules together.
% Add the profile thread modules with appropriate clock divider
add_module(SYS, profile_thread_module('ProfileThread1', '1Q0'));
add_module(SYS, profile_thread_module('ProfileThread2', '1R0'));
% Add multi thread module (actual custom module where processing spanned into multiple threads)
add_module(SYS, multi_thread_example_module('MultiThreadMod', 'ProfileThread1', 'ProfileThread2'));
% Connect them together
connect(SYS, '', 'MultiThreadMod');
connect(SYS, 'MultiThreadMod', '');
User must select proper clock divider value (1, 2, 4, etc) depending on the custom thread behavior. As in the first scenario of problem statement where thread process time is within the main module process, the clock divider value should be 1. Whereas in the second scenario, the custom thread completes in 2 blocks of the main thread and in this case clock divider value should be 2.
The subsystem module prebuild should update the profile thread modules clock divider based on the main module info as below:
% ----------------------------------------------------------------------
% Prebuild function.
% ----------------------------------------------------------------------
function SYS = multi_thread_subsys_prebuild(SYS)
% Update core ID of ProfileThread modules here based on the input pin core ID.
COMP_INPUT = convert_thread_id(SYS.inputPin{1}.clockDivider, 'components');
for threadName = {'ProfileThread1', 'ProfileThread2'}
    COMP_PT = convert_thread_id(SYS.(threadName{1}).constructorArgument{1}.value, 'components');
    % Update ProfileThread module clock divider and core ID with input info.
    % clockDivider is the product of the input pin and the thread requirement
    clockDivider = COMP_INPUT(1) * COMP_PT(1);
    % Sub-instance ID comes from the thread
    subThreadID = COMP_PT(2);
    % InstanceID is inherited from the input pin
    instanceID = COMP_INPUT(3);
    SYS.(threadName{1}).clockDivider = convert_thread_id([clockDivider subThreadID instanceID], 'clockDividerF');
end
return
Custom Module C Code
The MultiThreadExample custom module uses 2 custom Windows threads, which are added in InnerMultiThreadExample_Other.c.
DWORD WINAPI sampleCustomThread1(LPVOID lpParam)
{
    awe_modMultiThreadExampleInstance *S = (awe_modMultiThreadExampleInstance *)lpParam;
    WireInstance **pWires = ClassModule_GetWires(S);
    FLOAT32 *inPtr;
    FLOAT32 *outPtr;
    INT32 sample, numSamples;
    inPtr = (FLOAT32 *)(pWires[0]->buffer);
    outPtr = (FLOAT32 *)(pWires[1]->buffer);
    numSamples = (INT32) ClassWire_GetNumSamples(pWires[0]);
    /*********************************************/
    // This is an example thread function. While creating thread
    // in the Set function, user has to pass S->thread1 as an thread argument.
    // Then single thread to start processing (semaphore or with any other way)
    // Wait here for an event from MultiThread module to start thread processing.
    while (!S->stopThread1)
    {
        DWORD waitResult = WaitForSingleObject(S->hEvent1, INFINITE);
        if (waitResult == WAIT_OBJECT_0)
        {
            ResetEvent(S->hEvent1);
            // Call the function aweProfileThreadStartTick with first ProfileThread
            // module pointer, to start profiling for this thread.
            aweProfileThreadStartTick(S->thread1);
            // Do the processing. Below is just as an example.
            for(sample = 0; sample < numSamples; sample++)
            {
                outPtr[sample] = inPtr[sample] * S->gain;
            }
            // Call the function aweProfileThreadStopTick to end profiling for this thread.
            aweProfileThreadStopTick(S->thread1);
            // End of first thread part.
            /********************************************/
        }
        // Thread processing is done
        S->isProcessingDoneThread1 = 1;
    }
    return 0;
}

DWORD WINAPI sampleCustomThread2(LPVOID lpParam)
{
    awe_modMultiThreadExampleInstance *S = (awe_modMultiThreadExampleInstance *)lpParam;
    WireInstance **pWires = ClassModule_GetWires(S);
    FLOAT32 *inPtr;
    FLOAT32 *outPtr;
    INT32 sample, numSamples;
    INT32 i;
    inPtr = (FLOAT32 *)(pWires[0]->buffer);
    outPtr = (FLOAT32 *)(pWires[1]->buffer);
    numSamples = (INT32) ClassWire_GetNumSamples(pWires[0]);
    /*********************************************/
    // This is an example thread function. While creating thread
    // in the Set function, user has to pass S->thread2 as an thread argument.
    // Then singal thread to start processing (semaphore or with any other way)
    // Wait here for an event from MultiThread module to start thread processing.
    while (!S->stopThread2)
    {
        DWORD waitResult = WaitForSingleObject(S->hEvent2, INFINITE);
        if (waitResult == WAIT_OBJECT_0)
        {
            ResetEvent(S->hEvent2);
            // Call the function aweProfileThreadStartTick with next ProfileThread
            // module pointer, to start profiling for this thread.
            aweProfileThreadStartTick(S->thread2);
            // Do the processing. Below is just as an example.
            for (i = 0; i < 20; i++)
            {
                for(sample = 0; sample < numSamples; sample++)
                {
                    outPtr[sample] = inPtr[sample] * S->gain;
                }
            }
            // Call the function aweProfileThreadStopTick to end profiling for this thread.
            aweProfileThreadStopTick(S->thread2);
            // End of second thread part.
            /********************************************/
        }
        // Thread processing is done
        S->isProcessingDoneThread2 = 1;
    }
    return 0;
}
In this example module, all threads are given the same clock divider. i.e. main module thread should wait for custom threads completed, depending on the use case. Here is the example module process function:
void awe_modMultiThreadExampleProcess(void *pInstance)
{
    awe_modMultiThreadExampleInstance *S = (awe_modMultiThreadExampleInstance *)pInstance;
    WireInstance **pWires = ClassModule_GetWires(S);
    FLOAT32 *inPtr;
    FLOAT32 *outPtr;
    INT32 sample, numSamples;
    INT32 i;
    inPtr = (FLOAT32 *)(pWires[0]->buffer);
    outPtr = (FLOAT32 *)(pWires[1]->buffer);
    numSamples = (INT32) ClassWire_GetNumSamples(pWires[0]);
    // Start first thread by signalling, via event or semaphore etc.
    SetEvent(S->hEvent1);
    // Start next thread by signalling, via event or semaphore etc.
    SetEvent(S->hEvent2);
    /********************************************/
    // Main thread module processing should go here
    /********************************************/
    // Do the processing. Below is just as an example of burning cycles
    for (i = 0; i < 20; i++)
    {
        for(sample = 0; sample < numSamples; sample++)
        {
            outPtr[sample] = inPtr[sample] * S->gain;
        }
    }
    // At the end, wait for other spanned threads to complete, depending on the thread timining.
    // Note: If spanned threads are not executed concurrently, waiting here can cause deadlock.
    while(!S->isProcessingDoneThread1)
    {
        ;
    }
    while(!S->isProcessingDoneThread2)
    {
        ;
    }
    // Clear the flags
    S->isProcessingDoneThread1 = 0;
    S->isProcessingDoneThread2 = 0;
}
Please note that it is module developer responsibility to handle synchronization between main module process and custom threads processing. i.e. sharing data between threads, block main process for custom threads or if the custom thread processing needs more blocks etc.
If the custom thread processing is taking more than expected blocks, then call aweProfileThreadSetOverflow() with corresponding ProfileThread module pointer to keep track of overflow count.
If the module required to set custom threads priorities, user could query the priority of the thread in which main module is running in the following way. First get the layout number in which the module belongs with the API awe_getModuleLayoutNumber. Below is the signature of the function.
INT32 awe_getModuleLayoutNumber(AWEInstance* pAWE, void* pMod, INT32 *layoutNum)This should be called from the module’s process function only once at start time. With the layout number returned by this function, make a call into the BSP function (must be provided by the BSP integrator) to get the layout thread priority.
// Check if the start time activity flag is true (default to true in the module)
if (S->startTimeActivity)
{
  INT32 layoutNum;
  INT32 priority;
  AWEInstance *pAWE = AWE_MOD_GET_AWE_INSTANCE(S);

  awe_getModuleLayoutNumber(pAWE, S, &layoutNum);
  if (pAWE->cbGetLayoutThreadPriority)
  {
    priority = pAWE->cbGetLayoutThreadPriority(pAWE, layoutNum);

    // Set custom thread priority as per the requirement here
  }

  // Clear start up activity flag
  S->startTimeActivity = 0;
}
Users can further improve profiling results by setting the CPU affinity for the spawned system threads using the API awe_fwSetLayoutCoreAffinity. Setting the core affinity for the ProfileThread layout if it can run concurrently with the custom module thread will improve the profiling accuracy.
Profiling Results
When profiling layouts that have ProfileThread modules included, the profiling results will include a row for each unique layout associated with the ProfileThread modules, as well as a row for the module itself. For example, below is an example subsystem module MultiThreadSysExample that includes 2 ProfileThread modules (1Q and 1R) running in system threads.
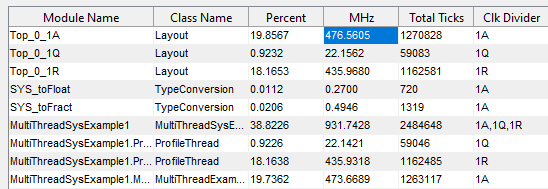
The Clk Divider column shows results for a Layout and ProfileThread Class for each of the 1Q and 1R clock dividers.