Advanced Module Features
Copying Modules
Existing modules can be copied and pasted within the same canvas, or across hierarchies and even across separate layouts. To copy and paste modules, highlight the module or modules to copy, then right click on the selection and select ‘Copy’. Right click on the canvas that you want to copy to and select ‘Paste’ to insert the selection onto the canvas.
Modules can also be copied by left clicking the selected module(s) and holding down, pressing the CTRL key, and dragging the cursor to the desired location on the canvas and releasing the left mouse button.
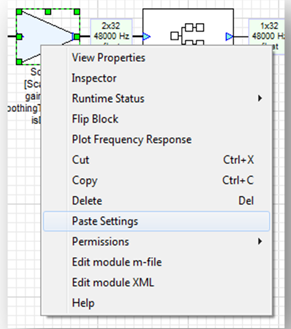
To copy the settings of one module to another of the same type, right click on a module and select ‘Copy’. Then right click on another module of the same type and select ‘Paste Settings’. When settings are pasted, only a module’s variables change, not its arguments.
Inspector Management
The ‘Inspector’ menu can be used to group the inspectors of related modules in the layout. The menu can also be used to show and hide different groups of inspectors to speed up inspector handling. To save an Inspector Group, open up your desired inspectors and then select the ‘Inspector → Save Group → New’ menu item. Once your Inspector Group is saved, it will appear under the top level Inspector menu. Selecting the group name will display your inspector group in exactly the same configuration as was saved.
The Inspector menu can also be used to close all open inspectors and to delete inspector groups.
Tunable Variables
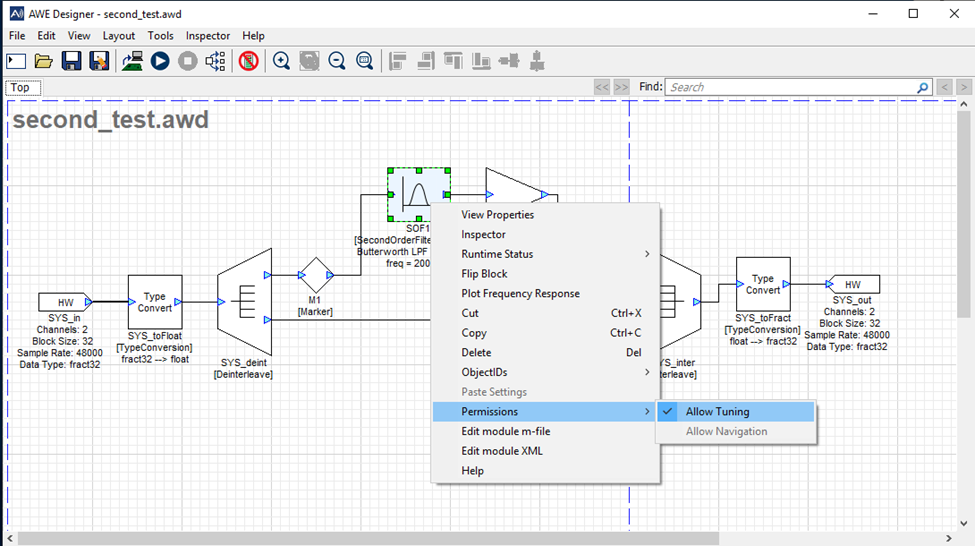
Many modules contain variables that can potentially be tuned at runtime. When a variable can cause undesirable side effects, it can be locked out from tuning. To do this, right click on the module and select the ‘Permissions’ context menu. There, as pictured below, variable tuning can be can be allowed or disallowed for a module.
ObjectIDs
ObjectIDs are generated symbols that are used in an AWE Core integration to allow the tuning of modules in the integration code. An objectID can be assigned to a module, and then that ID can be used to send tuning commands to a running layout on the target (without matlab or Designer). For more information on how to tune a layout via objectIDs, please see AWE Core 8 Integration Guide.
To assign an objectID to a module, right click the module of choice and select ObjectIDs->Assign.
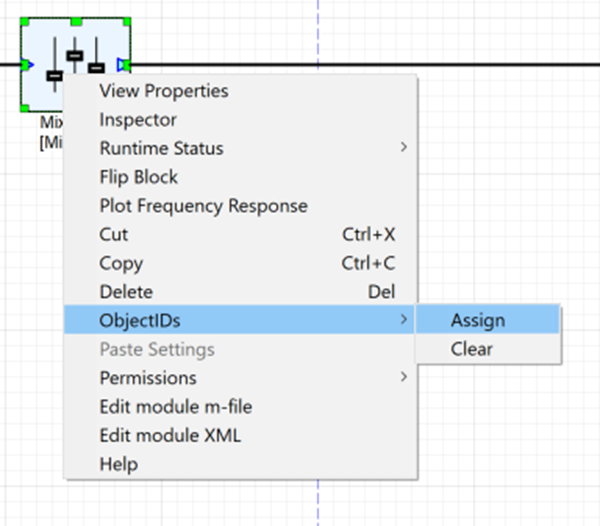
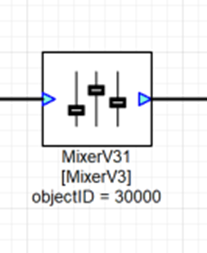
After you have assigned an objectID, it should appear under the Module on the canvas
You can clear the objectID by selecting “Clear” from the ObjectIDs menu shown above. You can also manually set a module’s objectID from the module properties “Build” tab.
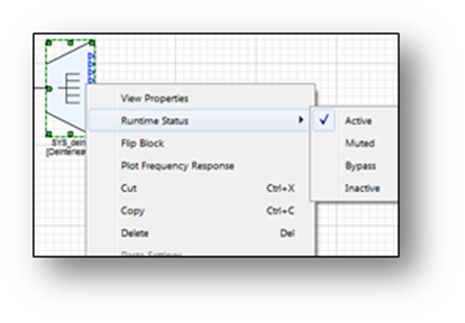
Module Status
Each module has an associated runtime status with 4 possible values:
Active — The module's processing function is being called. This is the default behavior when a module is first instantiated.
Muted — The module's processing function is not called. Instead, all of the output wires attached to the module are filled with zeros.
Bypassed —The module's processing function is not called. Instead, the module's input wires are copied directly to its output wires. Some modules use an intelligent generic algorithm which attempts to match up input and output wires of the same size. Other modules implement custom bypass functions.
Inactive — The module's processing function is not called and the output wire is untouched. This mode is used almost exclusively for debugging and the output wire is left in an indeterminate state.
Use Inactive runtime status with caution!
Changing the module status is useful for debugging and making simple changes to the processing at run-time. The module status can be changed in both Design mode and Tuning mode.
The Module Status can be changed by right-clicking on a module and selecting “Module Status”. To change the module status of a group, select multiple modules (including subsystems) with drag and select or by pressing ctrl, and right-click to change the status of all selected modules.