
Building Audio Module DLLs
The final phase in developing an audio module library is to compile the source files and create a Dynamic Link Library (DLL) for the Server. Typically, a DLL contains multiple modules organized around a common theme. For example, Audio Weaver provides several module packs:
FrameDll.dll — Standard Module Pack featuring basic modules
ModulePackAweAdvancedDLL.dll — Advanced Module Pack featuring more specialized functionality
ModulePackAweDeprecatedDLL.dll — Deprecated Module Pack, with modules that are no longer supported and should be avoided in new designs.
After a DLL is built with the x86 Release configuration, it is copied into the directory containing the Server executable
<AWE>\Bin\win32-142-rel
The Server then loads the DLL next time it launches. The audio module DLL contains all of the information needed by the Server to instantiate, execute, and control the module. The DLL also contains the schema information facilitating real-time tuning.
This section describes how to generate an audio module DLL by working through the Examples module library discussed in Examples Module Library. Building an audio module DLL requires Visual Studio 2019 or later. If you are running custom audio modules on an embedded processor, you'll need to build an audio module DLL and also rebuild the target executable. This section focuses on building the DLL. Refer to the AWE Core 8 API Quick Start for the additional steps needed on the target.
The steps described below indicate one method of structuring files and scripts to generate the module DLL. You can adapt this to fit your development process.
Building ExamplesDLL.dll
Run the master code generation script for this library
make_examplesOpen up the Visual Studio solution <AWE>\AWEModules\Source\Examples\Examples.sln
The solution contains two projects shown below: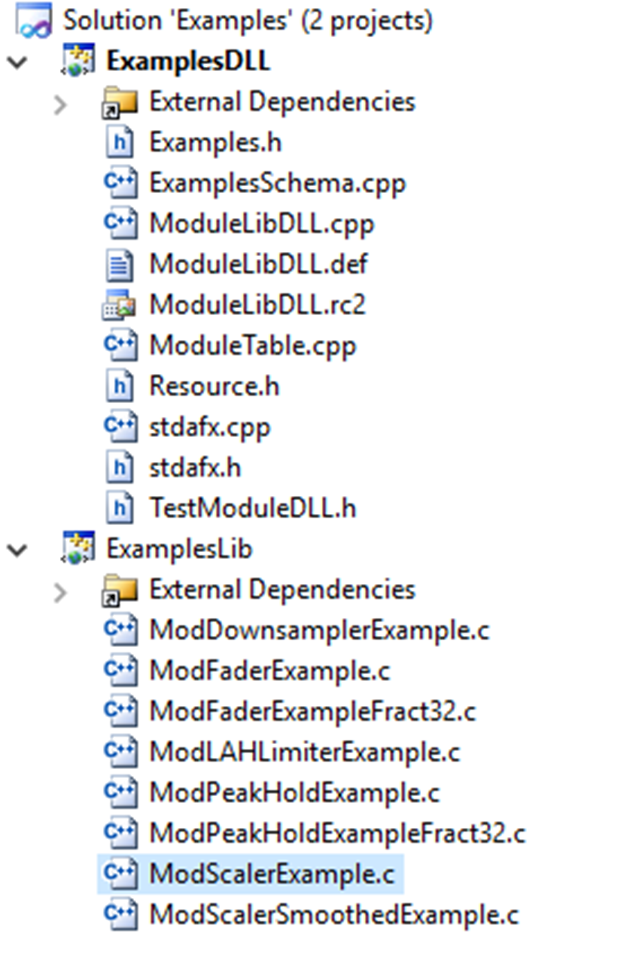
The ExamplesLib compiles the module source files and builds an overall library. The ExamplesDLL project builds the DLL. ExamplesLib is easily understood by C programmers. Understanding ExamplesDLL requires some Windows expertise. Fortunately, you can use the Examples projects as starting points for your own custom DLL development and do not have to delve into the underlying Windows issues.
To build the audio module DLL, right-click on ExamplesDll and select Rebuild, ensuring that the x86 Release configuration is selected. The project dependencies are set so that first ExamplesLib will be built followed by ExampleDll.
ExamplesDLL generates DLL at the location <AWE>\Bin\win32-142-rel directory so that it can be referenced by the Server.

Note: If the AWE_Server.exe executable is not in the expected place, then change the destination directory in this General configuration step.
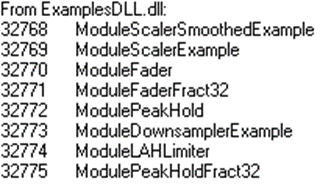
If the DLL was properly built, you'll be able to open the Server and see the new library of examples listed. Select Target > List Modules and scroll down the list looking for the ExamplesDLL.dll entry:
Cloning the Examples Library
We recommend that you use the Examples directory as a starting point for your own custom module libraries. We also recommend maintaining the existing directory structure.
Begin by copying and renaming the entire Examples directory in <AWE>/<ModuleLibs>. We'll assume that the new module library will be called MyModules and will be stored in the directory <MYMODULES>.
Delete all generated files, they will be regenerated:
<MYMODULES>/Examples.h
<MYMODULES>/ExamplesSchema.cpp
<MYMODULES>/ExamplesSchema.sch
<MYMODULES>/Examples.ncb, if exists
<MYMODULES>/Examples.suo, if exists
<MYMODULES>/Source/*
<MYMODULES>/Include/*
<MYMODULES>/Doc/*
Delete all files in <MYMODULES>/matlab except make_examples.m
Rename the following files from "Example" to "MyModules". You'll end up with:
<MYMODULES>/BuildDll/MyModulesDLL.vcproj
<MYMODULES>/BuildLib/MyModulesLib.vcproj
<MYMODULES>/matlab/make_mymodules.m
<MYMODULES>/MyModules.sln
Clear out any module m-files in the folder <MYMODULES>\matlab
Clear out any code pieces in the following directories:
<MYMODULES>\matlab\code
<MYMODULES>\matlab\process
<MYMODULES>\matlab\test
Copy in the files for your custom modules.
Edit make_mymodules.m and replace all the occurrences of “Examples” to “MyModules”. Also specify the list of modules you would like included in the library. Note that the module must be specified with complete arguments.
Edit the class ID file <MYMODULES>\classids.csv and specify unique class IDs for the modules in your library.
Issue the command
awe_initin the MATLAB command window to initialize the Audio Weaver environment.Update the module search path using the
add_module_pathMATLAB function or the Audio Weaver menu option File->Set Module Path.Issue the command
make_mymodulesin the MATLAB command window.Edit the *.vcxproj files in a text editor and delete the
ProjectGUIDstring. This string is supposed to be unique and thus uniquely identify the project within Visual Studio. However, since we just copied and renamed the .vcproj file, the ProjectGUID will no longer be unique.Find the line with the
ProjectGUIDkeyword near the top each .vcproj file:ProjectGUID="{5FEC38A8-50BF-41E6-A94F-E489381E2B85}"The line will be similar to this, but not exact. Change it to
ProjectGUID=""
This forces Visual Studio to update the GUID next time the file is opened. Change all occurrences of "Examples" to "MyModules" throughout the file.
Edit the file <MYMODULES>\BuildDll\ModuleTable.cpp and instead of including
Examples.h, change it toMyModules.h.Open up the file <MYMODULES>\BuildDll\ModuleLibDLL.def and change
LIBRARY "ExamplesDLL"
toLIBRARY "MyModulesDLL"Open the MyModules.sln in any editor window and look for “Examples” and replace this with “MyModules”. If doesn’t work, delete MyModules.sln and create a new solution. Then add the two projects, “MyModulesDLL.vcproj” and “MyModulesLib.vcproj”, to the solution.
Add the generated source files from <MYMODULES>\Source\ to the Source Files of “MyModulesLib.vcproj” and add files from <MYMODULES>\Include to the Include Files of “MyModulesLib.vcproj”.
At this point, the projects are ready to build. Build the solution with the x86 Release configuration, and when complete, you'll have MyModulesDLL.dll in the <AWE>\Bin\win32-142-rel directory.