
Deploying Custom Modules to SHARC (ADI-21569-SOM)
About This Guide
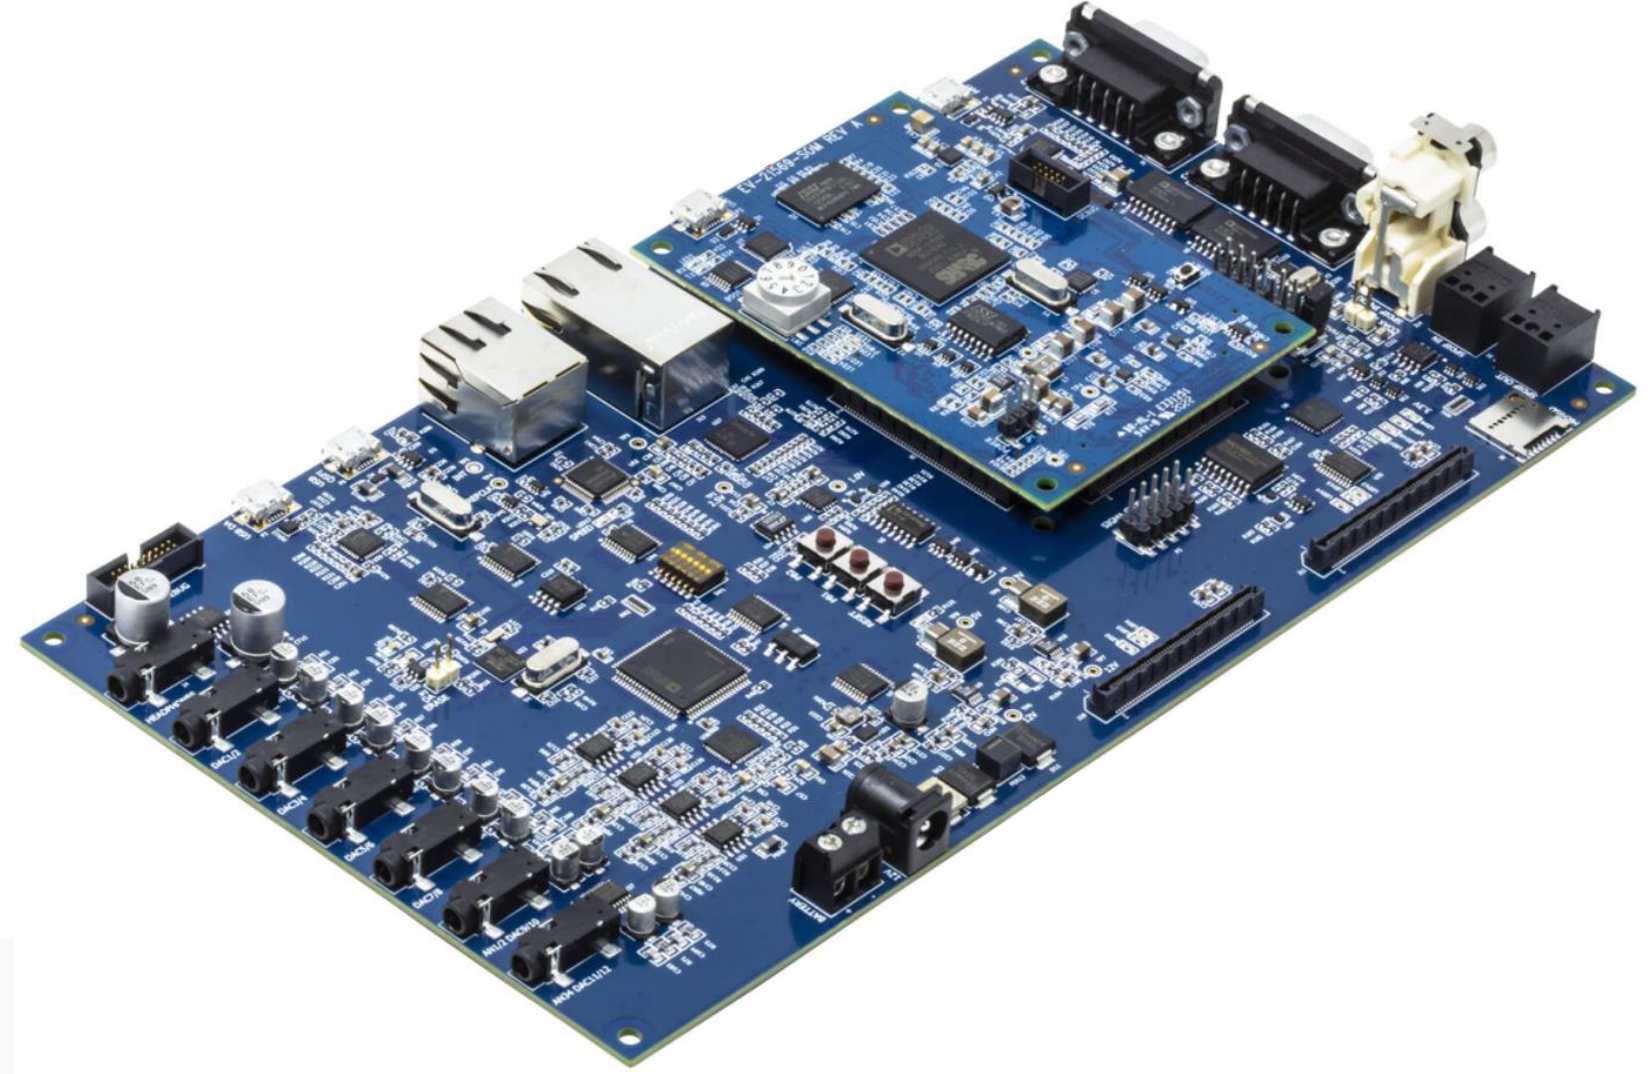
This guide contains instructions for deploying Audio Weaver custom modules to SHARC target hardware. This guide specifically uses the ADI-21569-SOM EVK, but the general process should be applicable for other SHARC target hardware.
General Process Overview
The process of adding custom modules on SHARC target is similar to other platforms, but the toolchain differs. For SHARC target hardware, the Analog Devices CrossCore Embedded Studio (CCES) IDE is needed to build an Audio Weaver custom module pack library and the board support package (BSP). Using the latest version of CCES is recommended.
Dependencies
To deploy Custom Modules to the ADI-21569-SOM SHARC DSP, the following dependencies are needed:
Audio Weaver Pro
CrossCore Embedded Studio IDE
Audio Weaver Custom Module source code
ADI-21569-SOM Audio Weaver BSP
General Steps
1. Build the Audio Weaver custom module static library in CCES
2. Include the Audio Weaver custom module static library in the BSP project linker options
3. Include desired custom modules from the Audio Weaver custom module static library in the ModulesList.h file
4. Build the BSP
NOTE: Depending on the module's size, there may be linker errors, but can be resolved by removing unnecessary module's or adjusting the linker file.
CCES Environment Setup and Custom Module Library Build
CCES Workspace
Download the Analog Devices CCES IDE for SHARC processors from the Analog Devices website: CrossCore Embedded Studio (CCES).
Set up CCES workspace directory:
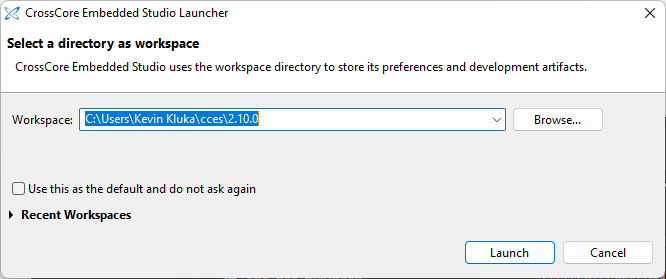
Figure 1: CCES Studio Launcher Workspace Directory
The default directory is fine unless another directory is preferred.
Create a new CrossCore Project. ‘File > New > CrossCore Project’:
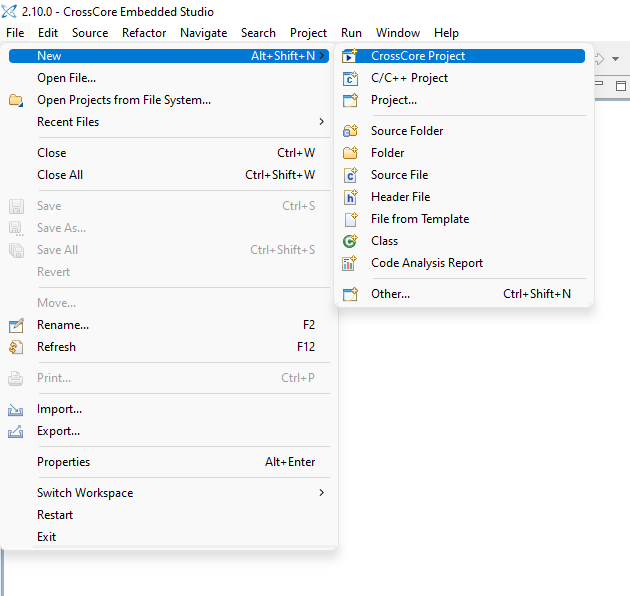
Figure 2: New CrossCore Project
When prompted, select the CrossCore Project Wizard:
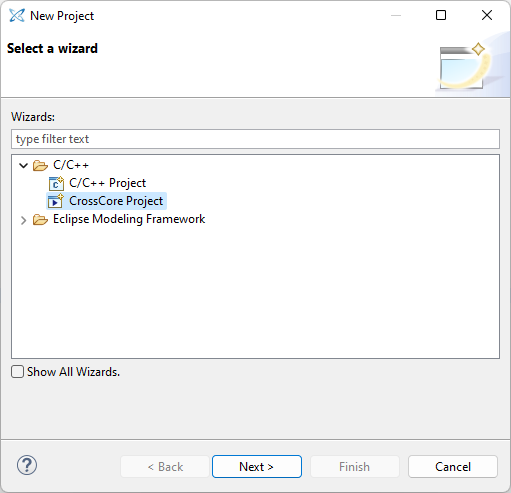
Figure 3: CrossCore Project Wizard
The standard Audio Weaver Module folder structure is pictured below:
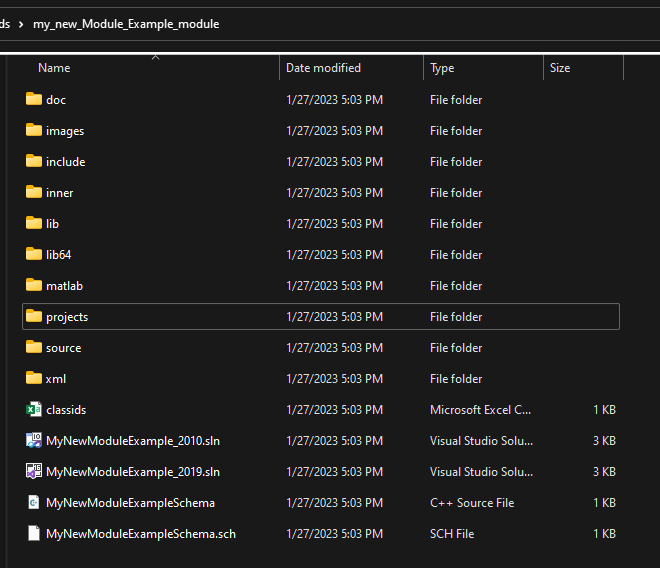
Figure 4: Standard Audio Weaver Module Folder Structure
NOTE: Refer to the Bringing Algorithms into Audio Weaver Application Note, Developing Custom Modules: Quick Start Guide, and Developing Custom Modules: Guide more information about the standard Audio Weaver Module folder structure.
We’ll want to create the CCES Project in the ‘/projects’ folder of the Custom Module directory to keep things contained and prevent path errors. After selecting the CrossCore Project Wizard, set the CrossCore Project Name and path as below. You may have to create a new ‘SHARC’ folder in ‘/projects’:
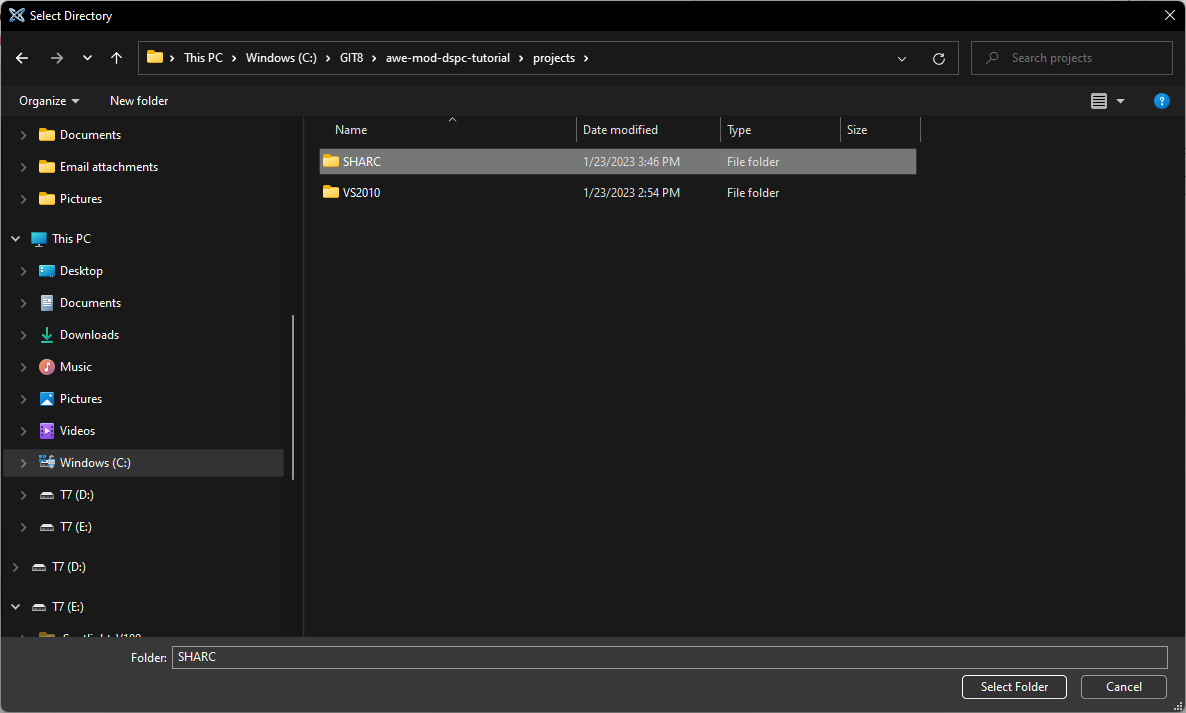
Figure 5: SHARC CrossCore Project Folder Path
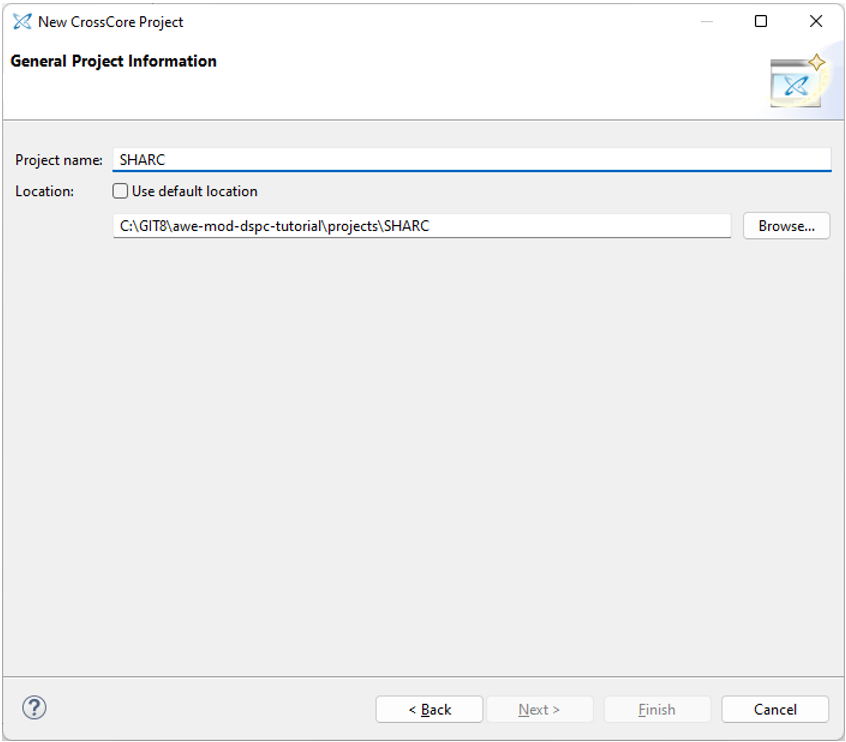
Figure 6: CCES Project Name and Location
Click ‘Next’ and choose the appropriate SHARC DSP you’re using in the next prompt. In this case, we select SHARC ADSP-21569:
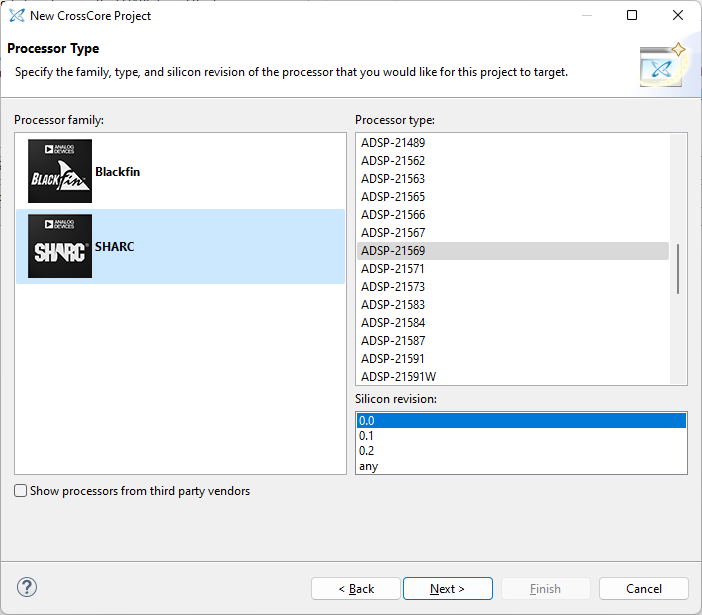
Figure 7: CrossCore Project Processor Type
Click ‘Next’, and then ‘Finish’ in the next Projects and Settings prompt:
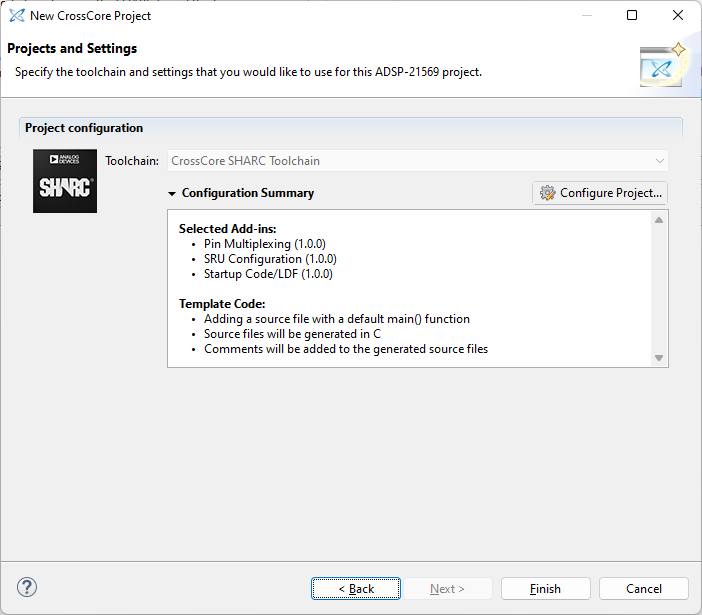
Figure 8: CrossCore Projects and Settings
Custom Module CrossCore Project Properties and Settings
Right click on the ‘SHARC’ project that we created in the previous steps, and navigate to ‘Properties’ in the context window:
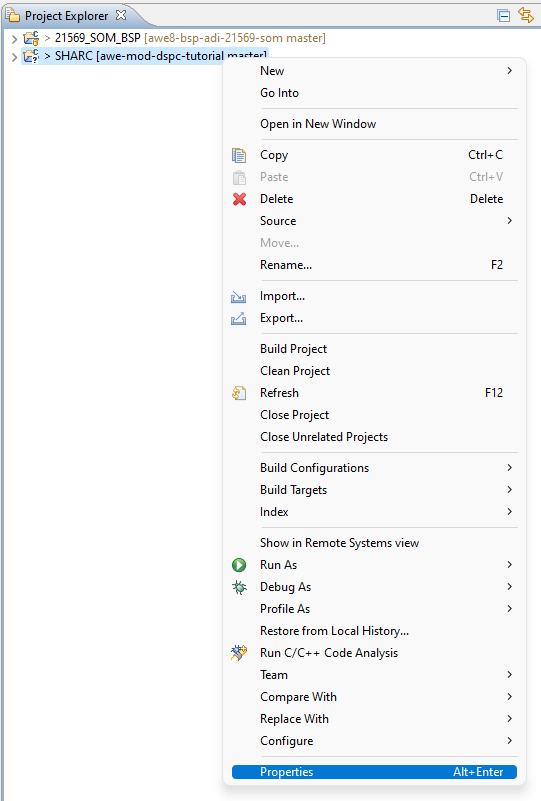
Figure 9: SHARC Project Properties
Navigate to ‘C/C++ Build > Settings’ for the Release Build Configuration, and in the ‘Build Artifact’ Properties tab, and choose ‘Static Library’ for the Artifact Type:
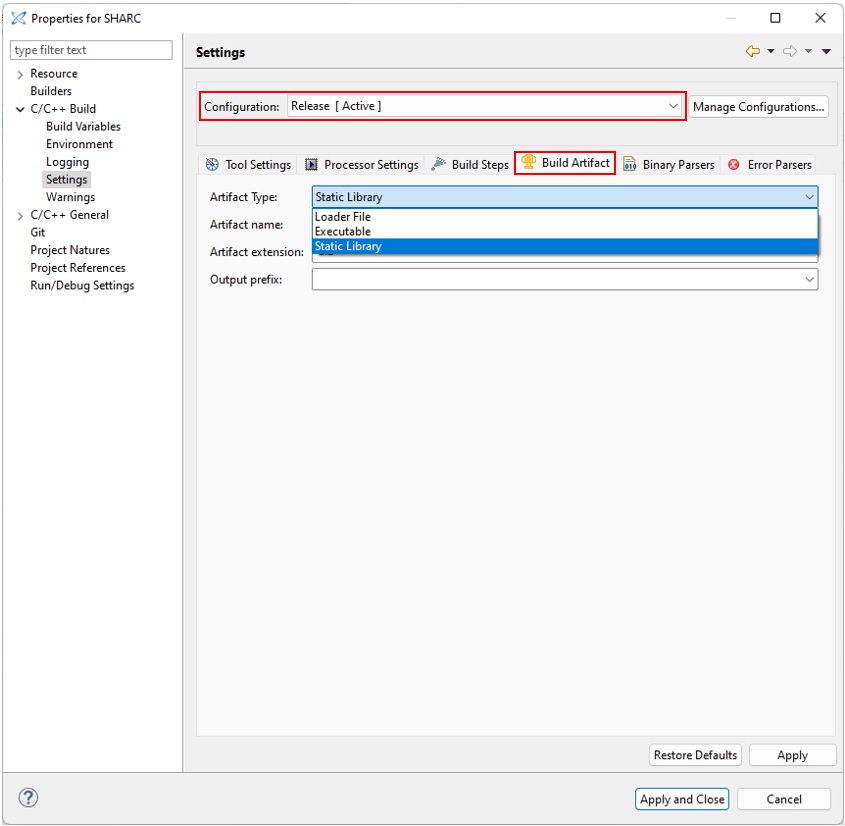
Figure 10: Release Build Artifact Type
Navigate to ‘C/C++ Build > Settings’ for the Release Build Configuration, and in the ‘Tool Settings’ Properties tab, add the following paths to the ‘Additional include directories’:
C:\DSP Concepts\AWE Designer 8.C.2.6 Pro\AWEModules\Source\Examples\Include
C:\DSP Concepts\AWE Designer 8.C.2.6 Pro\AWEModules\Source\Examples\Include\Targets
C:\DSP Concepts\AWE Designer 8.C.2.6 Pro\Bin\Assets\module\include
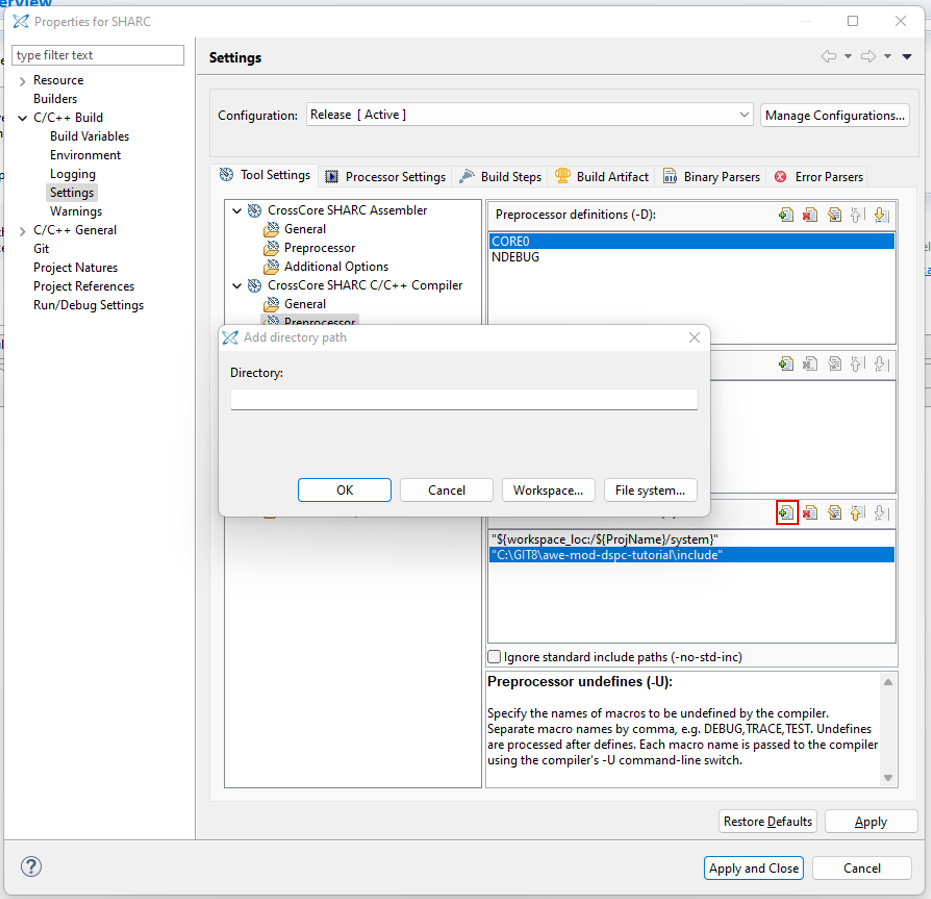
Figure 11: Additional Include Directories
Click ‘Apply and Close’:
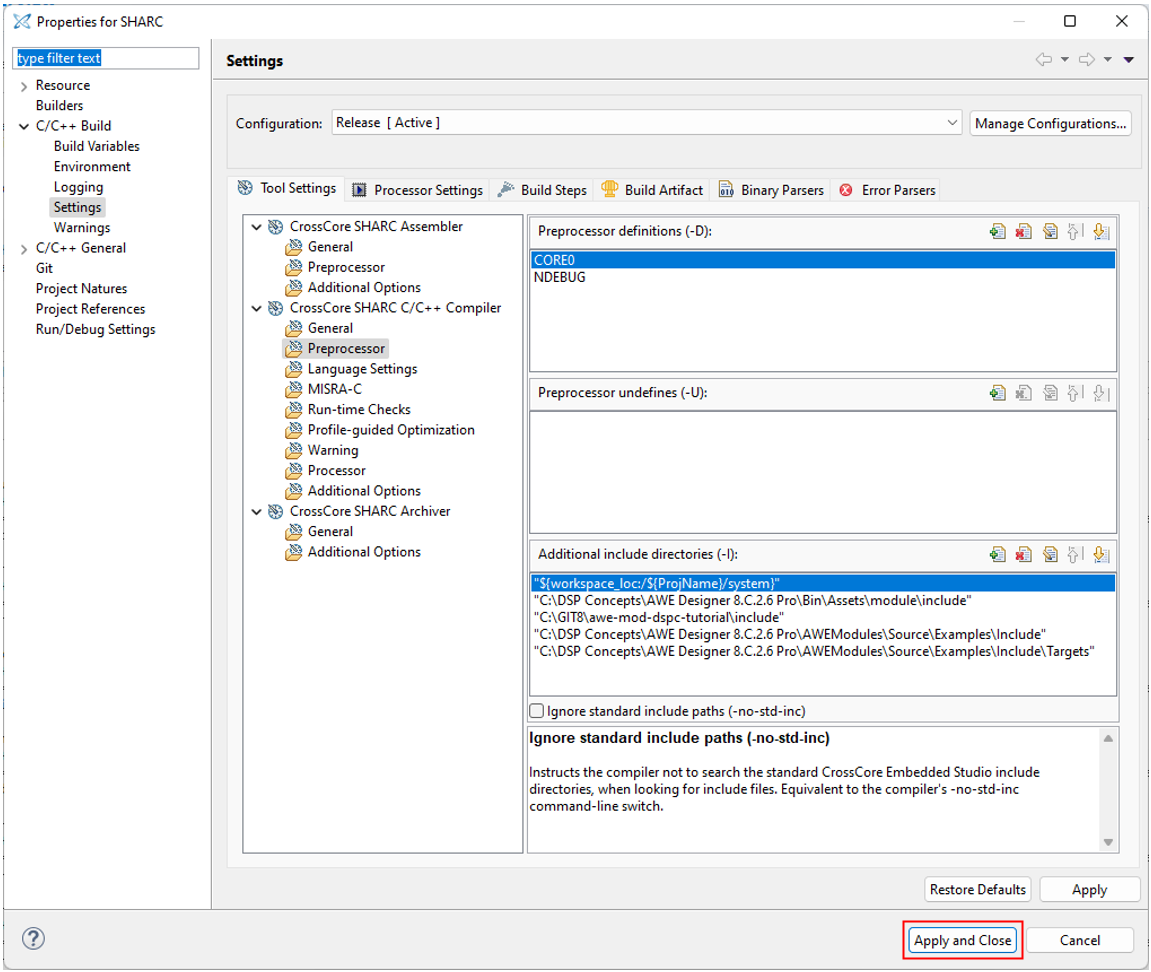
Figure 12: Apply Custom Module CrossCore Properties and Settings
It is ok to disregard these warnings if notified after applying the settings:
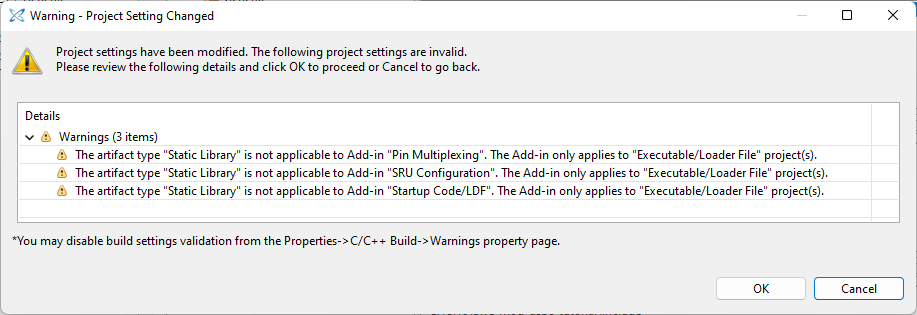
Figure 13: Custom Module CrossCore Project Settings Change Warning
Building the Custom Module .dlb Library
Now we must add the Custom Module C code.
NOTE: The C files to be added to the project are generated from a make_*.m script outlined in the Specifying Dependencies section of the Developing Custom Modules: Guide.
Right click on the ‘SHARC’ project in the Project Explorer tab on the left hand side of the CCES IDE window, and select to ‘Import’ from the context window:
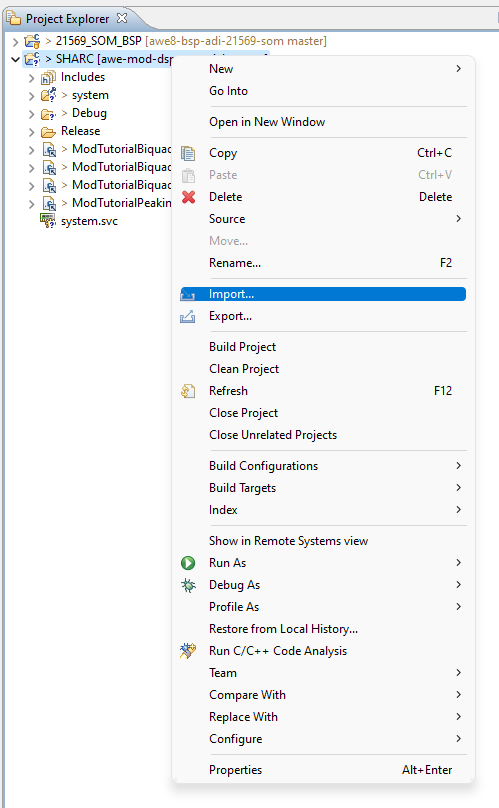
Figure 14: Import Custom Module C Code
Select ‘File System’ from the Import Wizard and click ‘Next’:
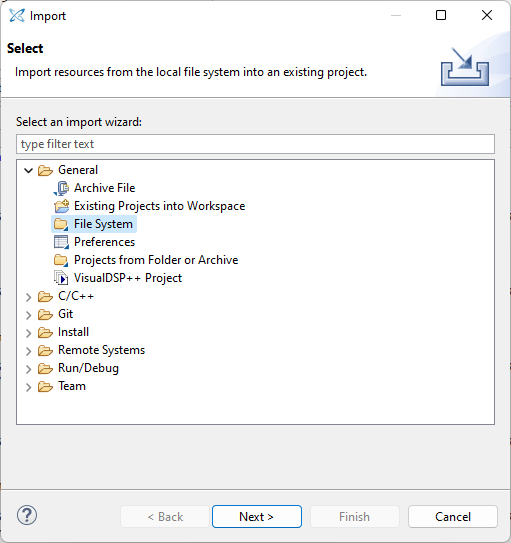
Figure 15: Import Wizard - Import File System
Select ‘Browse’ to navigate to the directory containing the Custom Module C code:

Figure 16: Custom Module C Code Directory
The standard path that the generated C files from the Custom Module make_*.m script are placed in the ‘source’ folder of the parent Custom Module directory (<DIR>\source). Select the ‘source’ folder of the Custom Module directory as the directory to be imported from:
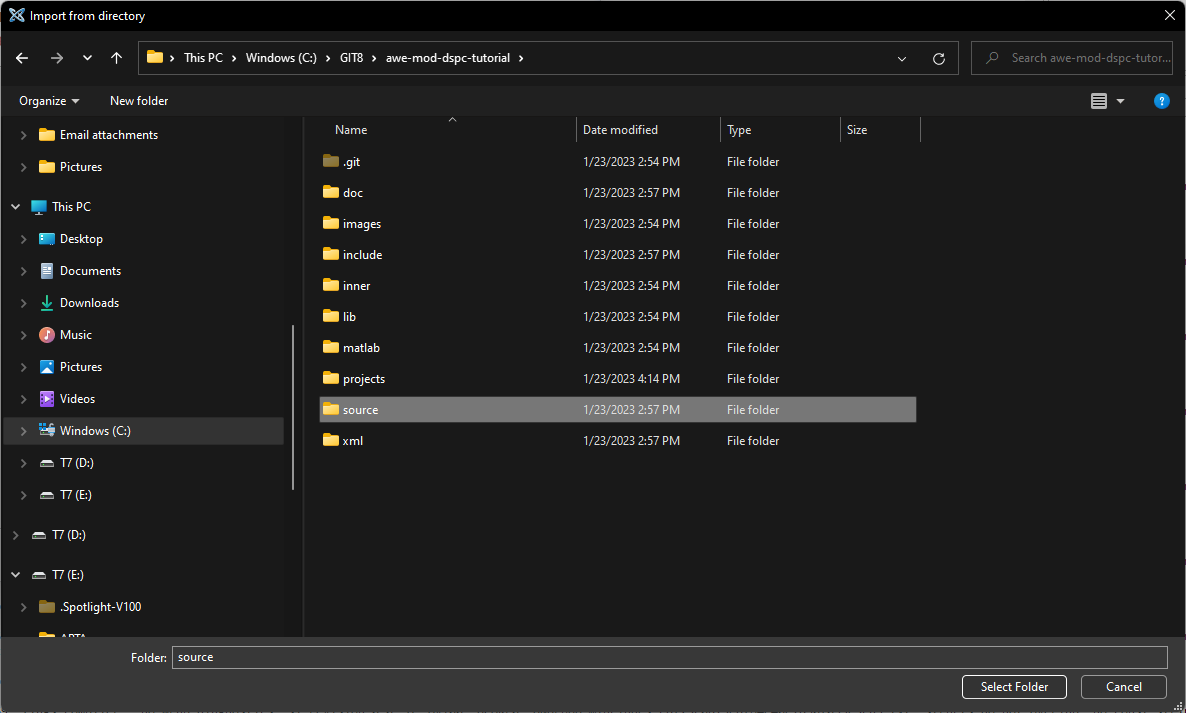
Figure 17: Custom Module Source Directory
Select the Custom Module C files to be added to the project, with the following import settings and click ‘Finish’:
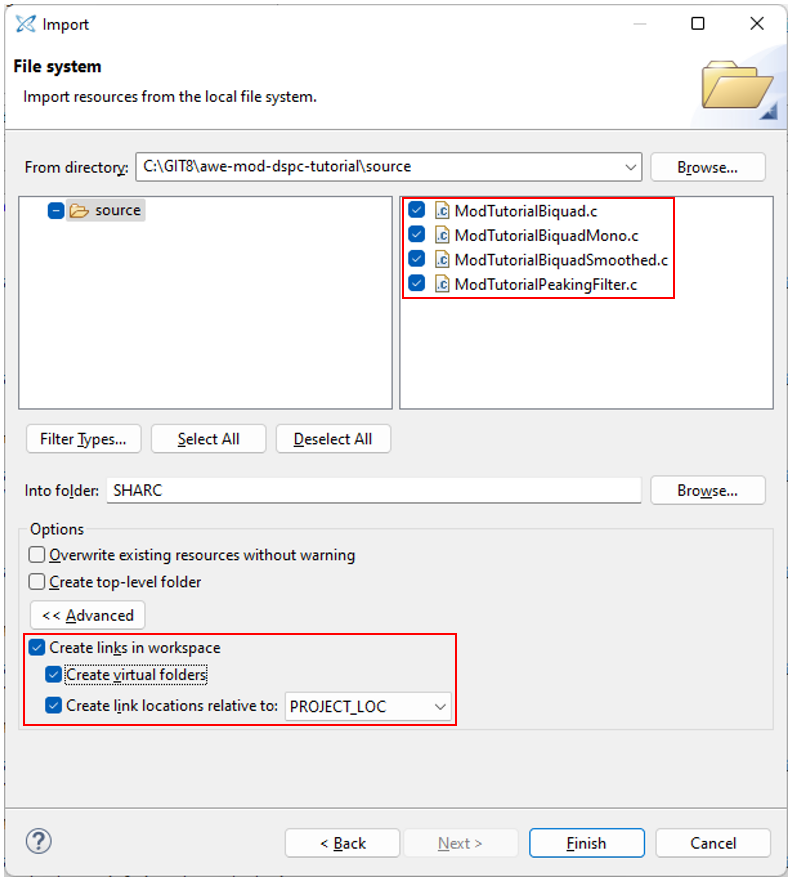
Figure 18: Import Custom Module C Files
You should now be able to see the Custom Module C Files included in the SHARC project, in the CCES IDE Project Explorer tab:
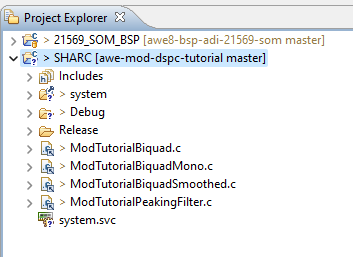
Figure 19: Included Custom Module C Files
Right click on the SHARC project in the CCES IDE Project Explorer tab and select ‘Build Project’ to build the Custom Module .dlb library:
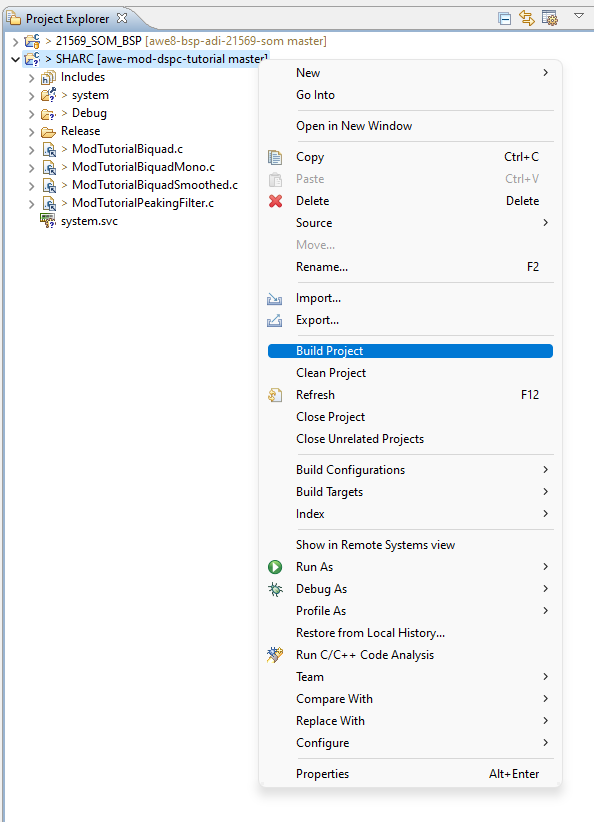
Figure 20: Build Custom Module .dlb Library
After building the project, you should see a Build Finished confirmation in the CCESSS IDE console:
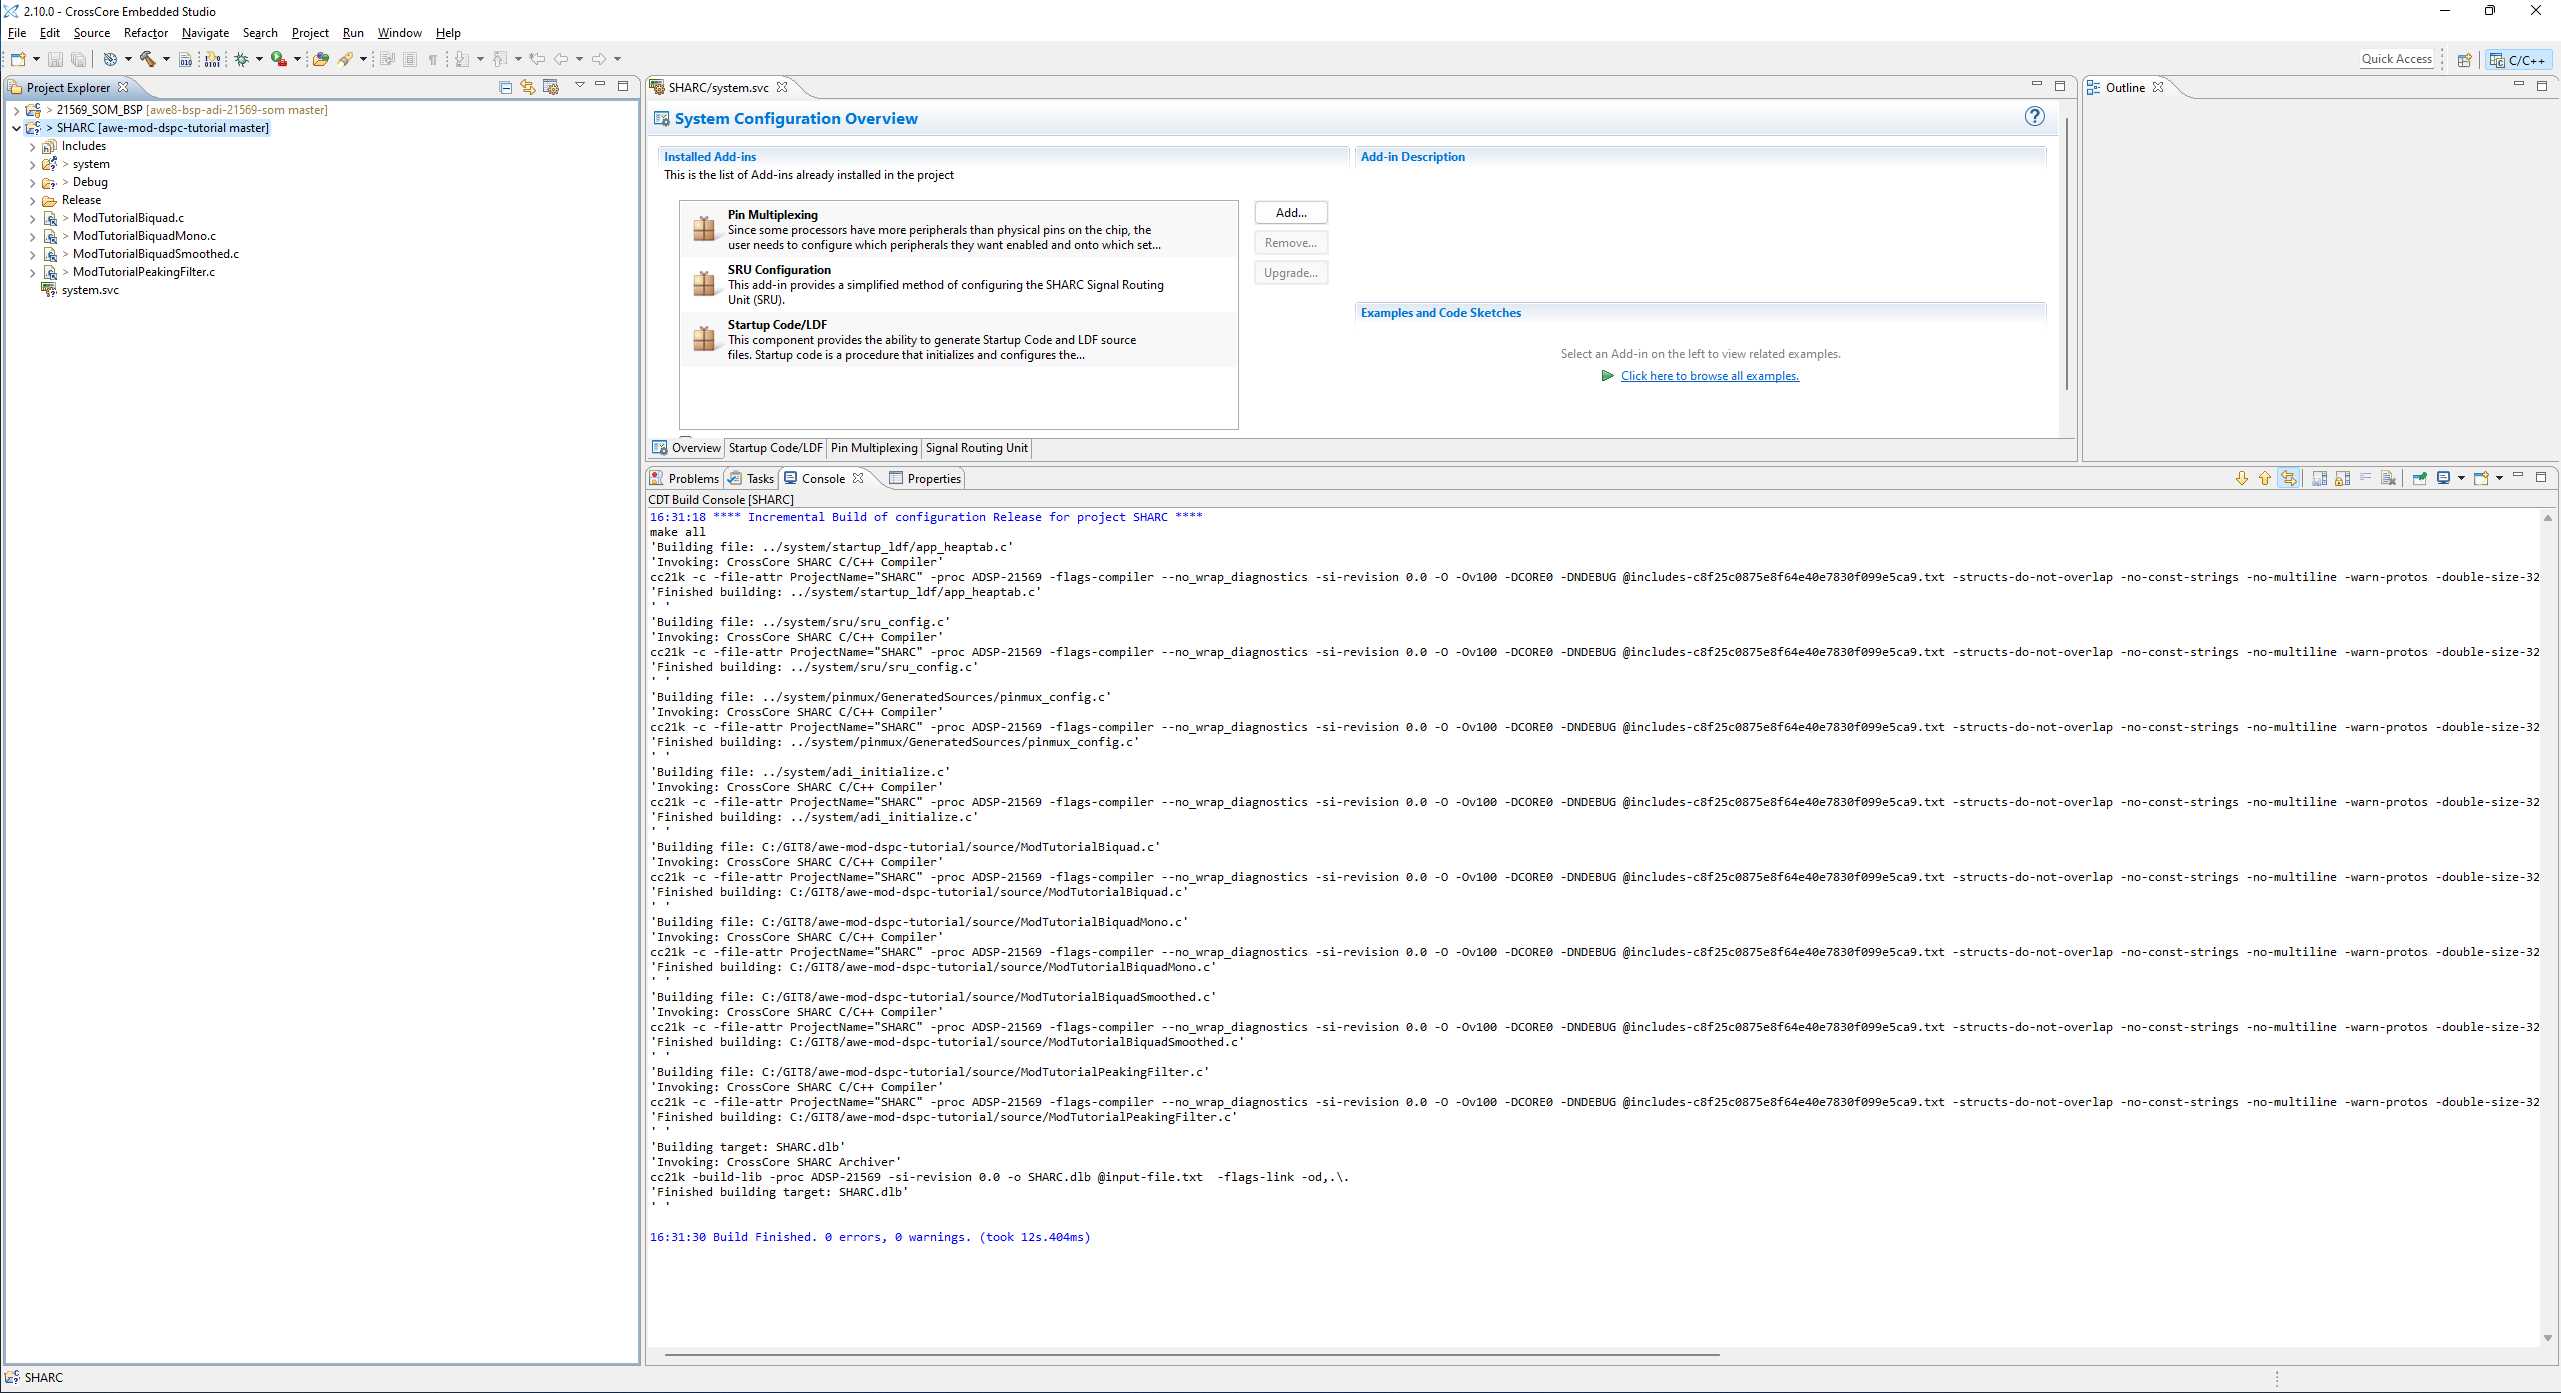
Figure 21: Custom Module .dlb Build Finished
You should now see the Custom Module .dlb library (SHARC.dlb) under the Custom Module Project in the CCES IDE Project Explorer:
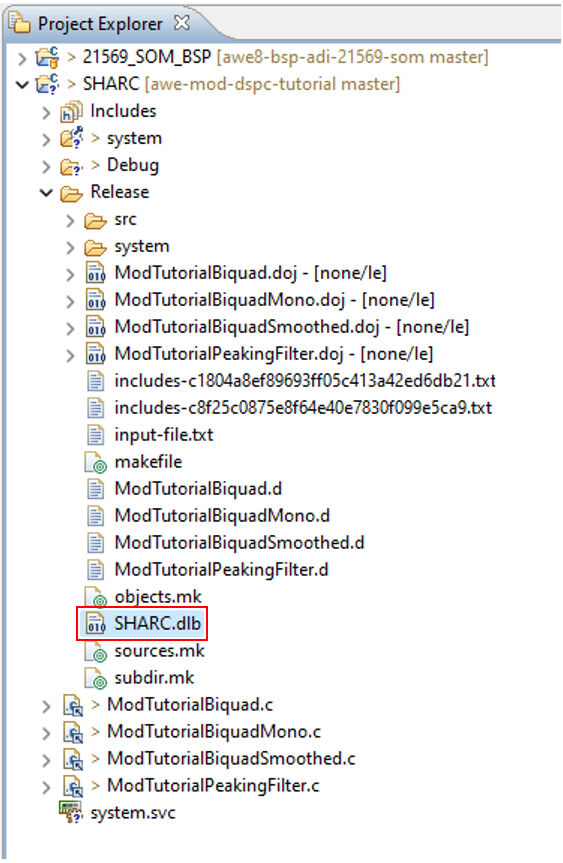
Figure 22: Built Custom Module .dlb Library
The Custom Module .dlb Library should be located in the ‘Release’ folder of the SHARC project directory:
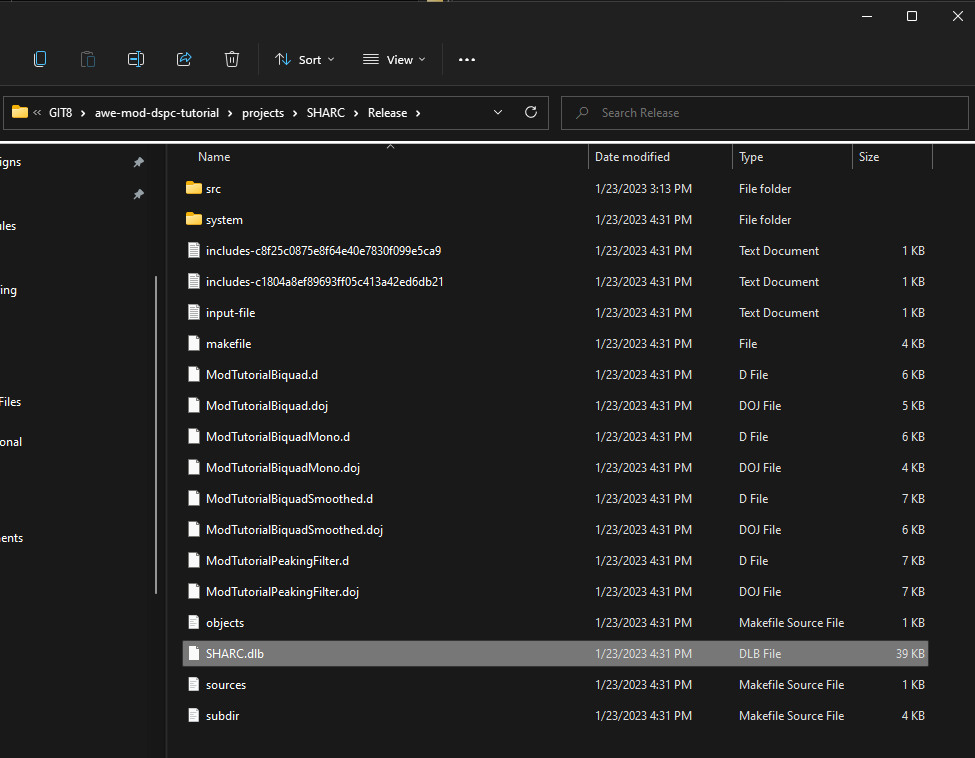
Figure 23: SHARC Release Build Folder
ADI-21569-SOM BSP
Importing the BSP to CCES IDE
From the top CCES IDE menu bar, select ‘File > Import’:
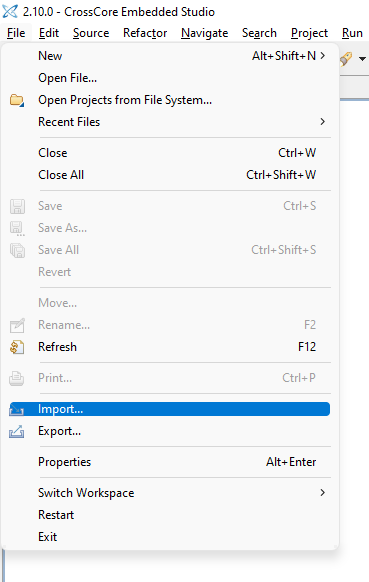
Figure 24: BSP Project Import
Select ‘General > Existing Projects into Workspace’ from the pop-up CCES IDE Import Wizard:
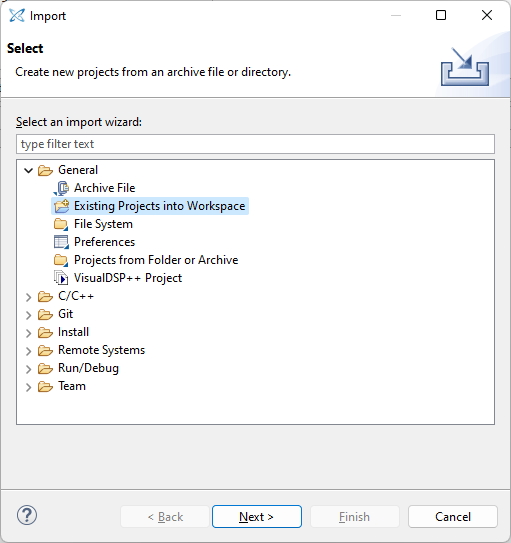
Figure 25: Import Existing Projects Into Workspace
Select the ‘Browse’ button to locate the ADI-21569-SOM BSP Project directory:
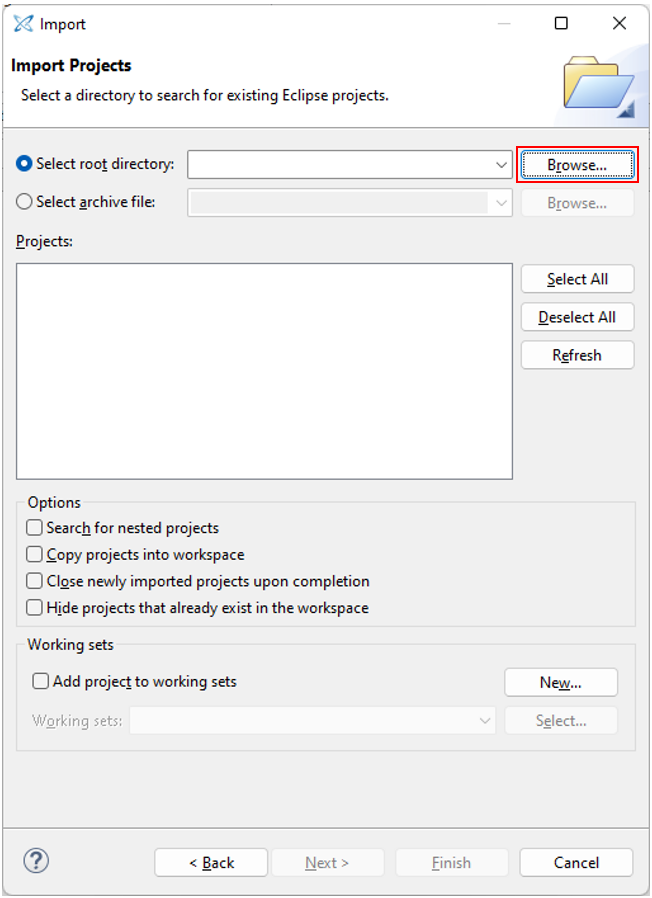
Figure 26: Browse for ADI-21569-SOM BSP Directory
The ADI-21569-SOM BSP should be located in the ‘<DIR>\awe8-bsp-adi-21569-som\SampleApp\21569_SOM\Build\CCES’ folder. Select the ‘CCES’ folder:
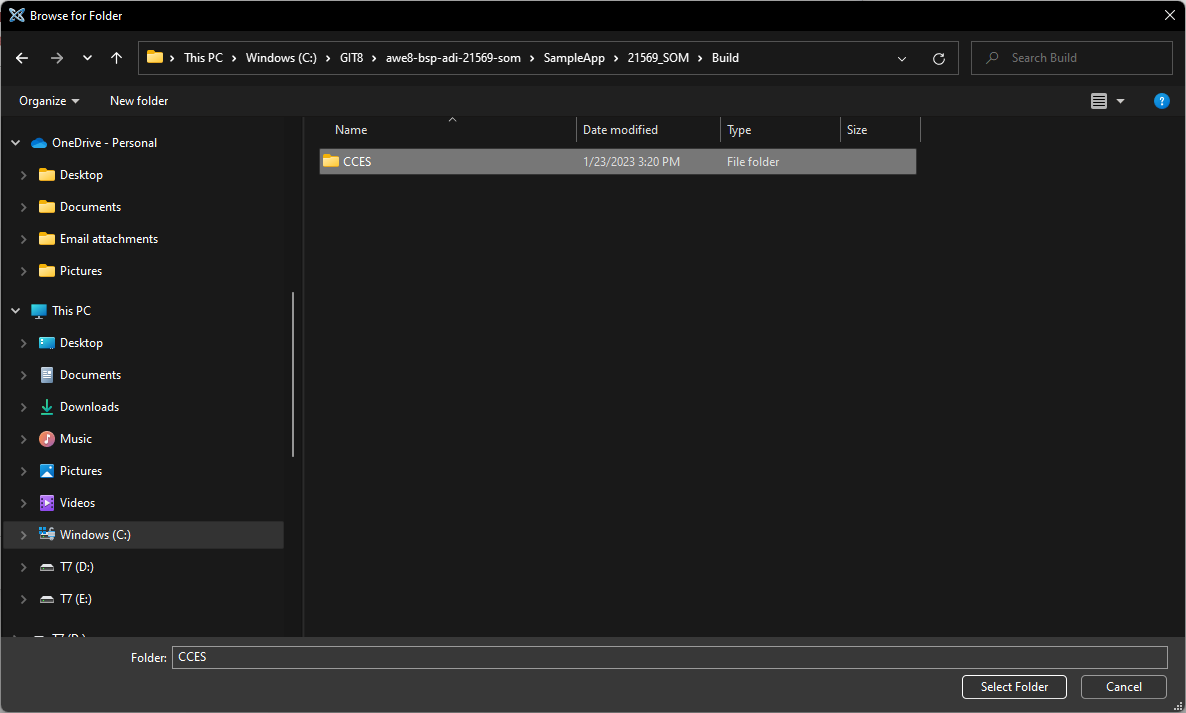
Figure 27: CCES ADI-21569-SOM BSP Folder
Select the ‘21569_SOM_BSP’ to be imported and click ‘Finish’:

Figure 28: 21569_SOM_BSP
You should now see the ‘21569_SOM_BSP’ in the Project Explorer in the left hand side of the CCES IDE window:
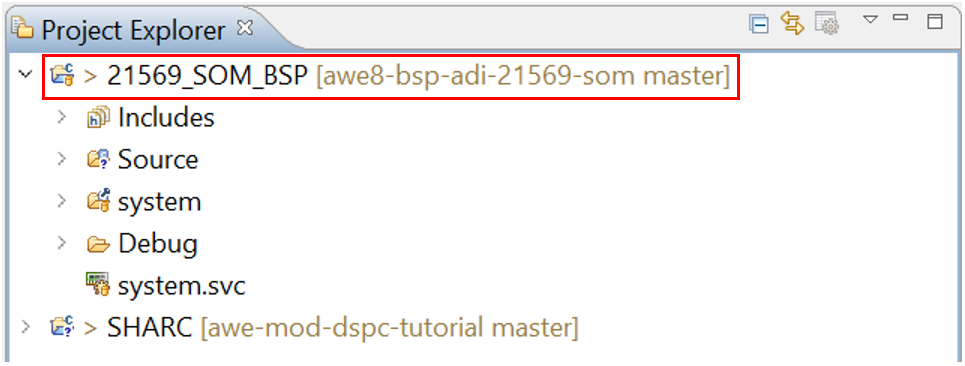
Figure 29: 21569_SOM_BSP Imported
Linking Custom Module .dlb Library to BSP
Copy the SHARC.dlb Library we built in Section 3.3 to the ‘<DIR>\awe8-bsp-adi-21569-som\AWECore\Lib\CCES’ folder, such that it shares a common path with AWECore.dlb:
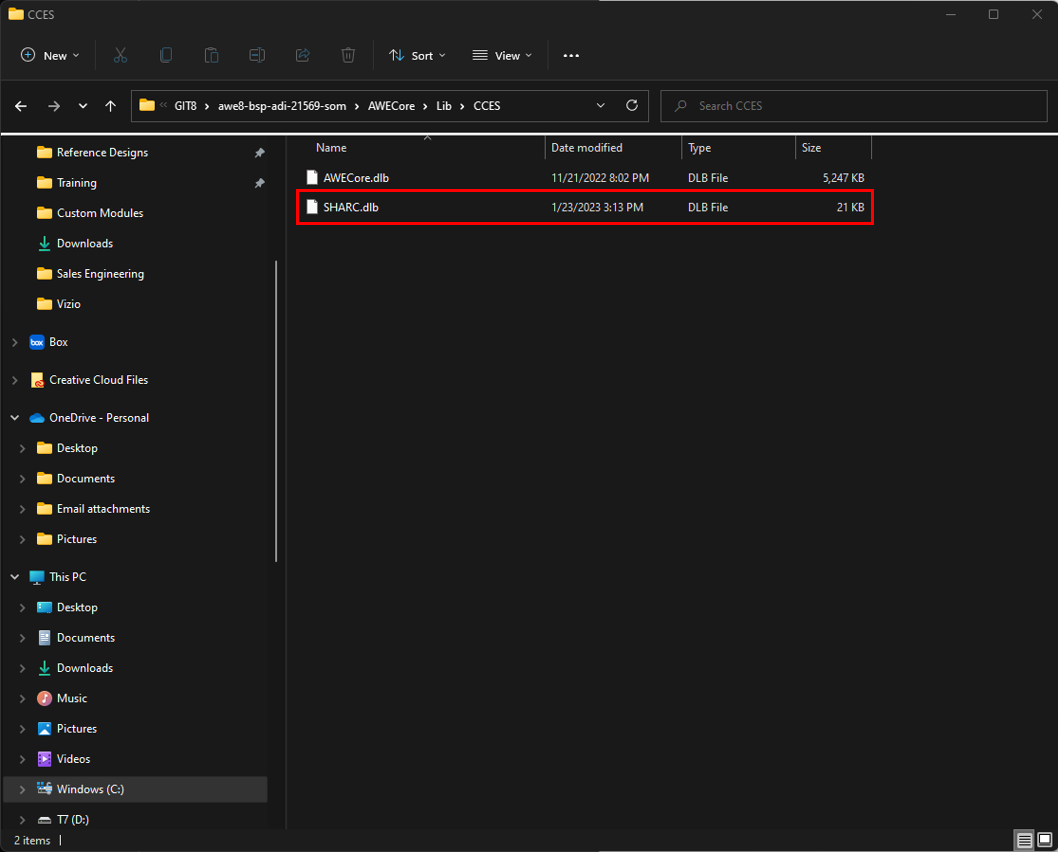
Figure 30: Copy SHARC.dlb Library
Right click on the ‘21569_SOM_BSP’ project in the CCES IDE Project Explorer and navigate to ‘Properties’ in the context menu:
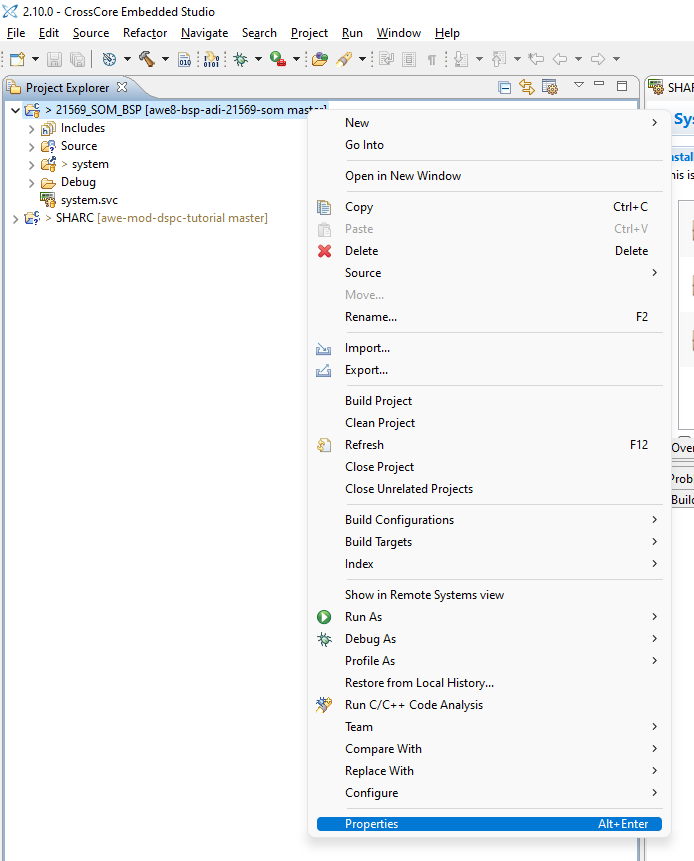
Figure 31: 21569_SOM_BSP Properties
In the ‘C/C++ Build > Settings’ Debug Build Configuration Tool Settings tab, under ‘CrossCore SHARC Linker > General’, click on the ‘+’ button in the ‘Additional libraries and object files’ pane:
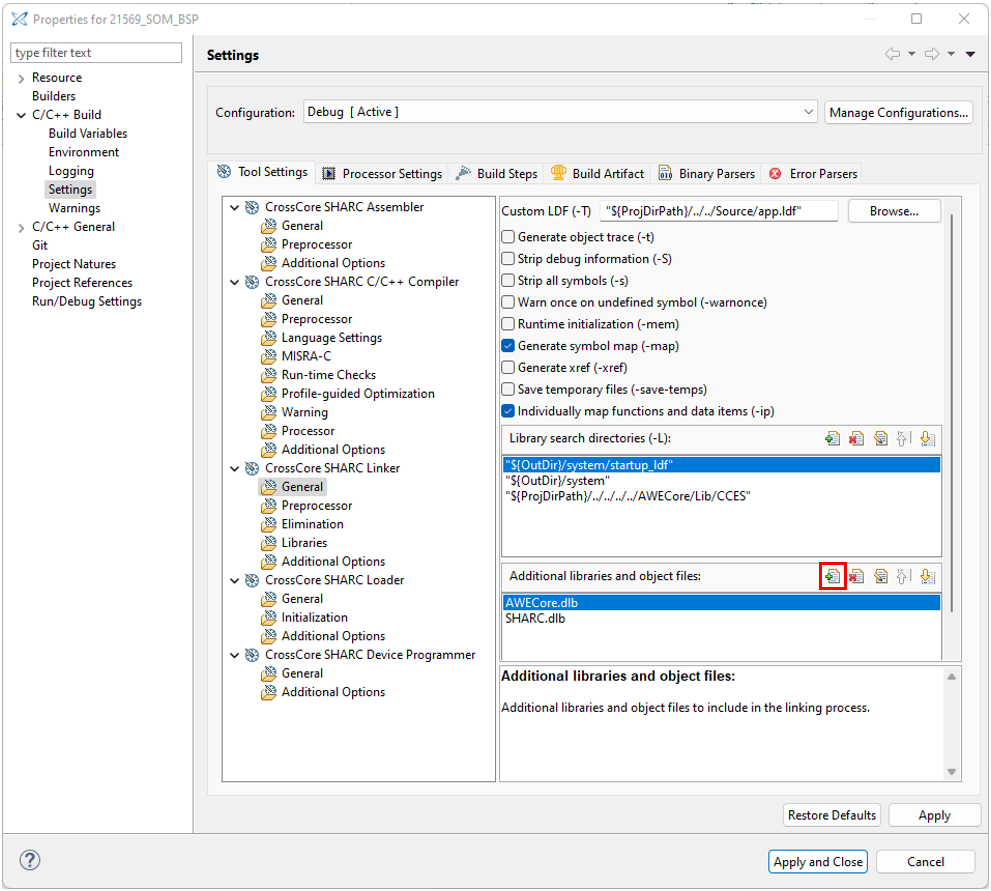
Figure 32: Add Additional Libraries and Object Files to CrossCore SHARC Linker
Since we copied the SHARC.dlb library to the same path as the AWECore.dlb library in a previous step, we can simply type in ‘SHARC.dlb’ in the File Path input bar:
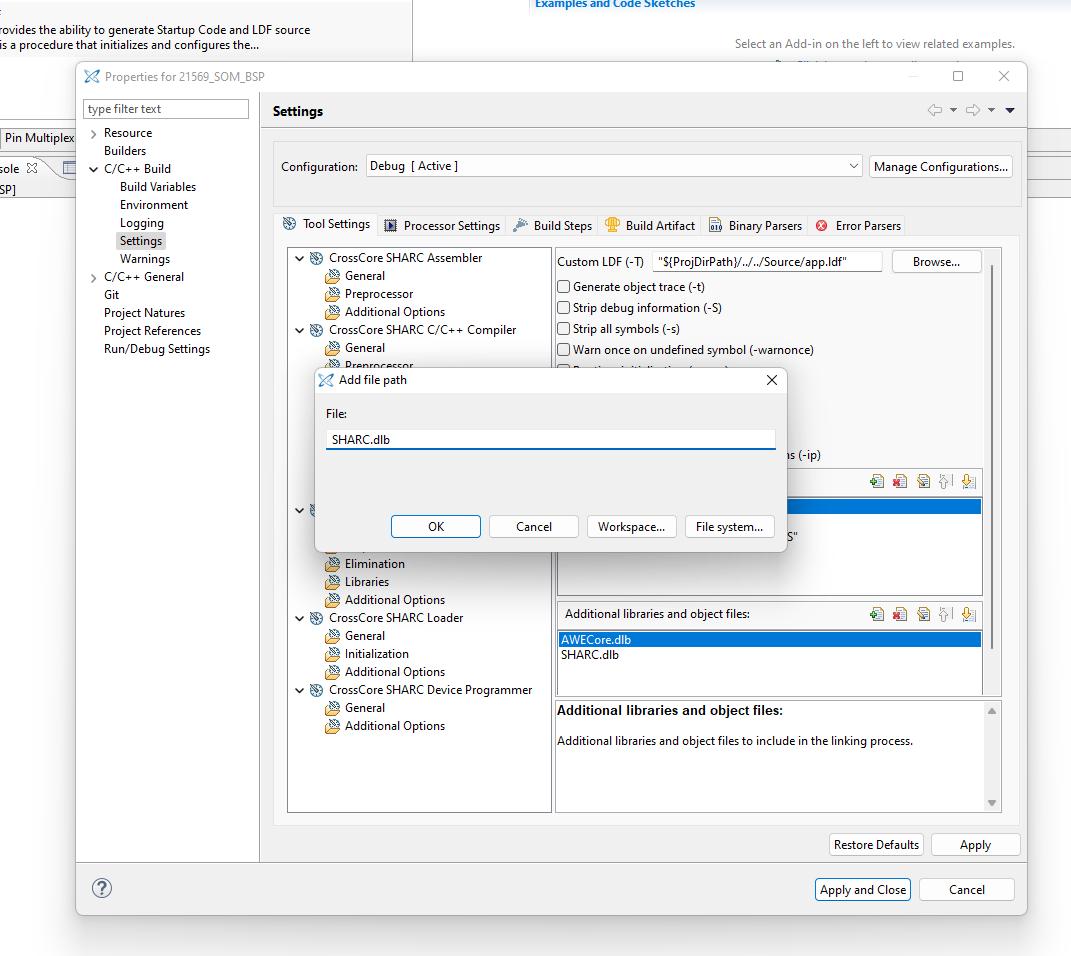
Figure 33: Add SHARC.dlb to CrossCore SHARC Linker
Click ‘Ok’ and then ‘Apply and Close’.
Adding Custom Module Objects to ModuleList.h
Navigate to the ‘<DIR>/awe8-bsp-adi-21569-som/SampleApp/21569_SOM/Source’ folder and open ModuleList.h for editing:
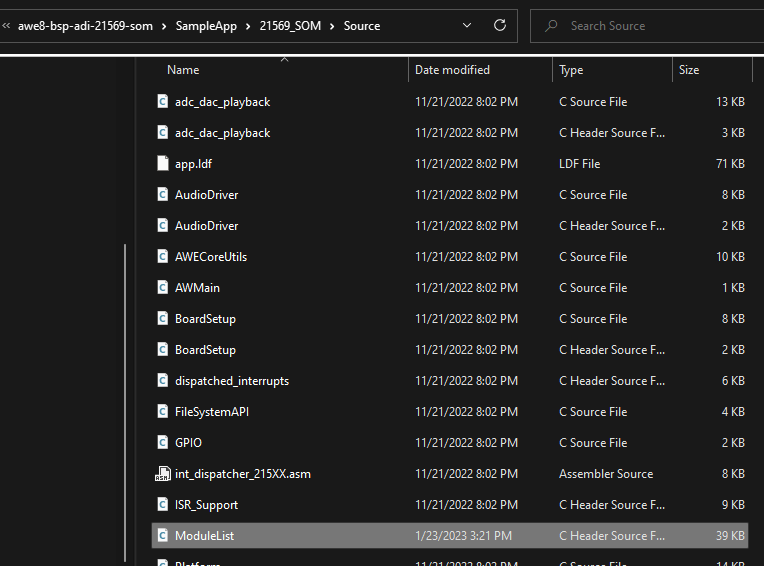
Figure 34: ModuleList.h
The ModuleList.h header file contains an array LISTOFCLASSOBJECTS that represents the list of all modules to be linked into the BSP build, so to use our new custom modules, we must add their symbols to this array.
NOTE: For more information about ModuleList.h and its functionality, refer to the Optimization section of the AWE Core 8 Integration Guide.
We must edit ModuleList.h in two places:
Declare the custom module symbols as extern const int variables
Add the custom modules to the preprocessor array
Also notice the naming convention. This naming convention must be followed to successfully link the new module classes.
First, we add the symbol variables:
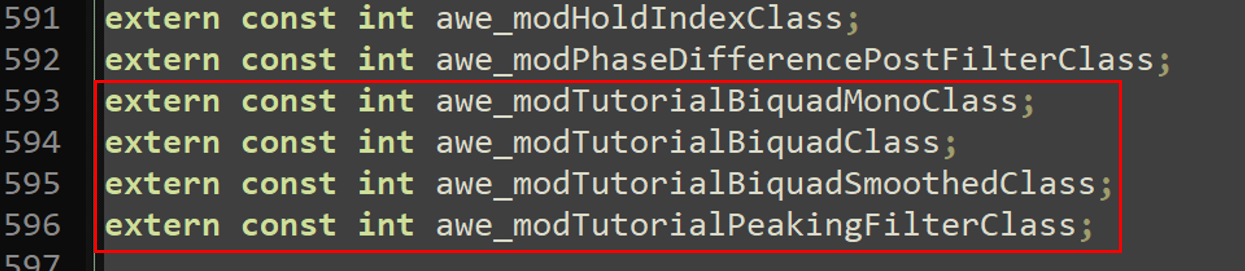
Figure 35: ModuleList.h Symbol Variables
Next, add the new module variables to the LISTOFLCASSOBJECTS array:
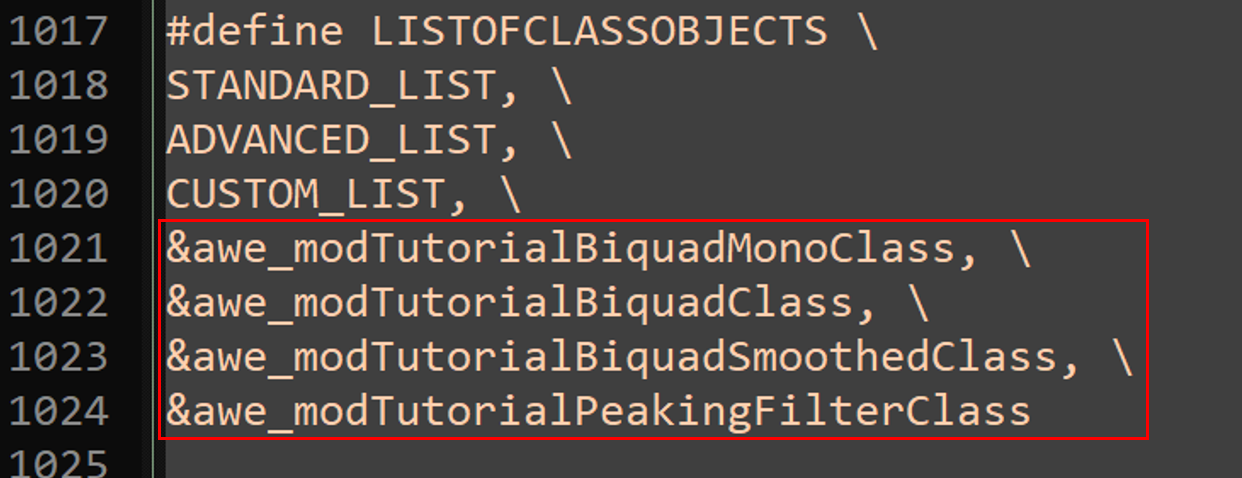
Figure 36:ModuleList.h LISTOFCLASSOBJECTS Array
Save the edited ModuleList.h file.
Build the BSP
Right click on the ‘21569_SOM_BSP’ in the CCES IDE Project Explorer, and select ‘Build Project’ from the context menu:
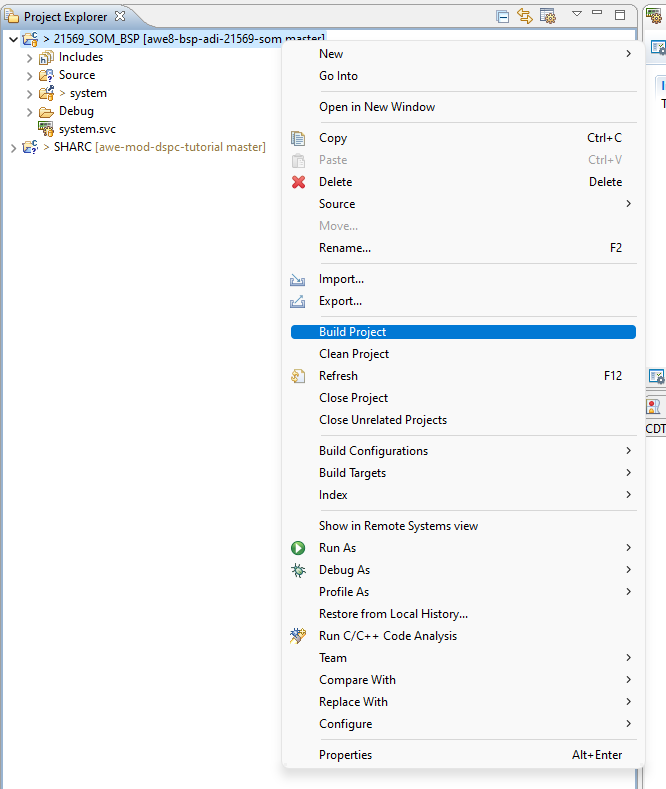
Figure 37: Build 21569_SOM_BSP Project
NOTE: If you get an error message about opening the ‘ezkit21569_initcode.dxe’ file, it may be because you are using a different version of CCES than the version the original BSP was built with:

Figure 38: Unable to Open File: ezkit21569_initcode.dxe
To remedy this, right click on the ‘21569_SOM_BSP’ in the CCES IDE Project Explorer, and select ‘Properties’ from the context menu:

Figure 39: 21569_SOM_BSP Properties
Navigate to the ‘C/C++ Build > Settings’ Debug Build Configuration Tool Settings tab, under ‘CrossCore SHARC Loader > Initialization’, and edit the Initialization file path to match the CCES IDE version you are using:
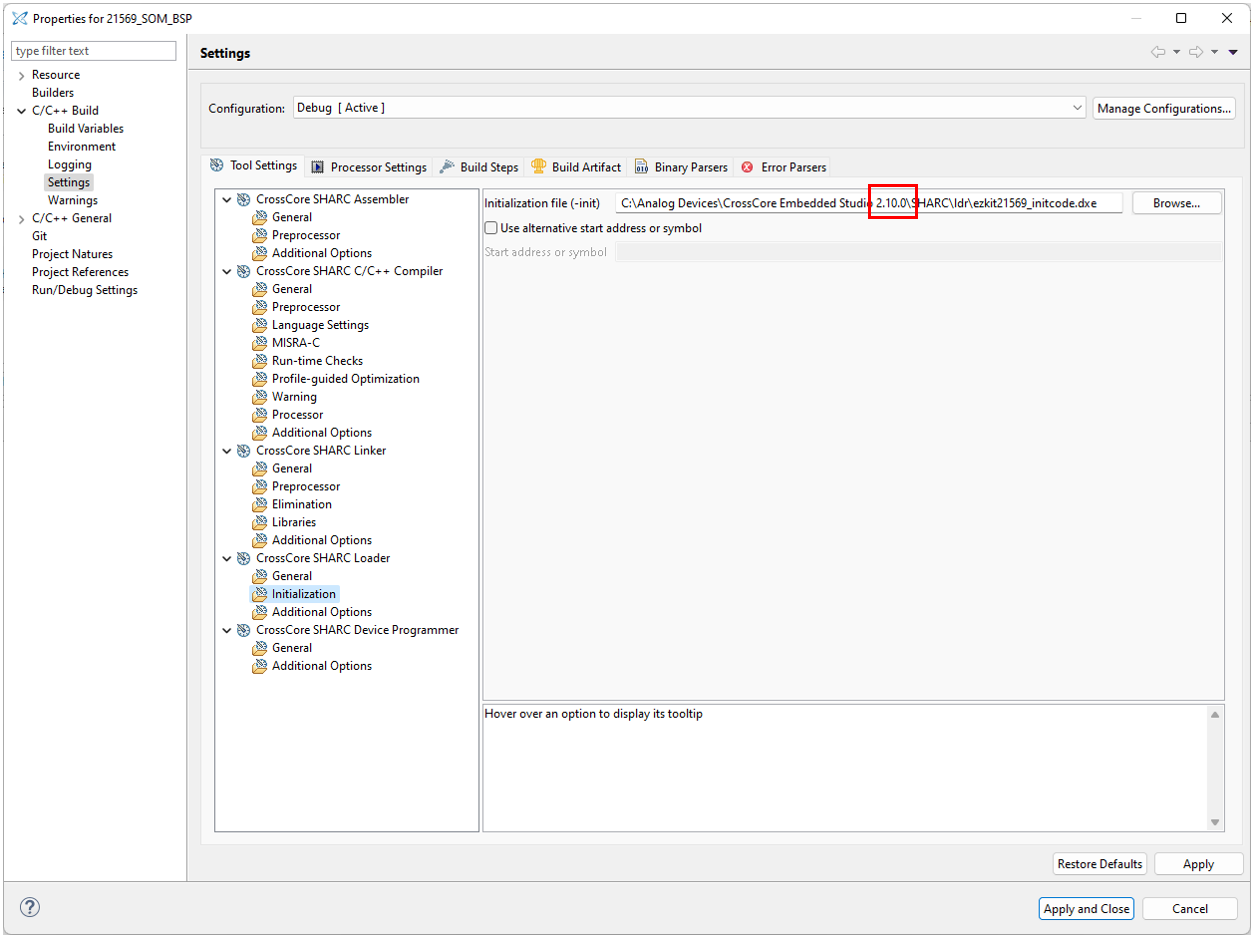
Figure 40: CrossCore SHARC Loader CCES IDE Version Initialization File Path
The ‘CrossCore Embedded Studio x.xx.x’ needs to match the CCES IDE you are using.
Click ‘Apply and Close’ once correctly edited (if applicable).
Right click on the ‘21569_SOM_BSP’ project in the Project Explorer and select ‘Build Project’ from the context menu:
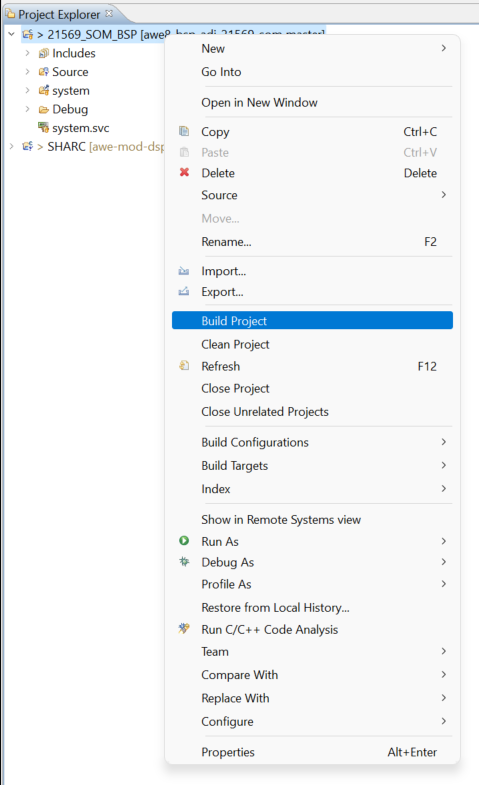
Figure 41: Build 21569_SOM_BSP
Upon successful completion of the BSP image build, you should see confirmation in the CCES IDE console window:

Figure 42: 21569_SOM_BSP Build Success
The ‘21569_SOM_BSP.ldr’ flash image will be placed in the ‘<DIR>\awe8-bsp-adi-21569-som\SampleApp\21569_SOM\Bin’ directory:
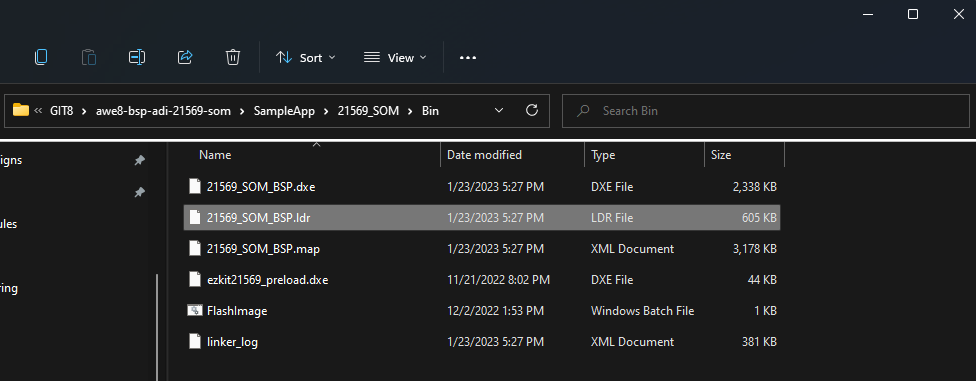
Figure 43: 21569_SOM_BSP.ldr
Follow the ‘Audio-Weaver ADSP-21569 SOM Target Users Guide.pdf’ document to flash your ADI-21569-SOM EVK, connect to Audio Weaver, and use your Custom Module(s) on the embedded SHARC DSP target hardware.