
Preferences and Layout
Global Preferences
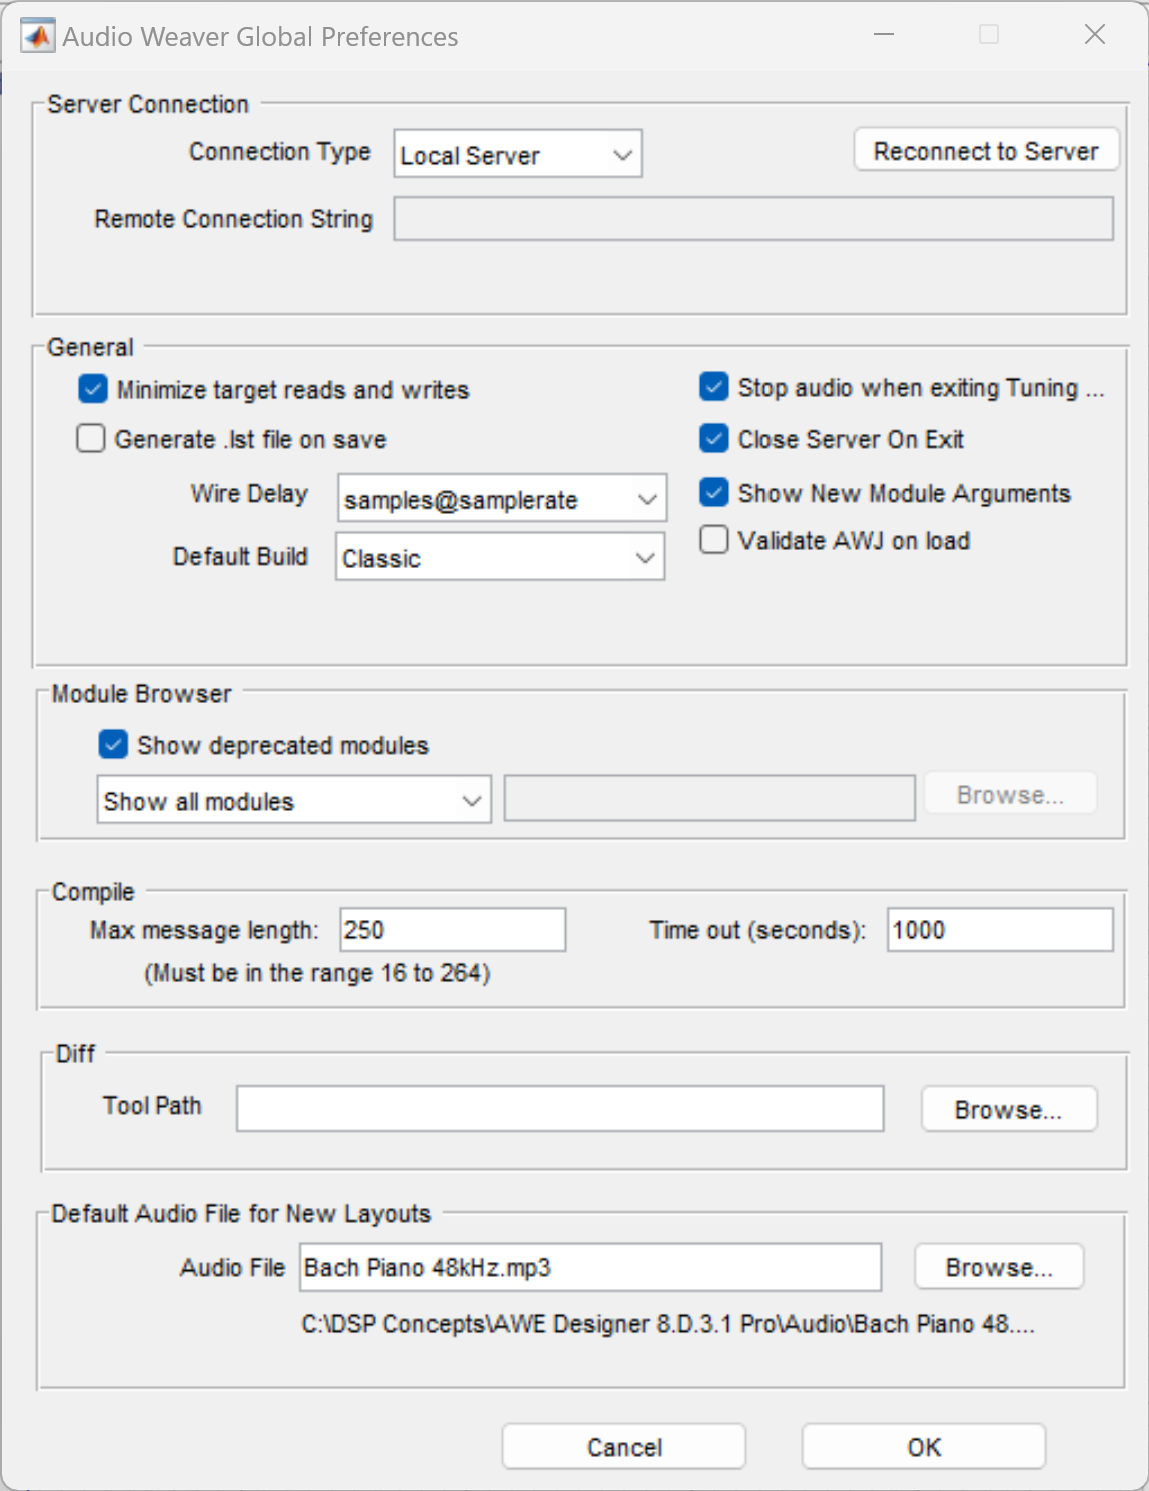
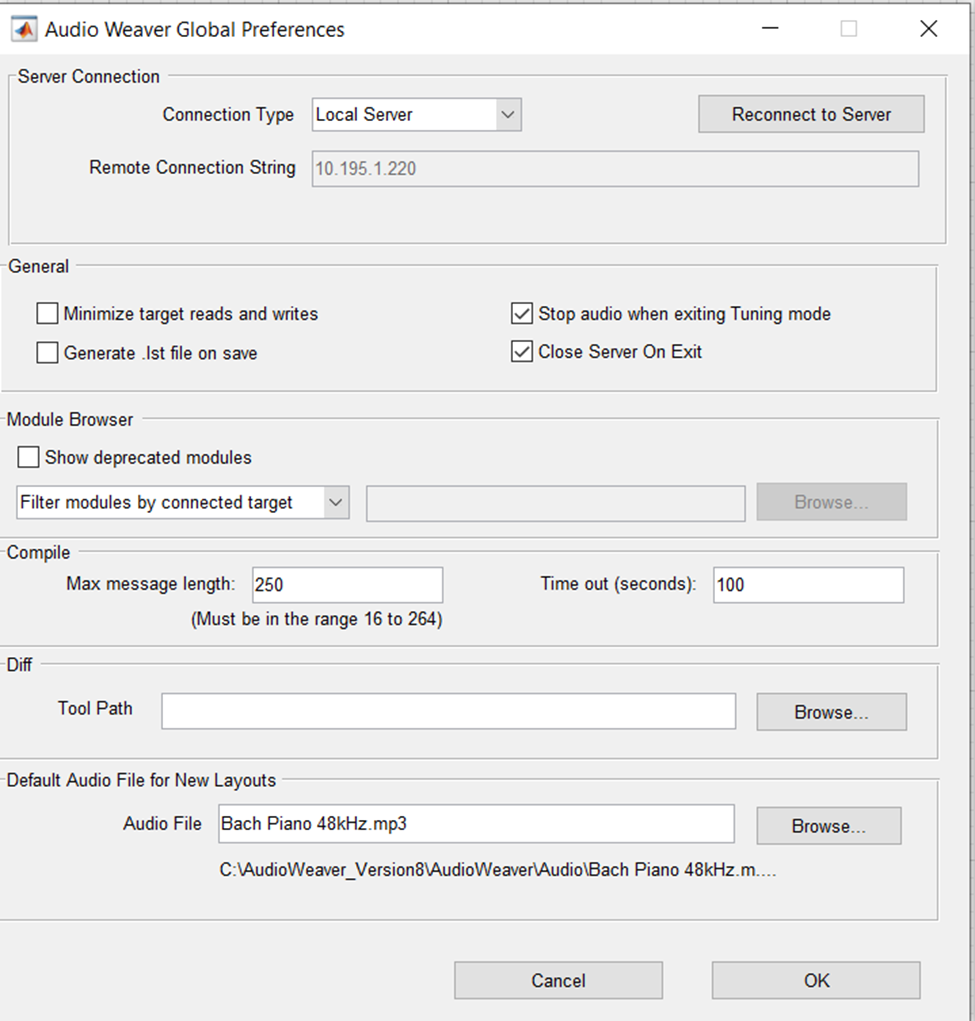
To apply custom Audio Weaver Designer settings, use the Global Preferences menu at ‘File → Global Preferences’.
Global Properties Menu
Minimize Target Reads and Writes
Minimize Target Reads and Writes is an optional feature of AWE Designer, and can be enabled/disabled with the “Minimize target reads and writes” checkbox in AWE Designer → Global Preferences. It is disabled by default.
When Minimize target reads and writes is disabled, AWE Designer uses the Tuning Interface to query a target for every module and its variables in the running layout, every time a change is made. This ensures that the canvas / target stay in sync throughout tuning, but also increases the traffic on the tuning interface.
With Minimize Target Reads and Writes enabled, AWE Designer will used cached module variable values on the canvas, as opposed to querying the target. This significantly reduces the number of commands sent by the Tuning Interface, but could cause the Canvas/target to be inaccurate and out of sync.
Minimize target reads and writes can be very useful on targets with limited communication/tuning capabilities.
Generate LST Files on Save
LST files provides a high level, human readable overview of a saved AWE layout. They are a good way to diff variables and arrays between different designs.
If enabled, a corresponding LST file is automatically generated/updated each time a layout is Saved in Designer. LST file generation is disabled by default, and can be enabled by selecting the “Generate LST file on save” checkbox in AWE Designer->Global Preferences.
Here is an example LST file generated from this passthrough layout.
----------------------------------------------------------------------
TopLevel,NewClass,active
blockSize: 32
numInChannels: 2
numOutChannels: 2
sampleRate: 48000
----------------------------------------------------------------------
SYS_deint,Deinterleave,active
SYS_toFloat.out --> in            out1 --> SYS_inter.in1
                                  out2 --> SYS_inter.in2
numOut: 2
----------------------------------------------------------------------
SYS_inter,Interleave,active
SYS_deint.out1 --> in1            out --> SYS_toFract.in
SYS_deint.out2 --> in2
numIn: 2
----------------------------------------------------------------------
SYS_toFloat,TypeConversion,active
.SYS_in --> in                    out --> SYS_deint.in
outType: 0
----------------------------------------------------------------------
SYS_toFract,TypeConversion,active
SYS_inter.out --> in              out --> .SYS_out
outType: 1
Validate AWJ on Load
When a layout is saved in the AWJ format, it is updated with the latest AWJ layout version in the JSON file. This version can be used by Audio Weaver when the layout is loaded to check for missing fields or format changes, as enforced by that version’s AWJ Schema definition. In addition to the latest AWJ Schema file, all previously released schemas are included in each release of Audio Weaver so that older AWJ layouts can still be verified against the appropriate schema.
This schema validation is turned off by default, but the user can enable this feature by checking the “Validate AWJ on Load” field in the Global Preferences menu. When this option is turned on, a warning message will appear in the MATLAB Console Output (in Designer Pro Edition only) when loading an AWJ layout that fails validation against its related schema.
If a user attempts to save an AWJ layout with an older version, a confirmation window will open (in all Designer Editions) to inform the user that their layout will be saved with the latest AWJ layout version, even if the “Validate AWJ on Load” checkbox is turned off.
Default Build
The default build engine used to build layouts in Designer can be updated in the Global Properties menu. This option defaults to ‘Classic’ builds, but can be changed to ‘Hierarchical’ instead. If ‘Hierarchical’ is chosen, the default wire allocation strategy can also be selected. These options are used only to choose the default build type for newly created layouts. They are not applied to the currently opened layout.
See the the Layout Properties menu documentation for more details about the different build engine types.
Native Audio Settings
The AWE Server → File → “Native Audio Settings” menu allows a user to customize PC audio settings when running AWE in Native mode.
Using the dropdown menu, users can select between DirectX and ASIO drivers. All available Input and Output devices will be shown, and the user can check/uncheck the toggle boxes to enable or disable certain devices. The user can also set the default hardware sample rate for both DirectX and ASIO, as well as additional ASIO specific parameters (block size, ASIO device).
Note: If ASIO drivers are not installed on the PC, then the ASIO option will not appear in the dropdown selector.
AWE Server keeps a tally of how many channels are currently enabled on the input and output, displaying the total counts in the text field to the right of device selector boxes. The input channels will be interleaved at the input pin of an Audio Weaver layout, and then back out at the output pin.
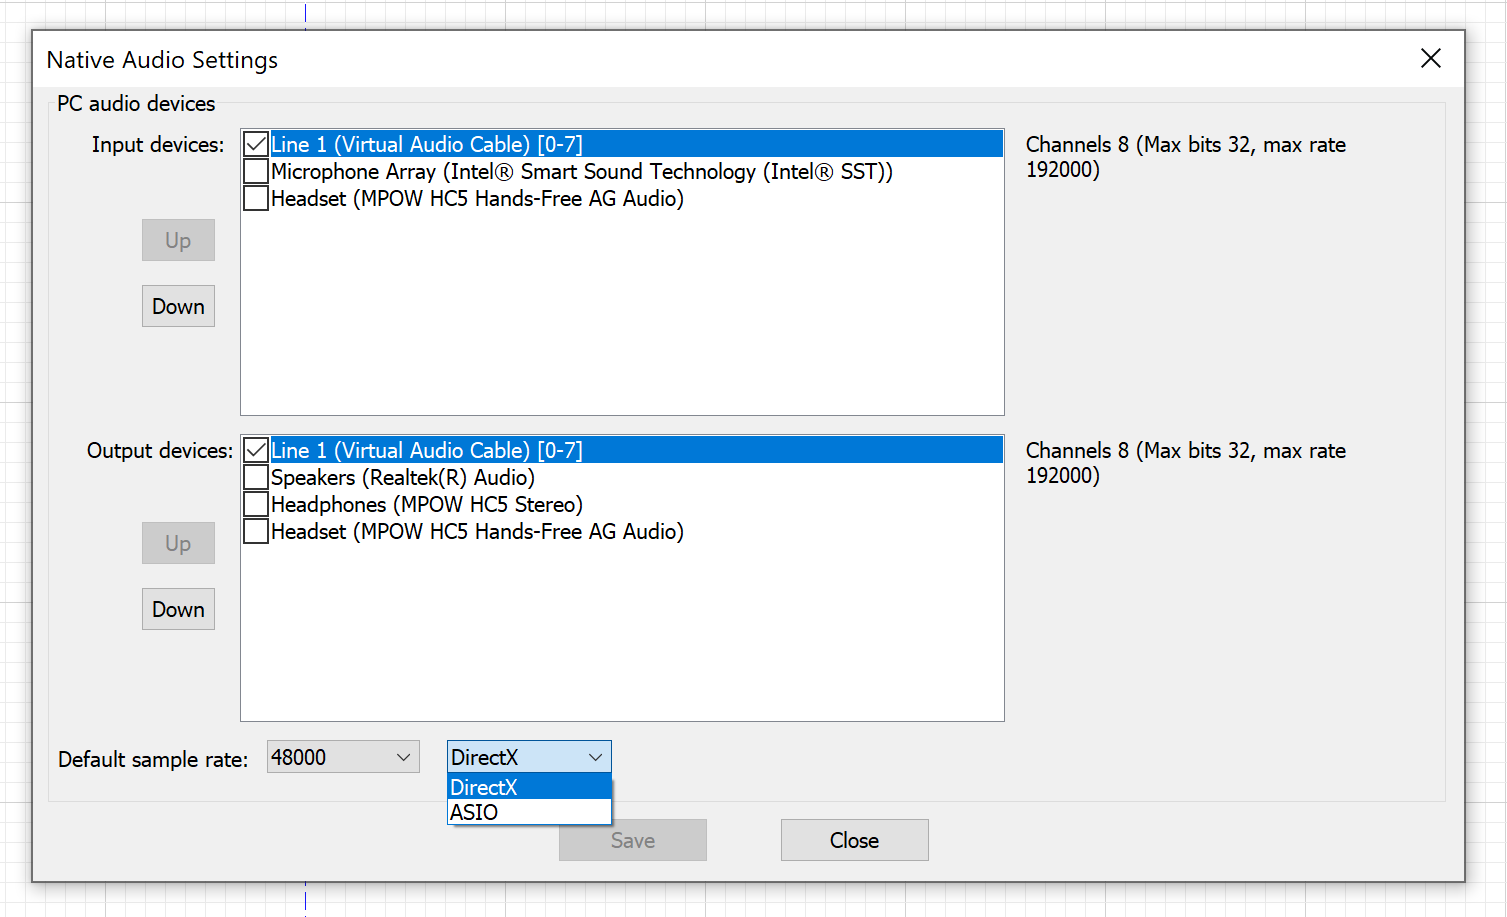
Native Audio Settings menu, showing DirectX/ASIO dropdown. DirectX is selected, and a variety of Input and Output devices are available to enable/disable.
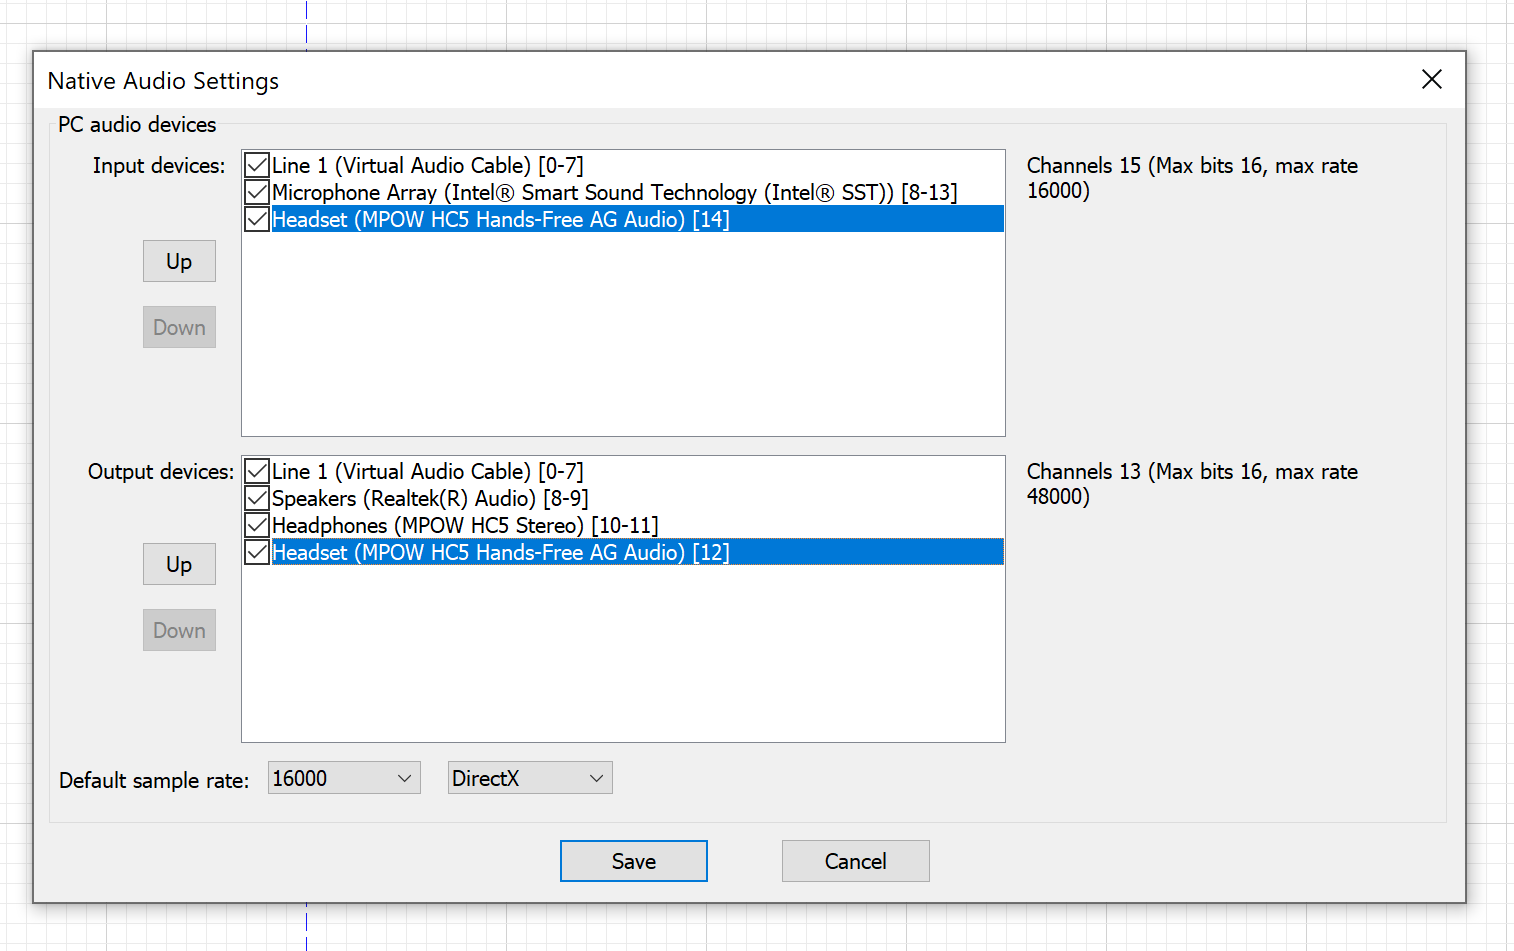
Native Audio Settings menu with all available DirectX input and output devices enabled. Note the increase in channel count vs the prior screenshot, where only one audio device is enabled. Also note the decrease in sample rate. This is because one of the selected input devices has a max SR of 16000, so all other devices conform to that max.
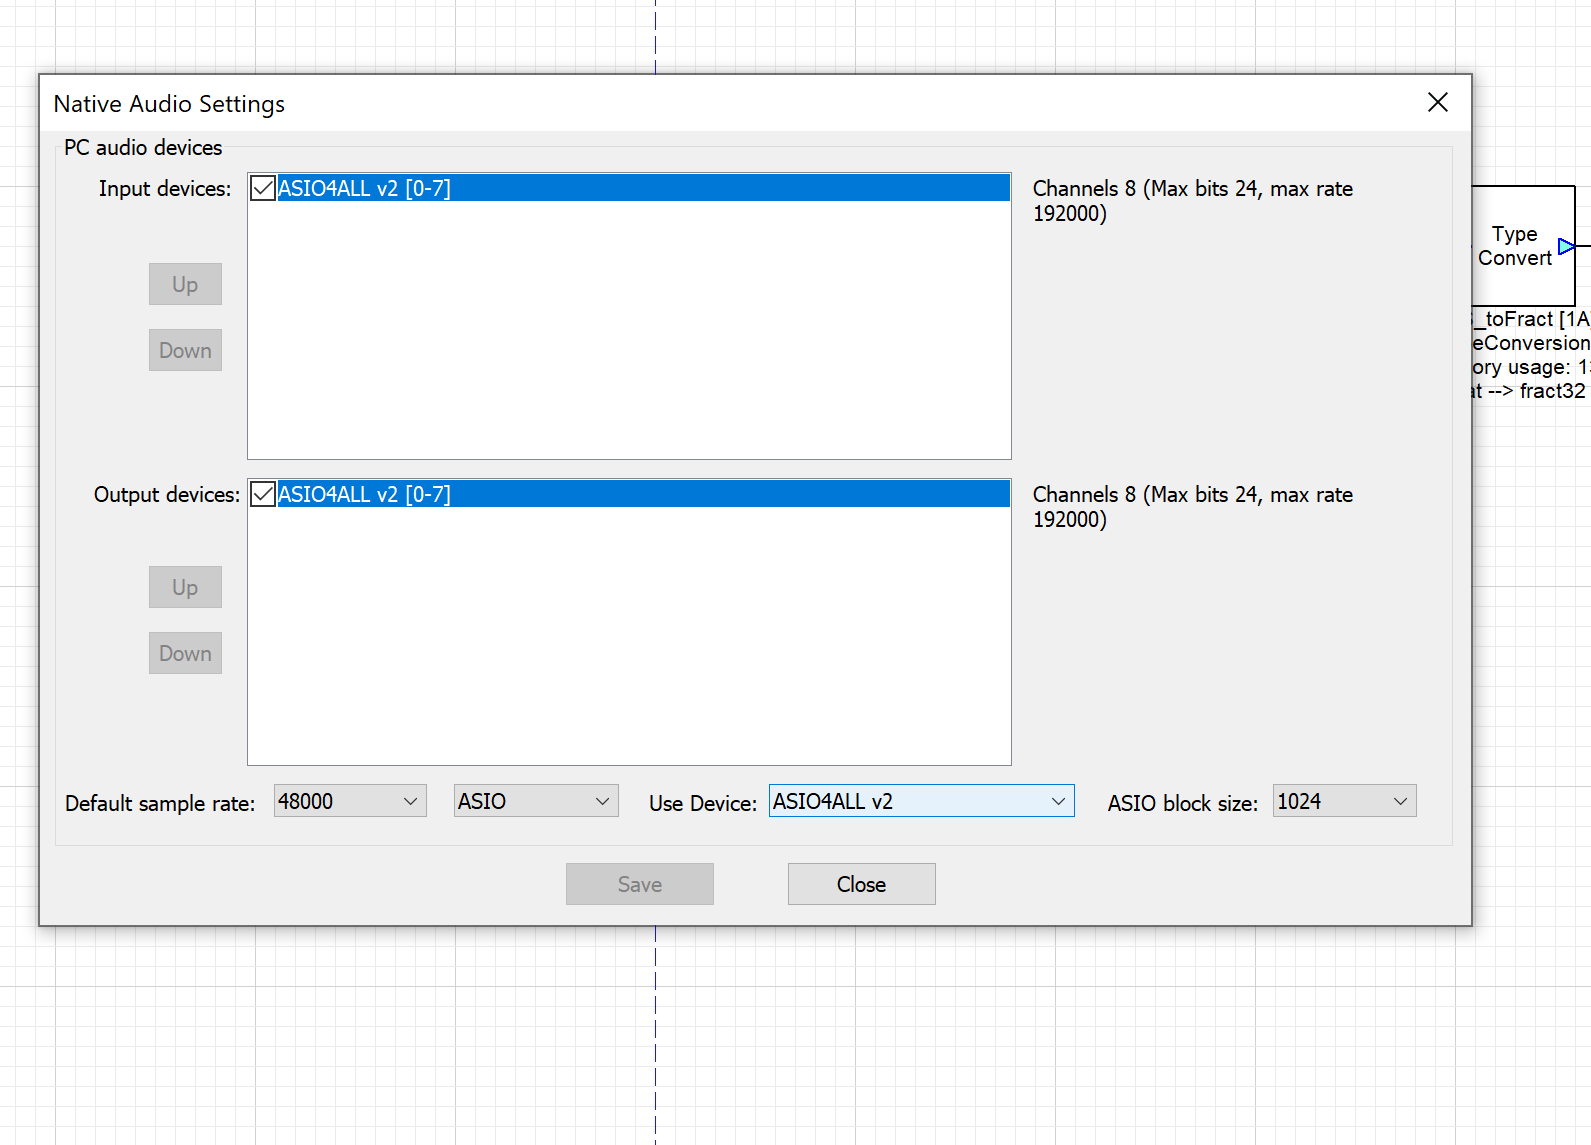
Native Audio Settings with ASIO selected. Note the extra ASIO specific configuration parameters (ASIO device, ASIO block size)
Loop-Back
Audio loopback can be a useful tool to route audio between different applications on the same PC. For instance, the audio output from a layout created in Designer and running on the Native target can be used as the input for a Digital Audio Workstation (DAW) such as Audacity. In Windows, a 3rd party application that implements audio loopbacks is required. In the example below, Virtual Audio Cable (VAC) is used, but there are many other options available.
Note: Loopback devices are only supported when connected to the Native target
To use audio loopback devices, select the loopback input and/or output devices in the Native Audio Settings menu (Line 1 (Virtual Audio Cable)) in the image below. In this example, the output from Designer will be routed to Audacity, so only the output VAC is selected. Click Save to apply the selection.
In Designer, open a new canvas and implement a layout similar to the one below, with generated stereo audio being output to the first two channels of the VAC.
Layout Properties Menu
The layout properties dialog provides information about the layout, along with some control over how the layout behaves. To edit the layout’s properties, navigate to ‘Layout → Layout Properties’ from the top banner of Audio Weaver.
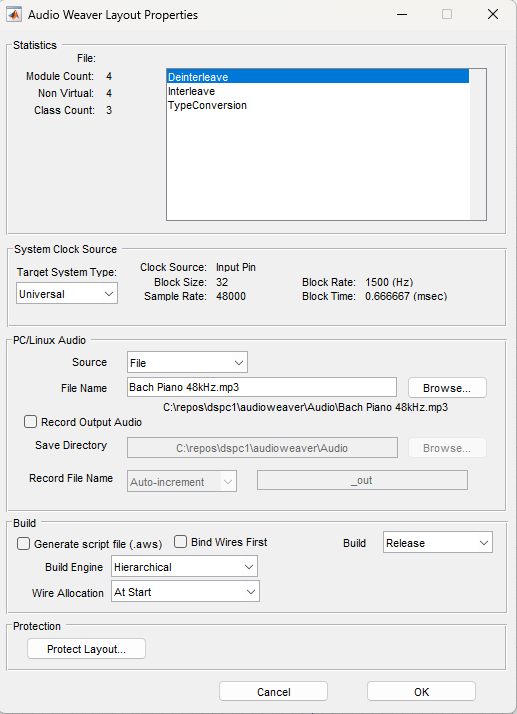
Layout Properties Dialog
Statistics
The Statistics section of the Layout Properties shows a summary of the modules used in the layout. This includes a list of each module class, as well as counts of total modules, total non-virtual modules (Marker modules are an example of a virtual module), and unique module classes used in the layout. The list of module classes used can be selected and copied using CTRL-A and CTRL-C hotkeys.
System Clock Source
The system clock source should only be changed to snapdragon for customers using that platform. The snapdragon device may optionally have a unique set of build rules based on snapdragon specific I/O devices. Most customers should use the universal target and leave this setting as default.
The displayed system clock reflects the build properties of the hardware input pin in universal targets. In snapdragon systems it is derived from the master I/O device.
PC/Linux Audio
The audio section allows the user to control whether to use a file input or line input as the audio source when running on the Native target. These options don’t apply when attached to an embedded target. If File input is chosen, then the system will search for the File Name on the Audio Weaver file search path (see File → Set File Search Path). If Line Input is selected, then the audio devices selected in AWE_Server’s File → Native Audio Settings will be used.
The output audio can also be recorded as .wav files in the selected Save Directory if running on the Native target. If Record File Name is chosen to be ‘Auto-increment’, then the output will be saved as ‘_out_####.wav' in the Save Directory, where #### starts at 0000 and increments by 1 for each new saved file. If ‘Specify’ is chosen, then the user can choose the output file name. If the specified output file already exists when the layout is run, then it will be overwritten.
Build
The Build section provides control about the layout build process. If selected, the ‘Generate script file (.aws)' option will save the AWS file generated from the layout build in the same folder as the current AWD file.
In Designer version 8.D.2.5 the ‘Bind Wires First' option was added to Layout Properties. Typically commands to create all the layout wires are placed at the beginning of the AWS/AWB file, followed by the bind wire commands to bind to the HW pins. However, the 'Bind Wires First’ option will place the bind wire commands immediately following the commands to create the wire for the HW pins. This may be chosen if the user would like to allocate memory for the HW wires in fast memory, which may have been depleted if bind wire is issued at the end of the wire allocation commands.
The Build dropdown menu controls the layout build configuration, and can be selected as either Release or Debug. See here for more details on the build configuration: Layout Build Configuration (Debug/Release)
Build Engine
The build engine used to generate the AWS/AWB files from the layout can be selected with the Build Engine dropdown. Designer version 8.D.3.1 introduces the ‘Hierarchical’ build engine - all layouts generated before this version will use the ‘Classic’ build engine.
The Hierarchical build engine uses a different approach than Classic, which can result in faster build times as well as potentially more efficient memory usage. In addition, Hierarchical builds allow for further control of when wires and modules are allocated in the build sequence, and when modules are executed during layout processing.
The build engine selected in Layout Properties is saved with the layout, and the default build engine used for new layouts can be changed in the Global Properties menu. Pro Designer users can modify the build engine used for a layout using the change_build_engine matlab function. Run help change_build_engine to see usage details.
Since the overall performance of the different build engines can vary based on layout design, modules used, and target configuration, it is recommended that the user experiment with the different build engines and wire allocation strategies to find the best options for their system.
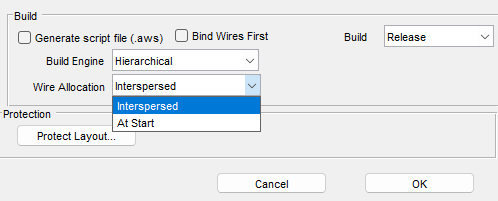
Wire Allocation
The ‘At Start’ Wire Allocation option will allocate all wires used in the layout at the beginning of the AWB, which is the same approach as for Classic builds. This means that wires have the highest memory allocation priority, consuming FASTA heap before any modules have the chance to do so. The ‘Interspersed’ option will instead allocate wires right before they are first used by a module. This results in wire allocations being interspersed throughout the build sequence, allowing modules earlier access to the FASTA heap when possible. To see the differences in the Wire Allocation strategies, generate an AWS file from the layout and compare where the create_wire commands occur. The Tools → Profiling → Profile Block by Block menu will also show the details of CPU and memory usage of each module and wire for the running layout.
Module Execution Order
When using the Hierarchical build engine, decisions about module creation and execution order when there are parallel paths are made based on the position of modules on the canvas. This lets advanced users have additional control over when modules are allocated to memory and executed while processing.
Signal flows commonly have parallel paths where multiple modules can be executed next in the build sequence. In Hierarchical builds, the decision about which module gets executed first in these situations is based on which module is farthest left on the canvas (if multiple eligible modules have the same horizontal alignment, then the topmost module wins). Consider the layout below:
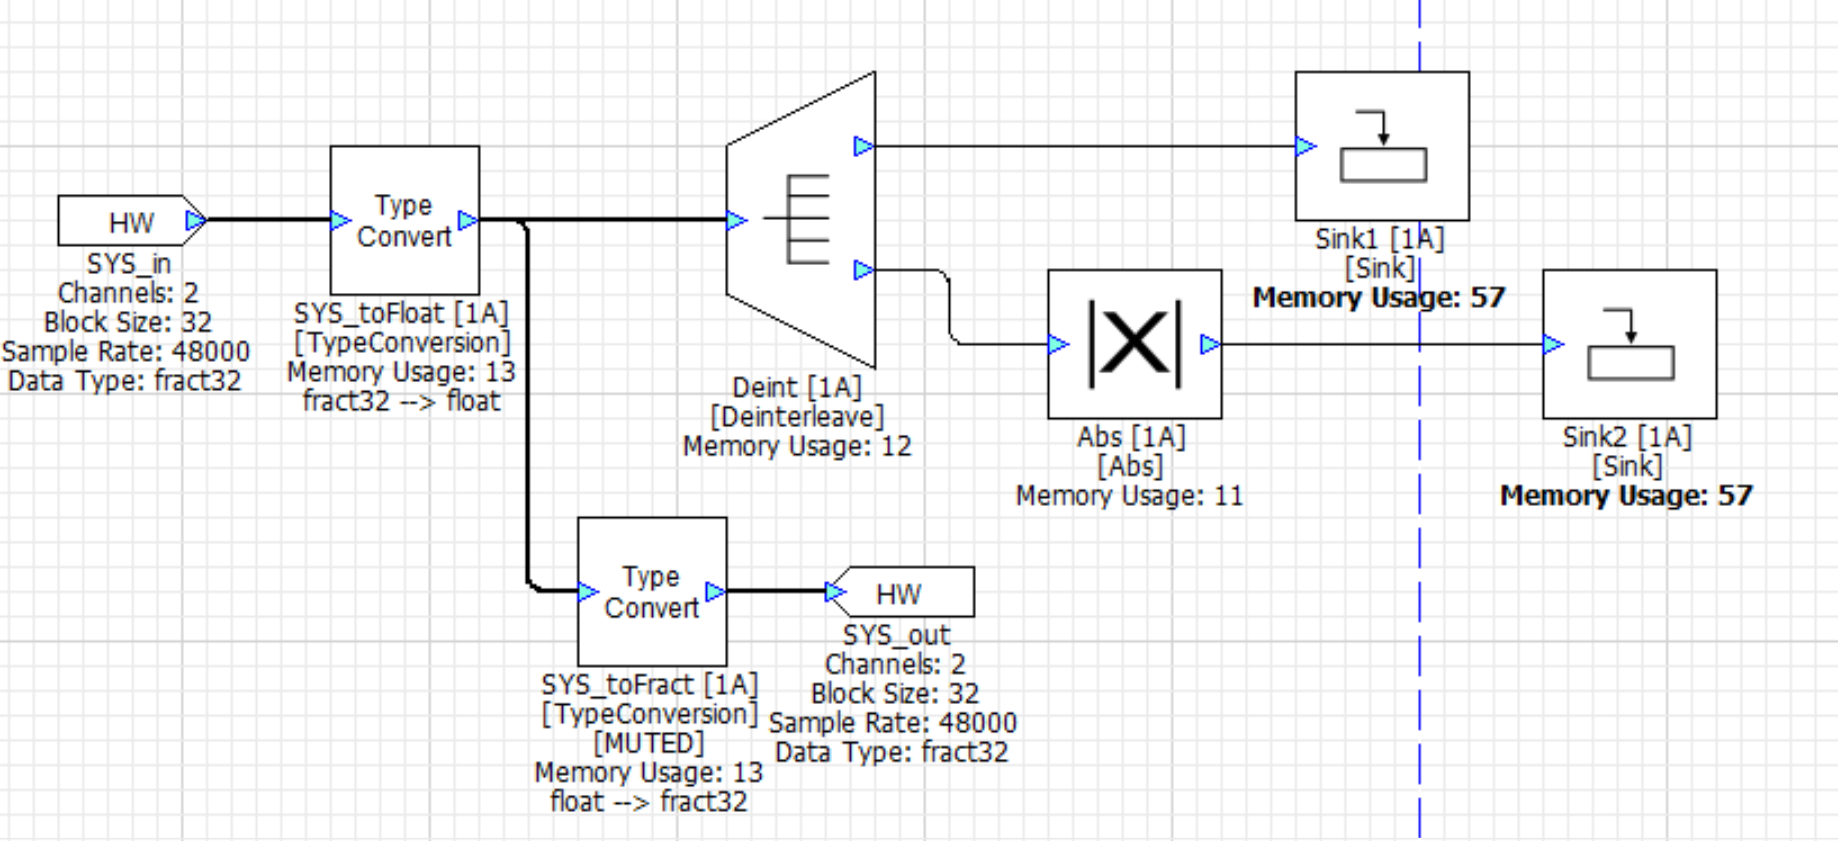
There are two parallel paths after the Deint module, where both the Sink1 or the Abs are valid choices for next module to execute. With the Hierarchical build engine, the Abs module is executed first because it is farther left on the canvas than the Sink1 module, as confirmed by the following AWS file generated from this layout (with Wire Allocation strategy ‘At Start’):
0,destroy
0,create_wire,wire1,48000,2,32,0,32,0,4,0,0
0,create_wire,wire2,48000,2,32,0,32,0,4,0,0
0,create_wire,wire3,48000,2,32,0,32,0,4,0,0
0,create_wire,wire4,48000,1,32,0,32,0,4,0,0
0,create_wire,wire5,48000,1,32,0,32,0,4,0,0
0,bind_wire,wire1,Input
0,bind_wire,wire2,Output
0,create_module,SYS_toFloat,ModuleTypeConversion,1,1,0,wire1,wire3,1,0
0,create_module,SYS_toFract,ModuleTypeConversion,1,1,0,wire3,wire2,0,1
0,set_module_state,SYS_toFract,2
0,create_module,Deint,ModuleDeinterleave,1,2,0,wire3,wire4,wire5
0,create_module,Abs,ModuleAbs,1,1,0,wire5,wire5
0,create_module,Sink1,ModuleSink,1,0,0,wire4,0
0,write_float_array,Sink1.yRange[0],-5.0,5.0
0,create_module,Sink2,ModuleSink,1,0,0,wire5,0
0,write_float_array,Sink2.yRange[0],-5.0,5.0
0,create_layout,theLayout_1A,1,6
0,add_module,theLayout_1A,0,SYS_toFloat,SYS_toFract,Deint,Abs,Sink1,Sink2
Observe that the create_module command for the Abs module (line 13) comes before the same command for Sink1 (line 14). Similarly, Sink1 is created before Sink2, which follows Abs in the signal flow above but is farther right than Sink1. The order of the create_module commands is equivalent to the memory allocation priority of the modules because the first modules created have the earliest access to the fastest memory heaps.
The order of the execution of modules is defined by the order they are added to the layout with the add_layout command. It can be seen that the order of execution from the example layout (line 19) is Deint,Abs,Sink1,Sink2, which matches the order of the create_module commands for the same modules.
The Sink1 module can be prioritized over Abs by simply moving it farther left o the canvas.
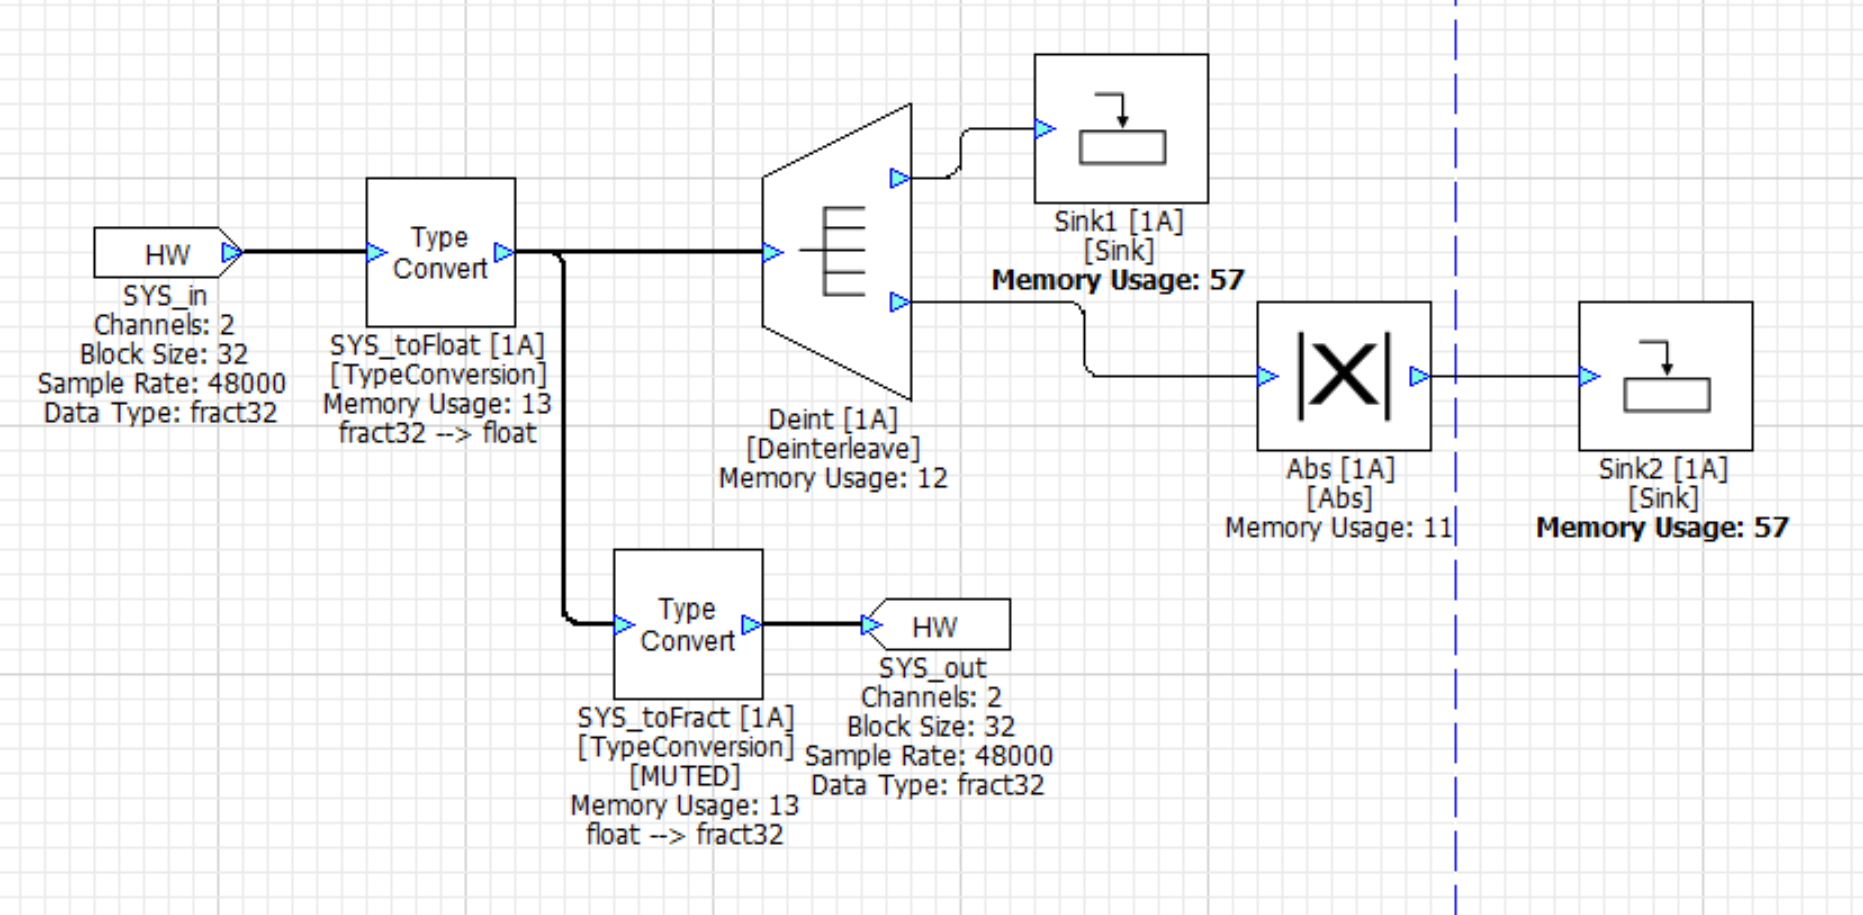
This layout ends up producing the following AWS file. Note that the Sink1 create_module command and its position in the add_layout command now come before Abs.
0,destroy
0,create_wire,wire1,48000,2,32,0,32,0,4,0,0
0,create_wire,wire2,48000,2,32,0,32,0,4,0,0
0,create_wire,wire3,48000,2,32,0,32,0,4,0,0
0,create_wire,wire4,48000,1,32,0,32,0,4,0,0
0,create_wire,wire5,48000,1,32,0,32,0,4,0,0
0,bind_wire,wire1,Input
0,bind_wire,wire2,Output
0,create_module,SYS_toFloat,ModuleTypeConversion,1,1,0,wire1,wire3,1,0
0,create_module,SYS_toFract,ModuleTypeConversion,1,1,0,wire3,wire2,0,1
0,set_module_state,SYS_toFract,2
0,create_module,Deint,ModuleDeinterleave,1,2,0,wire3,wire4,wire5
0,create_module,Sink1,ModuleSink,1,0,0,wire4,0
0,write_float_array,Sink1.yRange[0],-5.0,5.0
0,create_module,Abs,ModuleAbs,1,1,0,wire5,wire5
0,create_module,Sink2,ModuleSink,1,0,0,wire5,0
0,write_float_array,Sink2.yRange[0],-5.0,5.0
0,create_layout,theLayout_1A,1,6
0,add_module,theLayout_1A,0,SYS_toFloat,SYS_toFract,Deint,Sink1,Abs,Sink2
Some control modules (e.g. ParamSetV2, StatusSetV2, etc.) have an executionOrder argument that is used to control the execution order relative to the target module. This executionOrder argument only works in Classic builds, not Hierarchical. For Hierarchical builds, the scheme described above must be used to control execution order of control modules relative to the target module. For Pro Designer users, Hierarchical builds will print a warning in the matlab console if it detects that an executionOrder argument is at odds with the resulting execution order of the layout.
Note that the ‘allocationPriority’ field in the Build tab of each module can still be used to further control memory allocation priority with Hierarchical builds. This field trumps canvas position when determining the order of create_module commands, but does not impact execution order.
Protect Layout
The final section, ‘Protect Layout’, allows the entire layout to be locked from editing using a password.
Managing the Canvas
The AWE Designer Canvas consists of pages. You can change your drawing space using the “Layout → Canvas Size” menu.
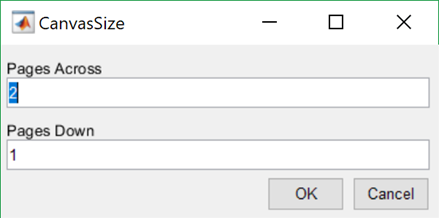
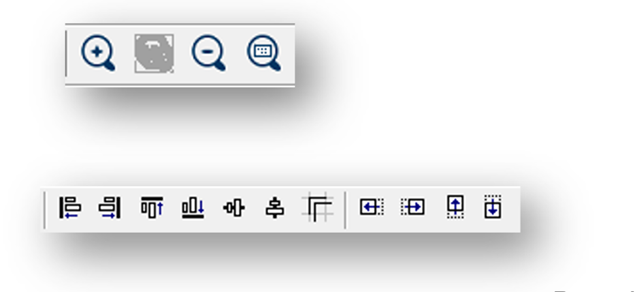
Note: The canvas size is limited to 10x7. The zoom and align toolbar icons can be used to change your view and to easily organize your modules.
Searching in the Layout
The Designer canvas has a search bar at the top right corner that can be used to search for modules and subsystems in the layout. Clicking on one of the entries in the returned list of matches will navigate to that item. Searches are always case insensitive, and the magnifying glass icon on the right can be used to refresh the search.

Searching for the string ‘agc’ in this AutoAmp_Example.awd returns any matching module class names or module/subsystem names in the layout.
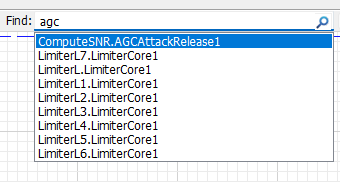
Results of searching for ‘agc’
The search bar also supports 4 qualifiers that can be used to narrow the search results. These can be used by formatting the search query as <qualifier>:<search_str>. The 4 qualifiers supported are:
module- search is limited to only module names. Subsystem names are not included.class- search is limited to only module class names.subsystem- search is limited to only subsystem names.status- returns a list of modules that match the runtime status type matching<search_string>. For example,status:mutedwill return all modules in the layout with a runtime status of muted. The search term will match to the closest status type (e.g.,status:mwill search for muted,status:inawill search for inactive, etc.).
Setting Search Paths
Audio Weaver Designer comes with a few default search paths for Audio and Modules. You can add additional search paths for both modules and files (audio files, etc) via Designer.
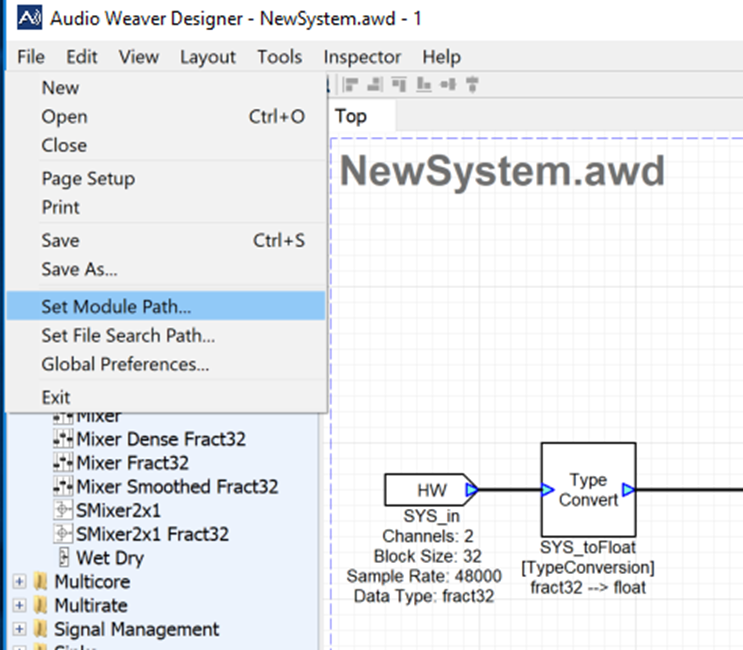
The reason to update a module search path would be if you have created your own custom module, or to point a folder containing RUS/CRUS modules. To add additional Module Search Paths, select File-> Set Module Path.
The File Search Path menu is used to update the search paths for audio files and other file types used by the layout or modules.
Module Browser/Palette
The Module Browser allows filtering by a few different parameters. You can filter the Module Browser list via data type by selecting/deselecting the boxes above the browser and under the search bar. The browser will only show modules with datatypes that match the selected boxes. For instance, if a user is not interested in any fract32 modules, they could deselect the box and see only float/int modules.
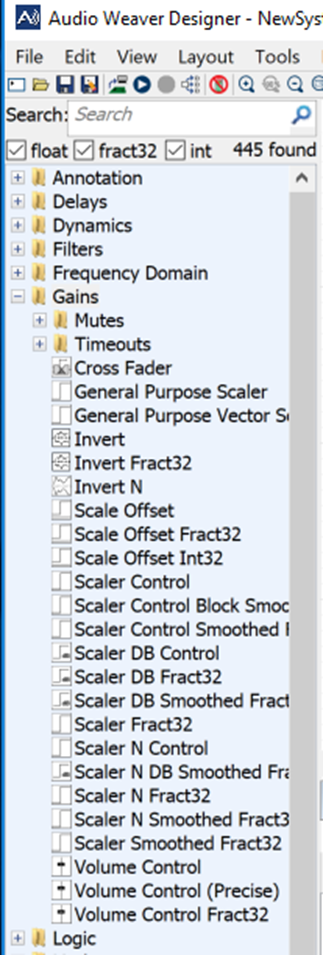
The image below shows the “Gain” modules of all data types.
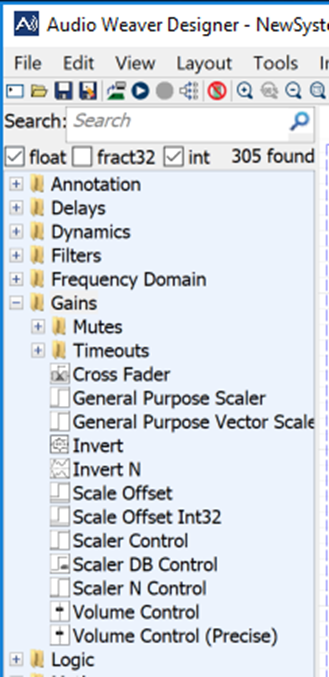
The next image shows the same “Gain” category but without fract32 modules. Notice that the list is significantly shorter.
If you know the name or a keyword of the desired module, you can also use the search bar to filter the available modules.
By default, the module browser will filter out deprecated modules and missing modules (not present on the connected target). To toggle these filters, open the Designer File->Global Preferences dialog and toggle the “Show deprecated modules” checkbox. Beneath the checkbox, there is also a dropdown menu which provides the option to show all modules, filter by target, or filter by ModuleList.h (see below). Deprecated modules will appear in the browser with a yellow exclamation mark overlay, and missing modules with a red x.
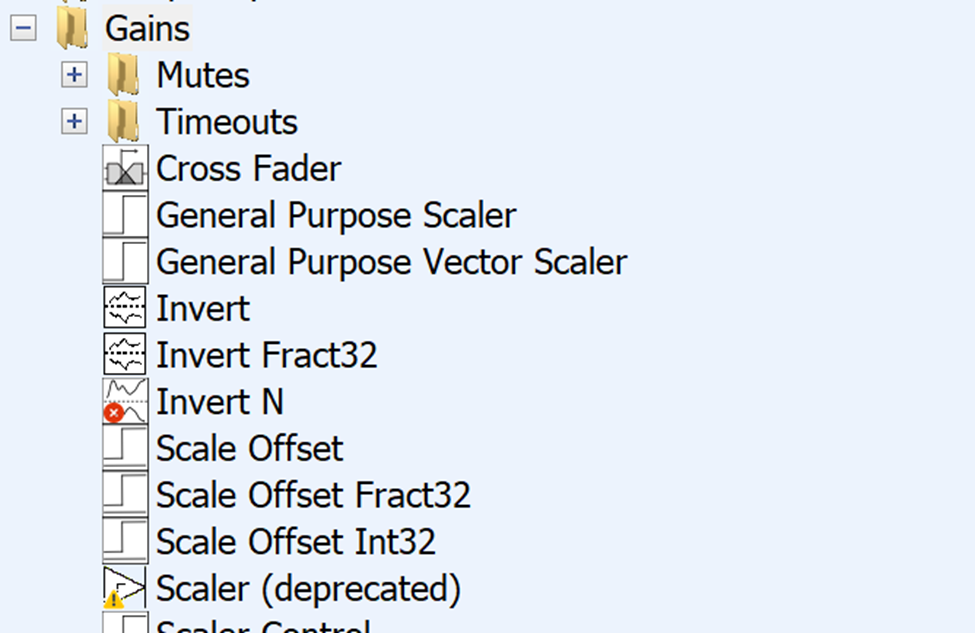
Note: The image above was captured while connected to a target which does not contain the advanced module pack, therefore InvertN is missing.
An advanced feature is the ability to specify a specific ModuleList.h file as module filter. Any modules not in the specified list will appear on the canvas outlined in red.
