
Custom Modules Quick Start
Overview
This Developers Quick Start Guide is a companion document to the Custom Modules Developer's Guide. It describes creating custom modules for Audio Weaver. Both of these documents reference information contained in the MATLAB Scripting API. This document is intended for developers creating their own custom Audio Weaver module packs.
Requirements
Developing custom audio modules for an external target requires the following:
Audio Weaver Designer 8.B.1.5 Pro Edition or later (For Custom Module Pack Creator Wizard)
Valid Audio Weaver Designer – Pro Edition License
Valid Audio Weaver Feature: Module Creator License
MATLAB 2017b (64-bit) or later
Microsoft Visual Studio 2019 Professional or later (must support MFC)
Toolchain and supporting development environment for the external target hardware
Development Cycle
Audio Weaver module creation is a multi-step process which consists of authoring a MATLAB m-file, authoring C-code, running a MATLAB script to generate various components, and finally creating a Windows DLL component that defines the new module to AWE_Server and Designer. The “Custom Module Pack Creator Wizard” tool built-in to Designer can automatically create a functional module pack with the above files. This generated module pack provides a good starting point for any custom module development. See Development Steps for detailed information.
Folder Organization
When running the MATLAB script to generate various components a particular file folder organization is expected. Some parts of the folder organization are required and some are simply a recommended convention. The containing folder must ultimately be added to the list of module paths for discovery by Designer.
Module Deployment
When the development process is complete two components (new Windows DLL and new target library) must be copied to known locations. The module library file must be copied to the external target board development environment to be linked in with the target and the Windows DLL file must be copied to the folder that contains the Designer and AWE_Server executables.
Module Operation
An Audio Weaver module has several required components that the system expects for proper operation. To explain what these components are and how they interact with Audio Weaver a typical use case shall be described.
The user searches for the new module in the AWE Designer module palette.
In order for the module to be fully functional and appear in the palette with the expected name and icon the following has to be in place:
The module’s Windows DLL must be in the same folder as the AWE_Server executable.
The path to the folder containing the module’s m-files, xml, images, and documentation must be defined on the module search path. This path can updated using the File > Set Module Path menu item in Designer.
The module creation m-file must exist in the “matlab” folder.
The module xml file must exist in the “xml” folder.
The module bmp/svg icons must exist in the “image” folder.
The module documentation must exist in the “Doc” folder.
The module must be in an include file defining the list of modules in use that has been compiled into both the Windows DLL and the target module library.
When the user drags the module from the Designer module palette to the canvas:
The module is instantiated by calling the module’s MATLAB m-file create function, then its prebuild function, then a set function if implemented. The module is displayed on the canvas using the icon image from the images folder with default pins and other information coming from the xml file in the xml folder.
Any parameters defined by the module MATLAB m-file are displayed by default underneath the module on the canvas unless marked hidden or explicitly written by calling a non-null TextLabelFunc. See Custom Modules Developer's Guide for more information on labels.
When the user hits the AWE Designer build and run button:
The module’s MATLAB prebuild function and any set function is called again. Next, a module create command for the module’s current configuration is generated as part of the list of AWS text commands sent to AWE_Server. AWE_Server turns the AWS text commands into binary AWB commands and sends each of these commands over the tuning interface to the target hardware. The target hardware (can be the Native Windows server) then instantiates the module as specified by the module create command and the module’s Constructor function.
For this to work, the C library containing the module’s definition must be linked into the target firmware, and the module must included in the ModuleList.h file’s list of modules compiled into the target.
Development Steps
To create a new custom module pack, open Audio Weaver Designer. Select “Tools->Module Pack Creator Wizard”
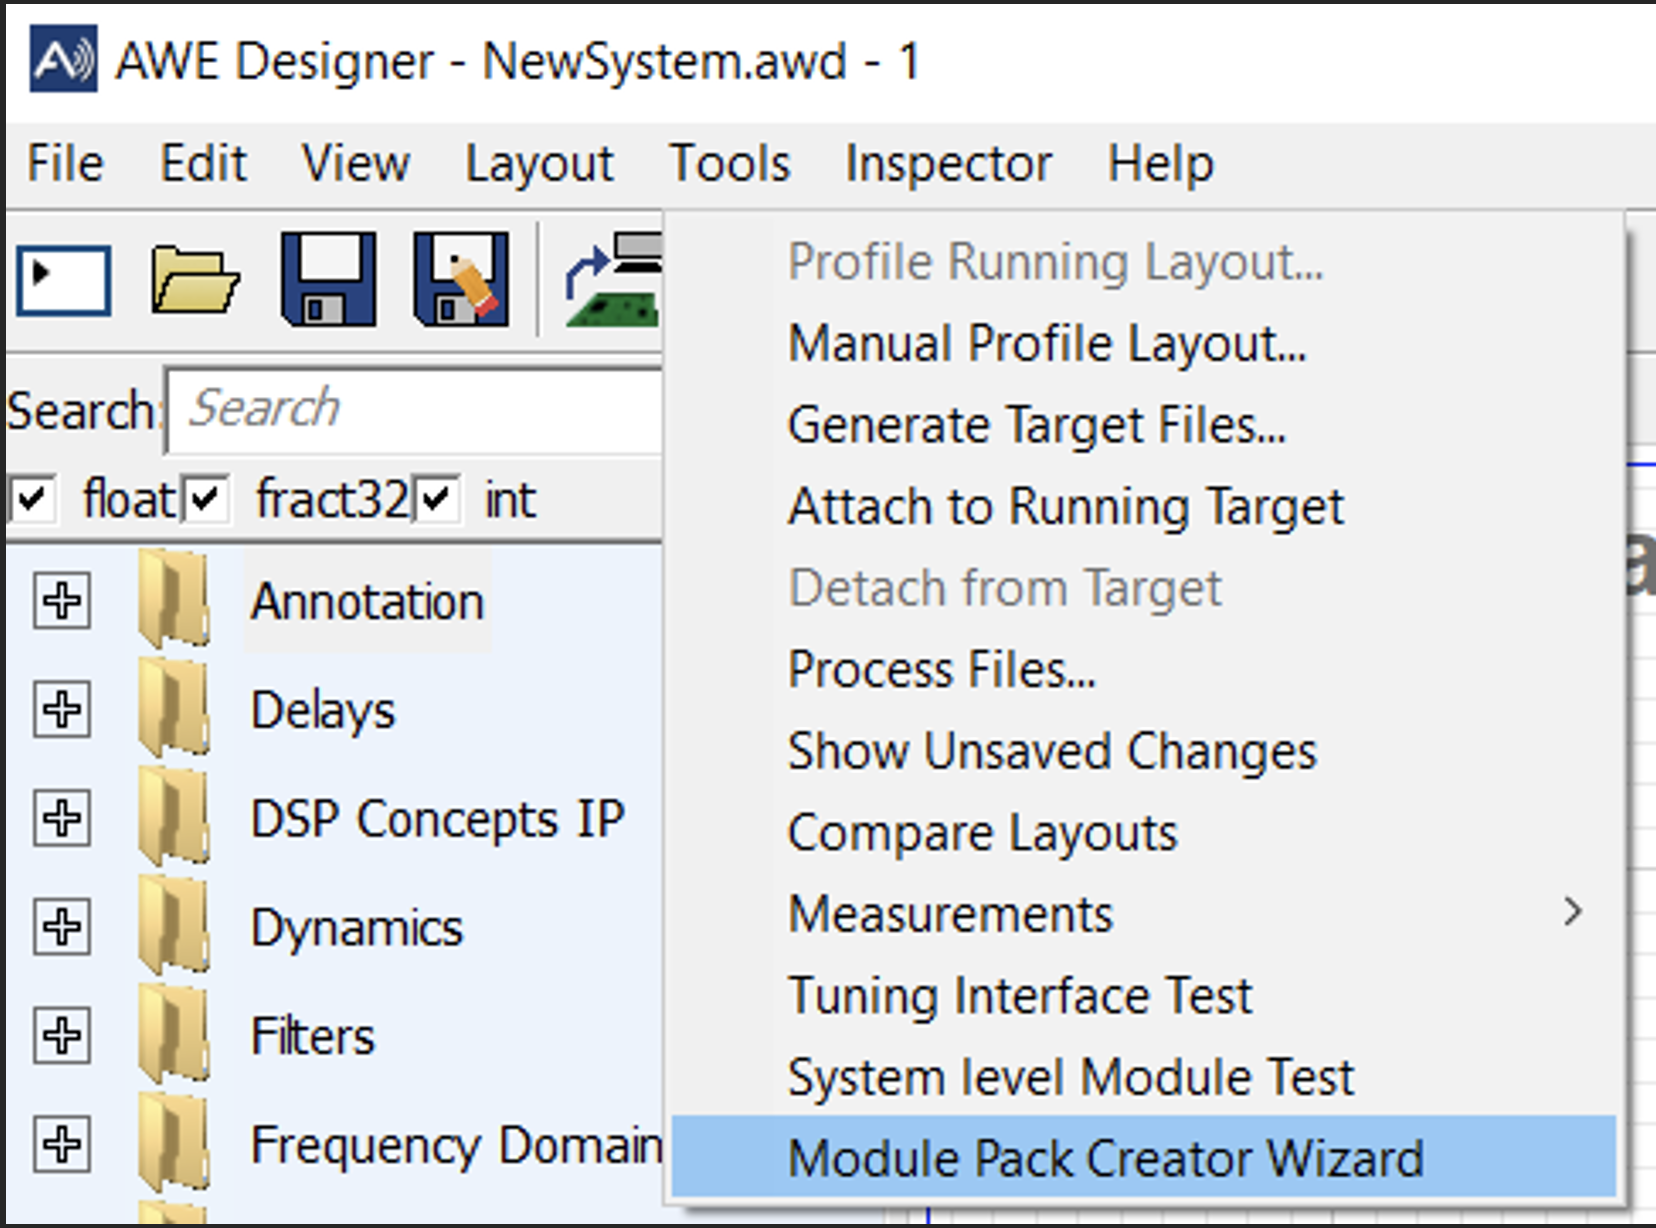
The following dialog is launched:
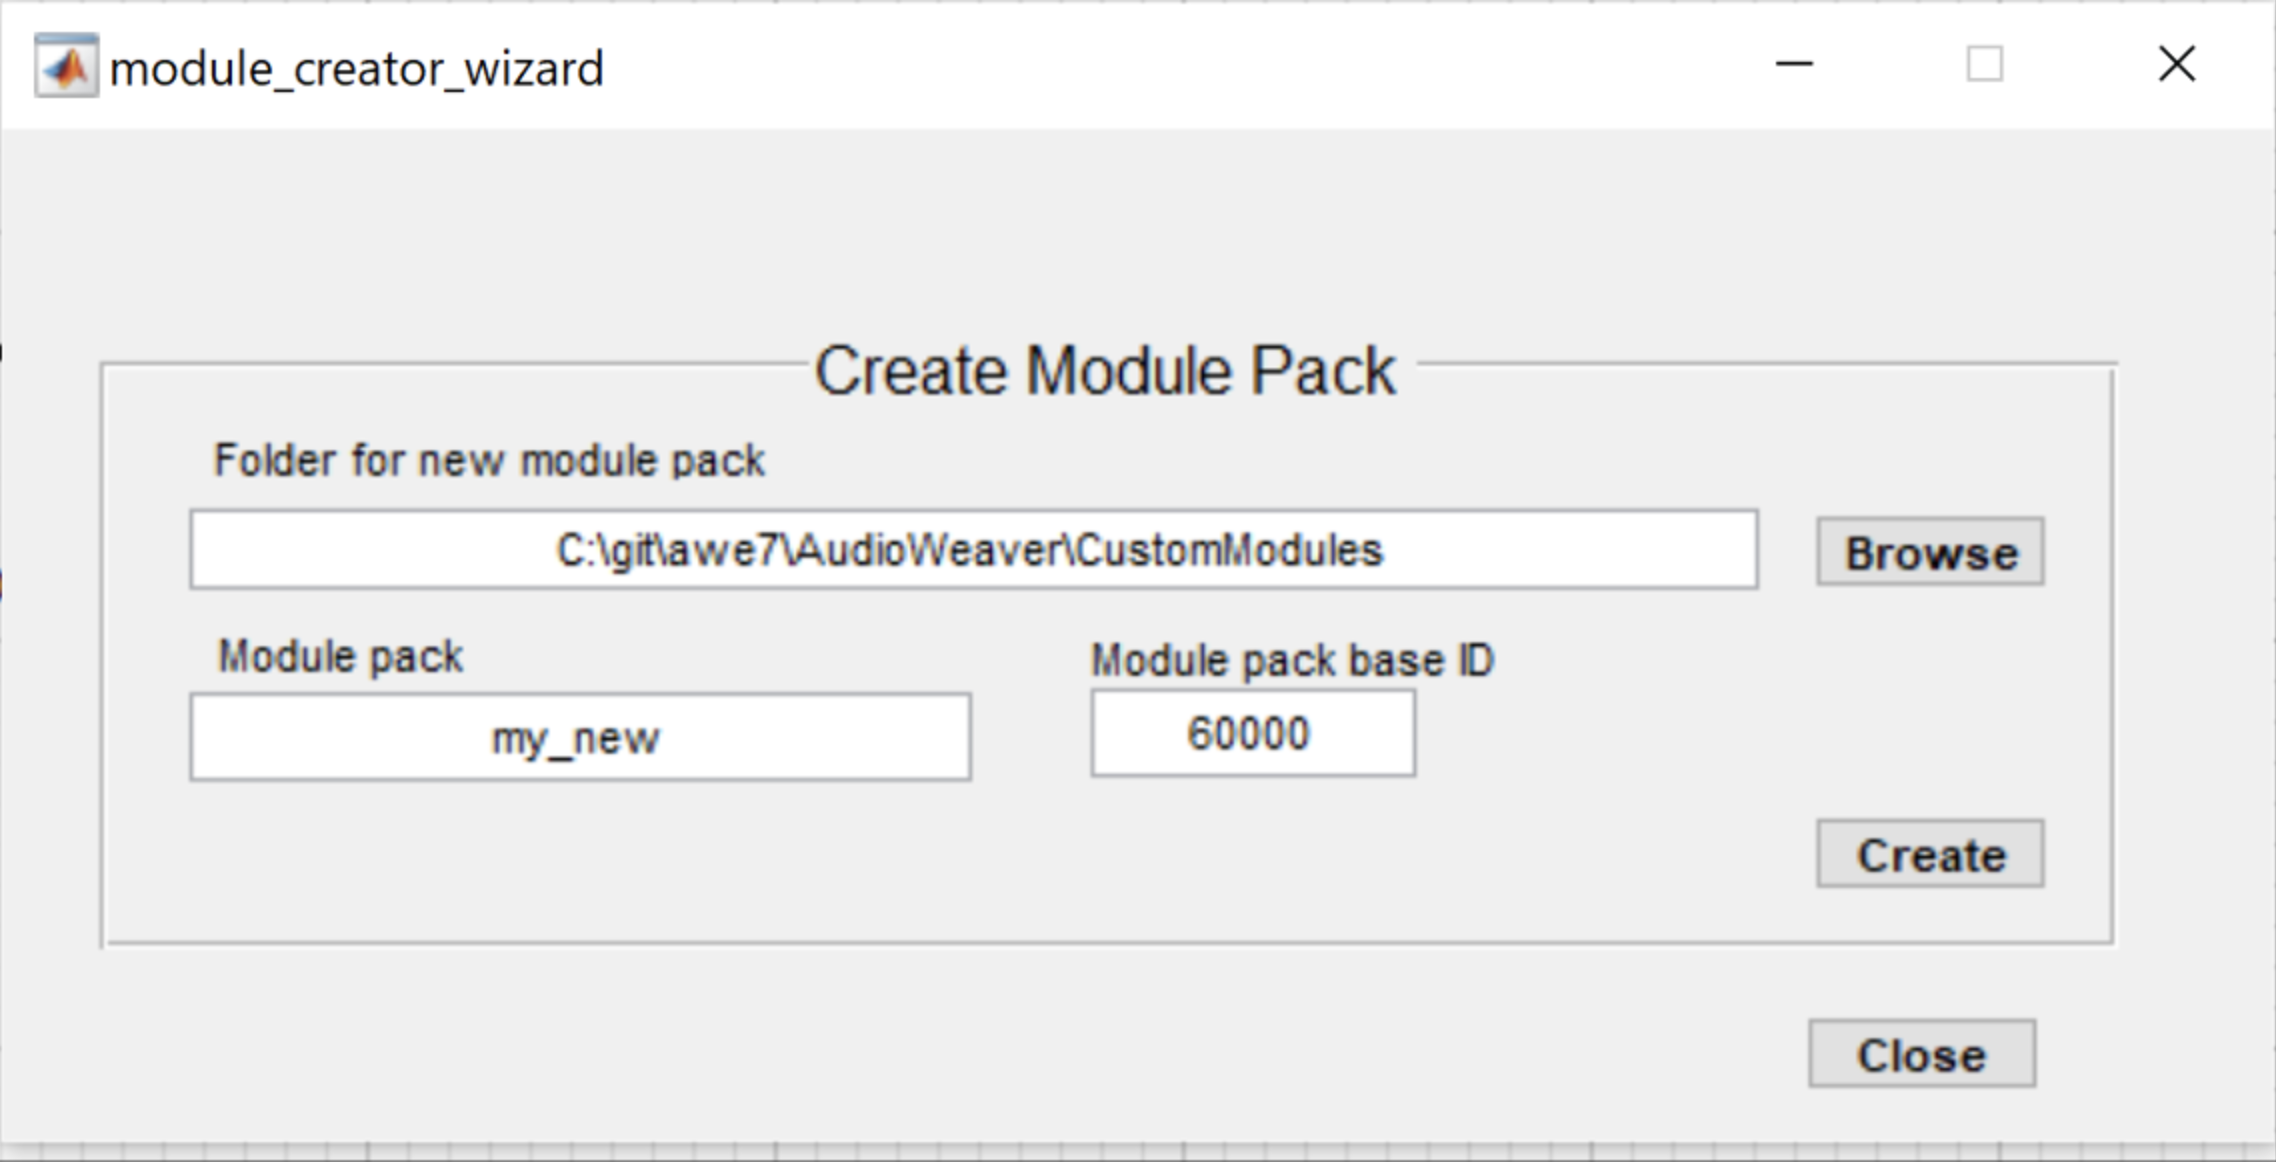
Browse to the folder where the custom module pack folders should be created, enter the desired module pack base name, and enter a module pack base ID of 60000 or greater up to 63486.
Contact DSP Concepts to allocate a block of class IDs for a new module pack.
Create Folders
For the following examples the module pack name is named “my_new” and the generated module is called “my_new_module”. Replace these names with the desired module pack and module name.
The wizard will create the following folder structure, with default files in each folder as necessary:
📂 my_new_module
📁 my_new_module\doc
📁 my_new_module\images
📁 my_new_module\include
📁 my_new_module\inner
📁 my_new_module\lib
📁 my_new_module\matlab
?? my_new_module\projects
📁 my_new_module\projects\source
📂 my_new_module\projects\VS2010
📁 my_new_module\projects\VS2010\BuildDll
📁 my_new_module\projects\VS2010\BuildLib
📁 my_new_module\projects\xml
Note: When creating or editing module folders, the following items apply:
The folder VS2010 must be renamed to match the appropriate version of Microsoft Visual Studio.
The folder matlab cannot be deleted from the File Explorer if the MATLAB application is open.
Module MATLAB m-file
The wizard creates a MATLAB m-file that defines the module arguments, pins, parameters, inner C file location, Inspectors, and more. This is the main starting point in the module creation process. See Custom Modules Developer's Guide for an in-depth look at creating this m-file. To be discovered by Designer, this m-file must reside in the “matlab” folder defined in the Create Folders section.
The module pack wizard will create a MATLAB file ‘my_new_module.m’ that defines a functional copier module.
function M= my_new_module(NAME)
% M = my_new_module(NAME)
% Copies input pin data to the output pin.
%
% Arguments:
% NAME - name of the module
%

% AudioWeaverModule [This tag makes it appear under awe_help]

M=awe_module('MyNew', 'Copies input wire to output wire');
if (nargin == 0)
 return;
end

M.name=NAME;
M.defaultName='MyNew';

% Add input and output pins with no data or size restrictions
PT=new_pin_type([], [], [], '*32', []);
add_pin(M, 'input', 'in', 'Input signal', PT);
add_pin(M, 'output', 'out', 'Output signal', PT);
% ----------------------------------------------------------------------
% Code generation details
% ----------------------------------------------------------------------
awe_addcodemarker(M, 'processFunction', 'Insert:\InnerMyNew_Process.c');
awe_addcodemarker(M, 'discussion', {'Copies the input to the output. '});
% ----------------------------------------------------------------------
% Module browser information
% ----------------------------------------------------------------------
M.docInfo.seeAlso={'Copier', 'Source', 'Sink'};
M.moduleBrowser.path = 'Third Party';
M.moduleBrowser.image = '../images/MyNew.bmp';
M.moduleBrowser.searchTags = 'pass thru through copy';
return;
Inner C files
The wizard will create the processing C code for the default copier module that will run on the target firmware. You may manually have to create any optional “constructor” C code, optional “set” C code, or optional “get” C code. These files must reside in the “inner” folder defined in the Create Folders section, and must be explicitly referenced in a ‘awe_addcodemarker’ command in the *_module.m file. The code in these inner files gets copied to the appropriate function of the generated Mod*.c file when the make_*.m script is run.
Here is the simple inner Process code from “InnerMyNewModule_Process.c” that copies the input pin data straight to the output pin:
awe_modMyNewInstance *S = (awe_modMyNewInstance *)pInstance;
WireInstance **pWires = ClassModule_GetWires(S);
UINT32 numSamples = ClassWire_GetNumSamples(pWires[0]);
UINT32 *pSrc = (UINT32 *)(pWires[0] ->buffer);
UINT32 *pDst = (UINT32 *)(pWires[1] ->buffer);
UINT32 i;
for (i = 0; i < numSamples; i++)
{
    *pDst++ = *pSrc++;
}
Image files
The wizard will create a default BMP icon to be used in the module palette view. The BMP file is 32 x 32. To control the appearance of the module when it is displayed on the canvas, an SVG image can be provided. Module blocks can be resized on the canvas so a vector graphics image (SVG) is used here which allows the image to resize appropriately whenever the module size is changed. If an SVG image is not specified, as is the case in the auto-generated module, then the module name is used. If an invalid SVG image is provided, an error will be logged in the Bin/Assets/logs/general.log file See the AWE Designer Logging Overview for more information.
Class ID List
The wizard will also create a file named “classids.csv” and place in the “parent” folder defined in the Create Folders section. This file defines the unique class ID for each of the modules in the module pack, where the IDOFFSET is the value
The content of the classids.csv file for the generated module pack (‘my_new’ pack with base ID 60600) is as follows:
% Class ID list for my custom modules,
% $Revision: $,
IDOFFSET=60600,
MyNew,1
Any new modules added to this module pack need to have a unique class ID assigned in this file.
Module Pack Generation File
A MATLAB m-file named make_<my_name>_pack.m will be generated by the wizard. This m-file must reside in the “matlab” folder defined in the Create Folders section, and is used to generate all of the necessary files for the entire module pack.
The contents of this file for the my new module pack example is:
function [MM, NAME] = make_my_new_module_library(GENDOC)
%
% make_my_new_module_library(GENDOC)
% Generates the my_new_module library.
% this includes sources, header files, schema, and overall module
% list. Arguments:
% GENDOC - Boolean that specifies whether documentation (in Word)
% format should be generated. By default, GENDOC=0.
%
% [MM, NAME]=make_my_new_module_library(GENDOC)
% Optional output arguments return the cell array of modules that was
% used to build the library and the name of the library. When an
% output argument is requested, then the function DOES NOT GENERATE
% code.
%
% Copyright (c) 2019 DSP Concepts, Inc. All Rights Reserved.
if (nargin < 1)
 GENDOC = 0;
end

% ----------------------------------------------------------------------
% Instantiate each module using default arguments
% ----------------------------------------------------------------------
NAME = 'MyNew';
MM = cell(0,0);
MM{end+1} = my_new_module('temp');
if (nargout > 0)
 return;
end

% ----------------------------------------------------------------------
% Set the code generation directory relative to the directory
% in which this m-file is stored.
% ----------------------------------------------------------------------
MFILE = mfilename('fullpath');
[pathstr, name] = fileparts(MFILE);

% Remove the last directory level
ind = find(pathstr == filesep);
ind = max(ind);
SRC_DIR = pathstr(1:ind-1);
INC_DIR = fullfile(SRC_DIR, 'Include');
DOC_DIR = fullfile(SRC_DIR, 'Doc');
INNER_DIR = fullfile(SRC_DIR, 'Inner');
DIR = {SRC_DIR; INC_DIR; DOC_DIR; INNER_DIR};

% ----------------------------------------------------------------------
% Generate the library.
% ----------------------------------------------------------------------
global AWE_INFO;
AWE_INFO.buildControl.combineSourceFiles = 0;
AWE_INFO.buildControl.ignoreClassIDs = 0;
awe_generate_library(MM, DIR, NAME, '', GENDOC);
awe_generate_doc(MM, DOC_DIR, fullfile(DOC_DIR, '_my_new_module.html'), 'my_new_module');
To add additional modules to the module pack, add calls to the new module definition functions to the MM structure, as is done with ‘my_new_module’ in the script above.
Generating files
In addition to creating the necessary MATLAB and inner files, the wizard also runs the generated make_*.m script to create the rest of the module files. These generated module files include header files, C source files, html files, and xml files. These module files reside in the corresponding named folders defined in the Create Folders section.
Creating the Windows Dll
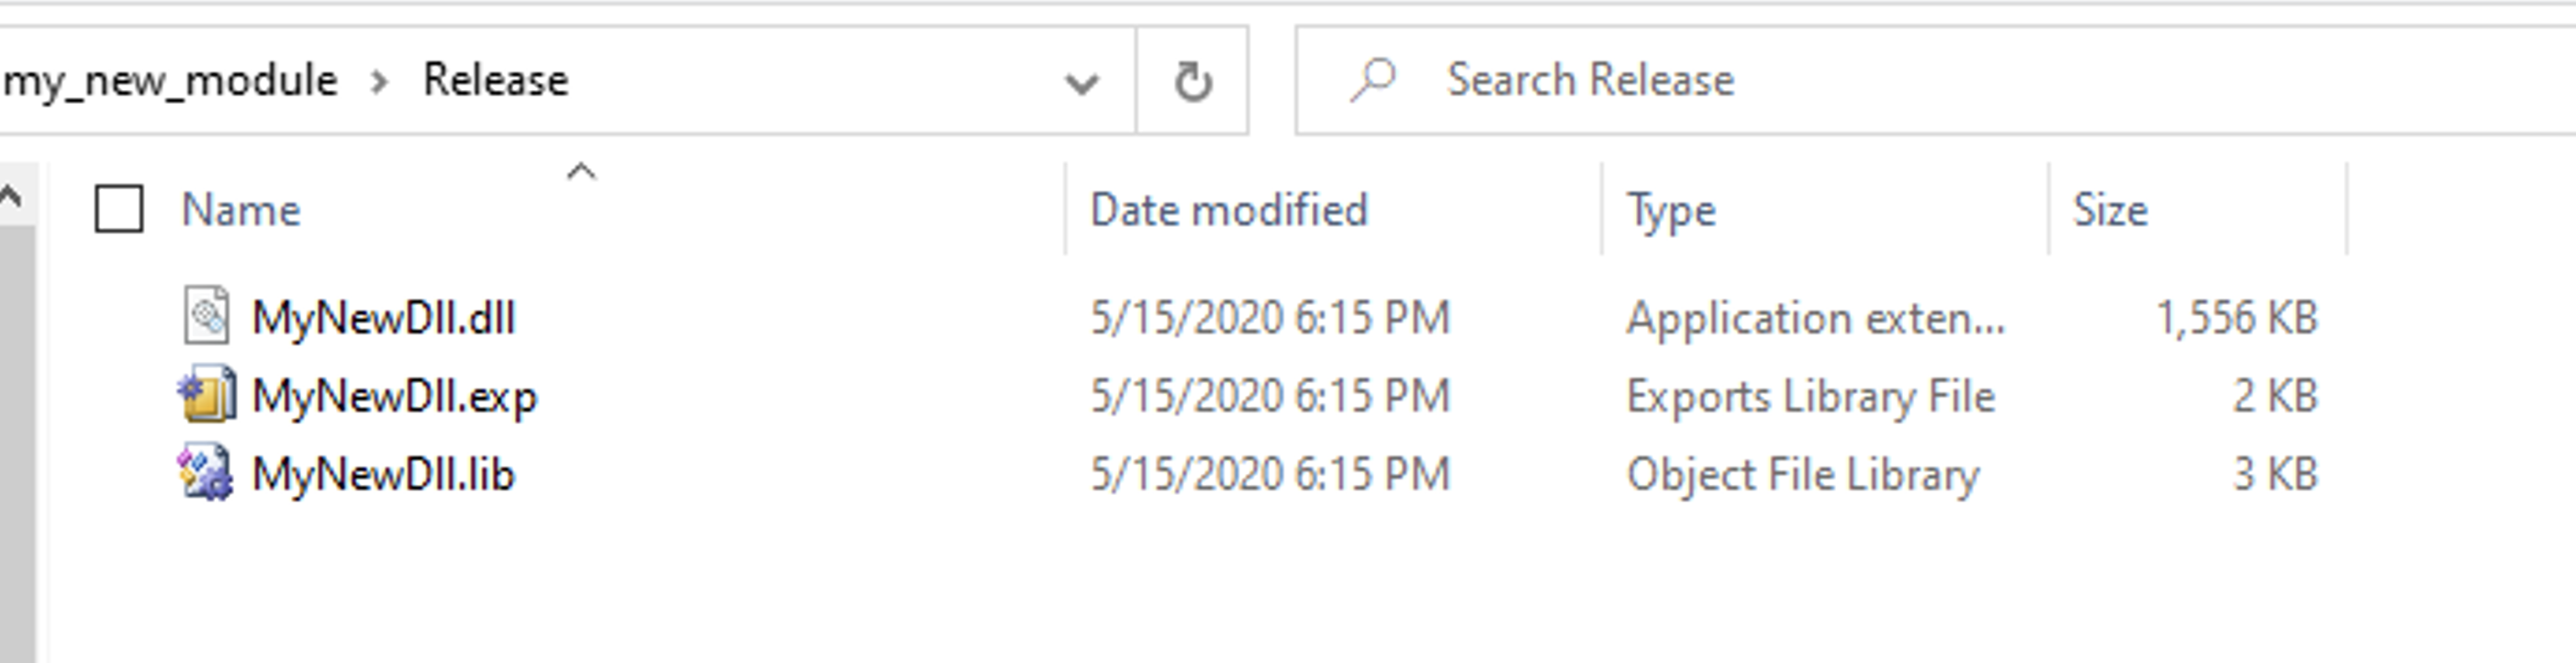
Creating the Windows DLL requires two separate Microsoft Visual Studio projects: one to create a static library and one to create the DLL. The wizard creates a Microsoft Visual Studio Solution file (.sln) with these projects. To create the module pack DLL, build the solution for x86 using Visual Studio. The module pack DLL and .lib files will be created in the Release or Debug folders of the module pack folder as shown below:
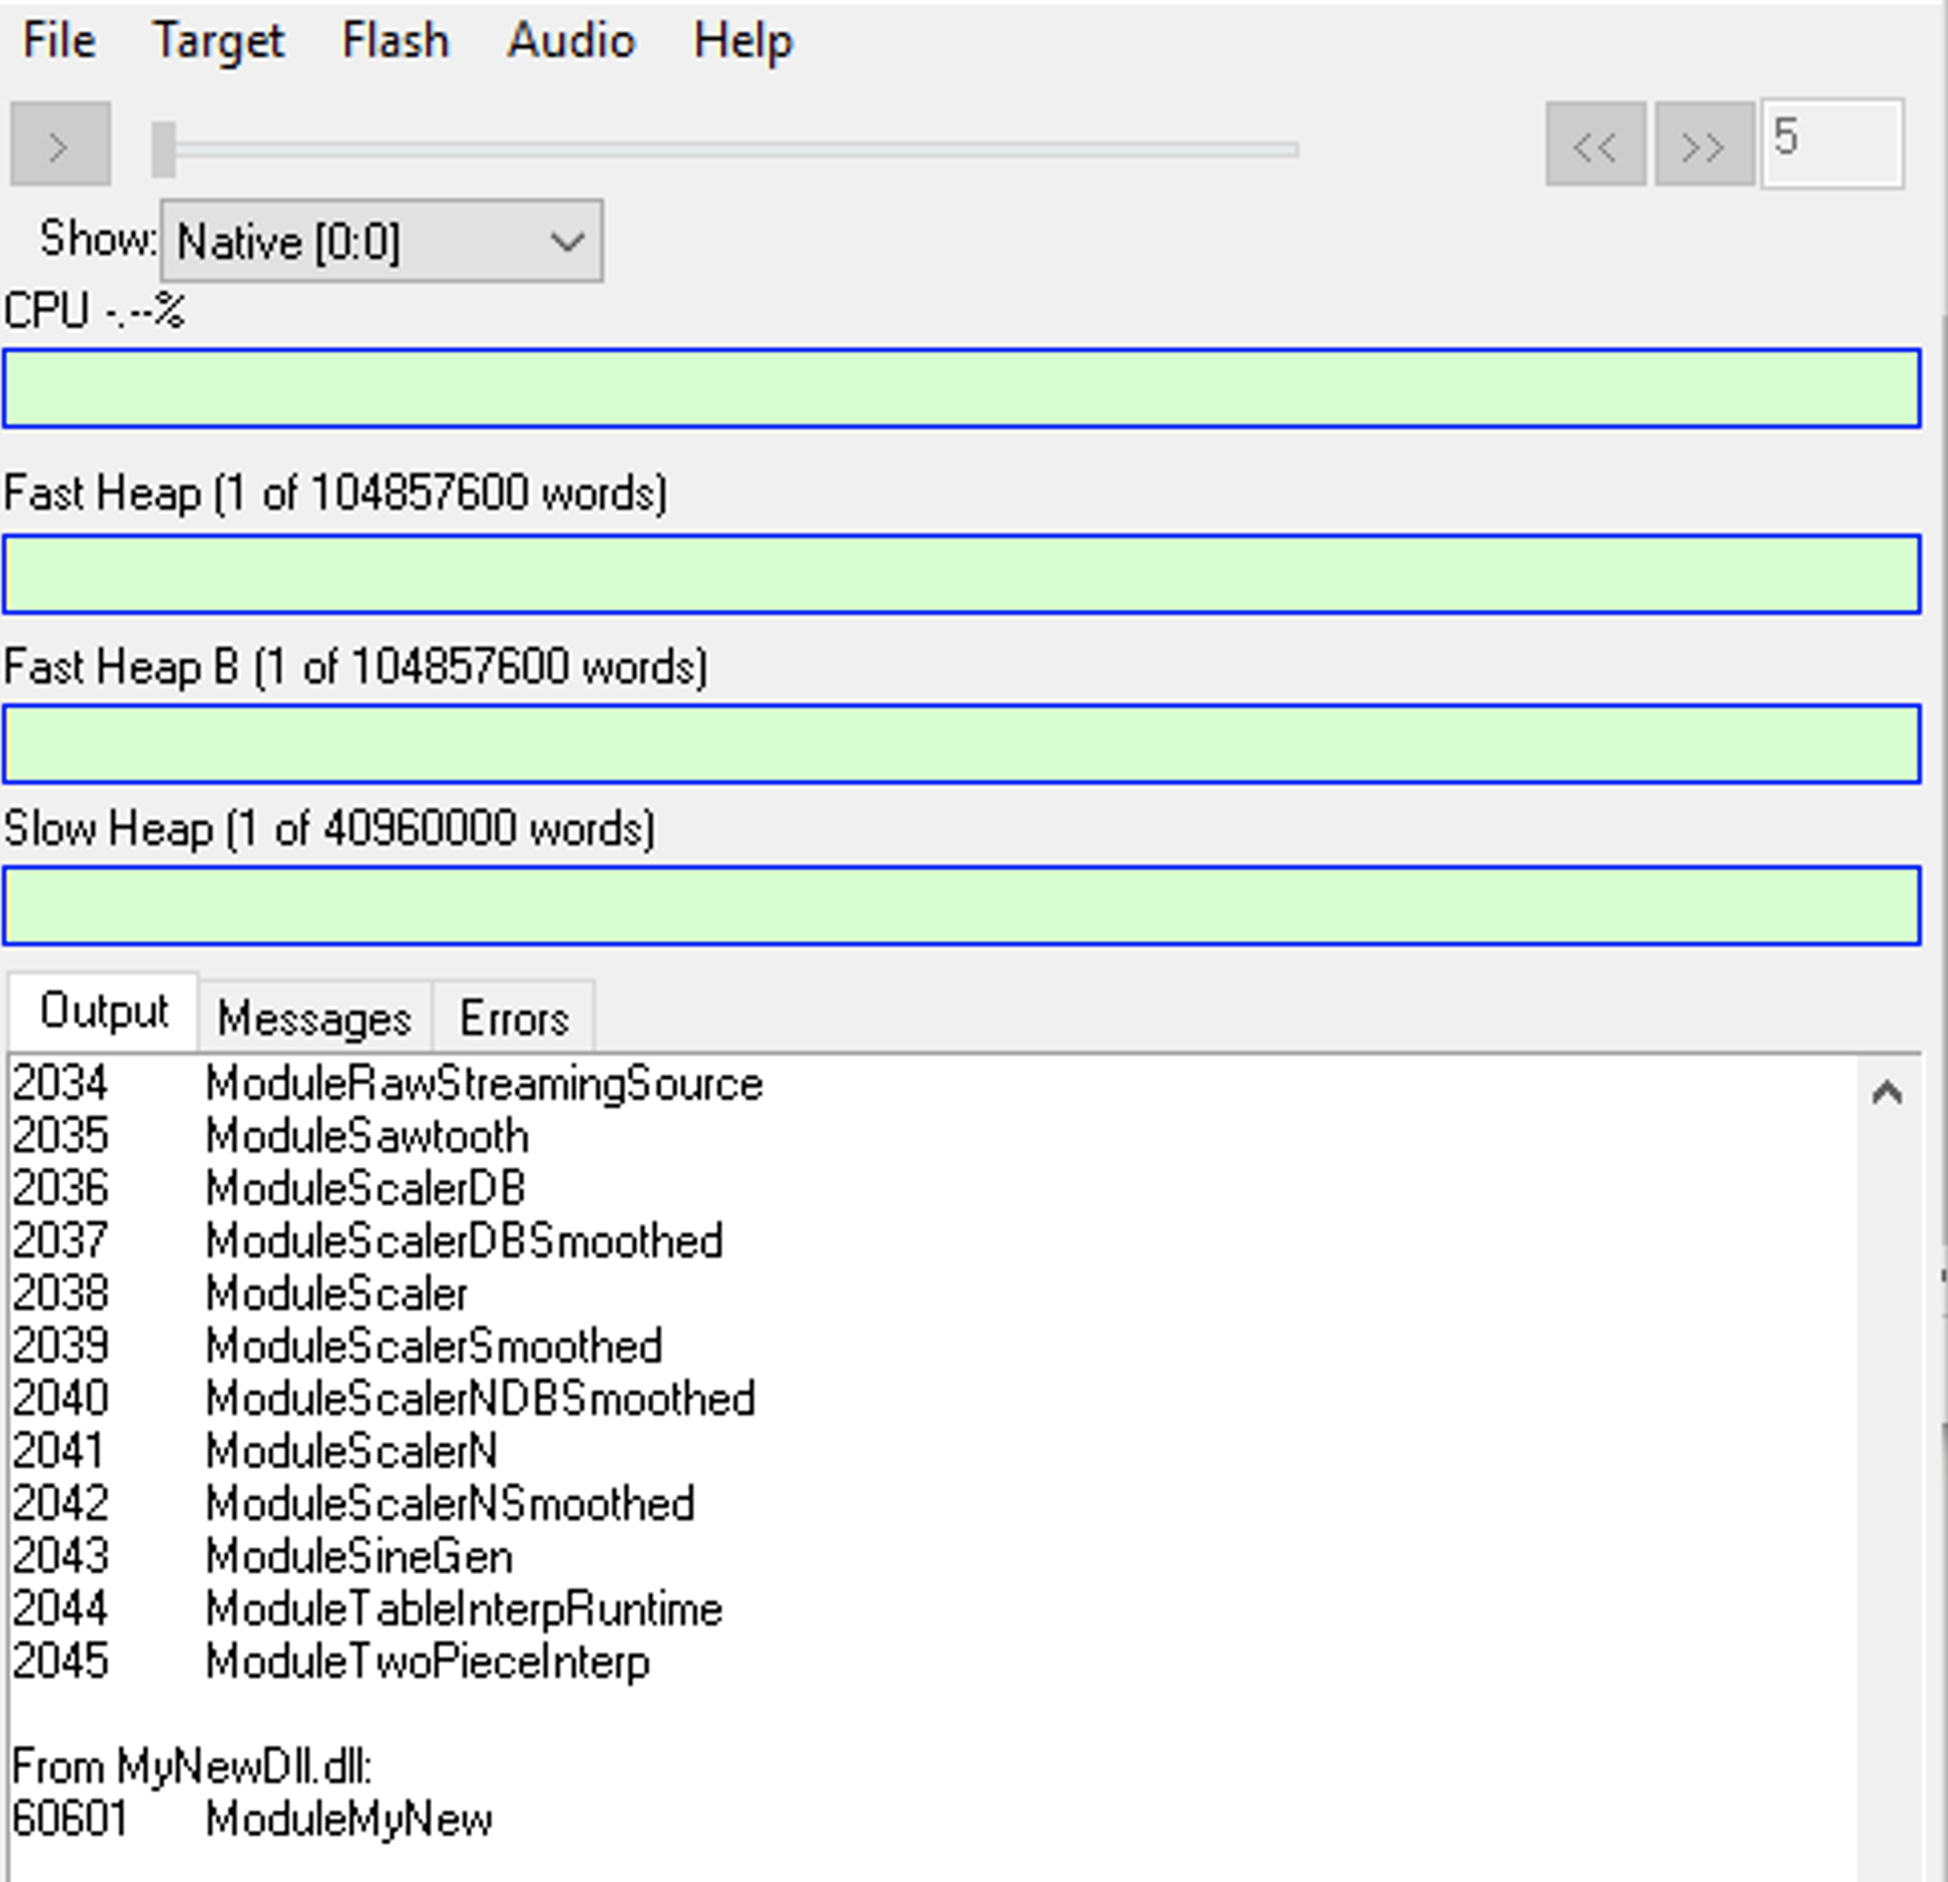
Build the .sln in x86 Release mode, and make sure the .dll file is copied to the Bin/win32-vc142-rel folder of the Designer installation. Once AWE Server is restarted, do Target → List Modules. If the new module pack is found by AWE Server, then the new module should be listed with the appropriate class ID as “60601 ModuleMyNew” is below:
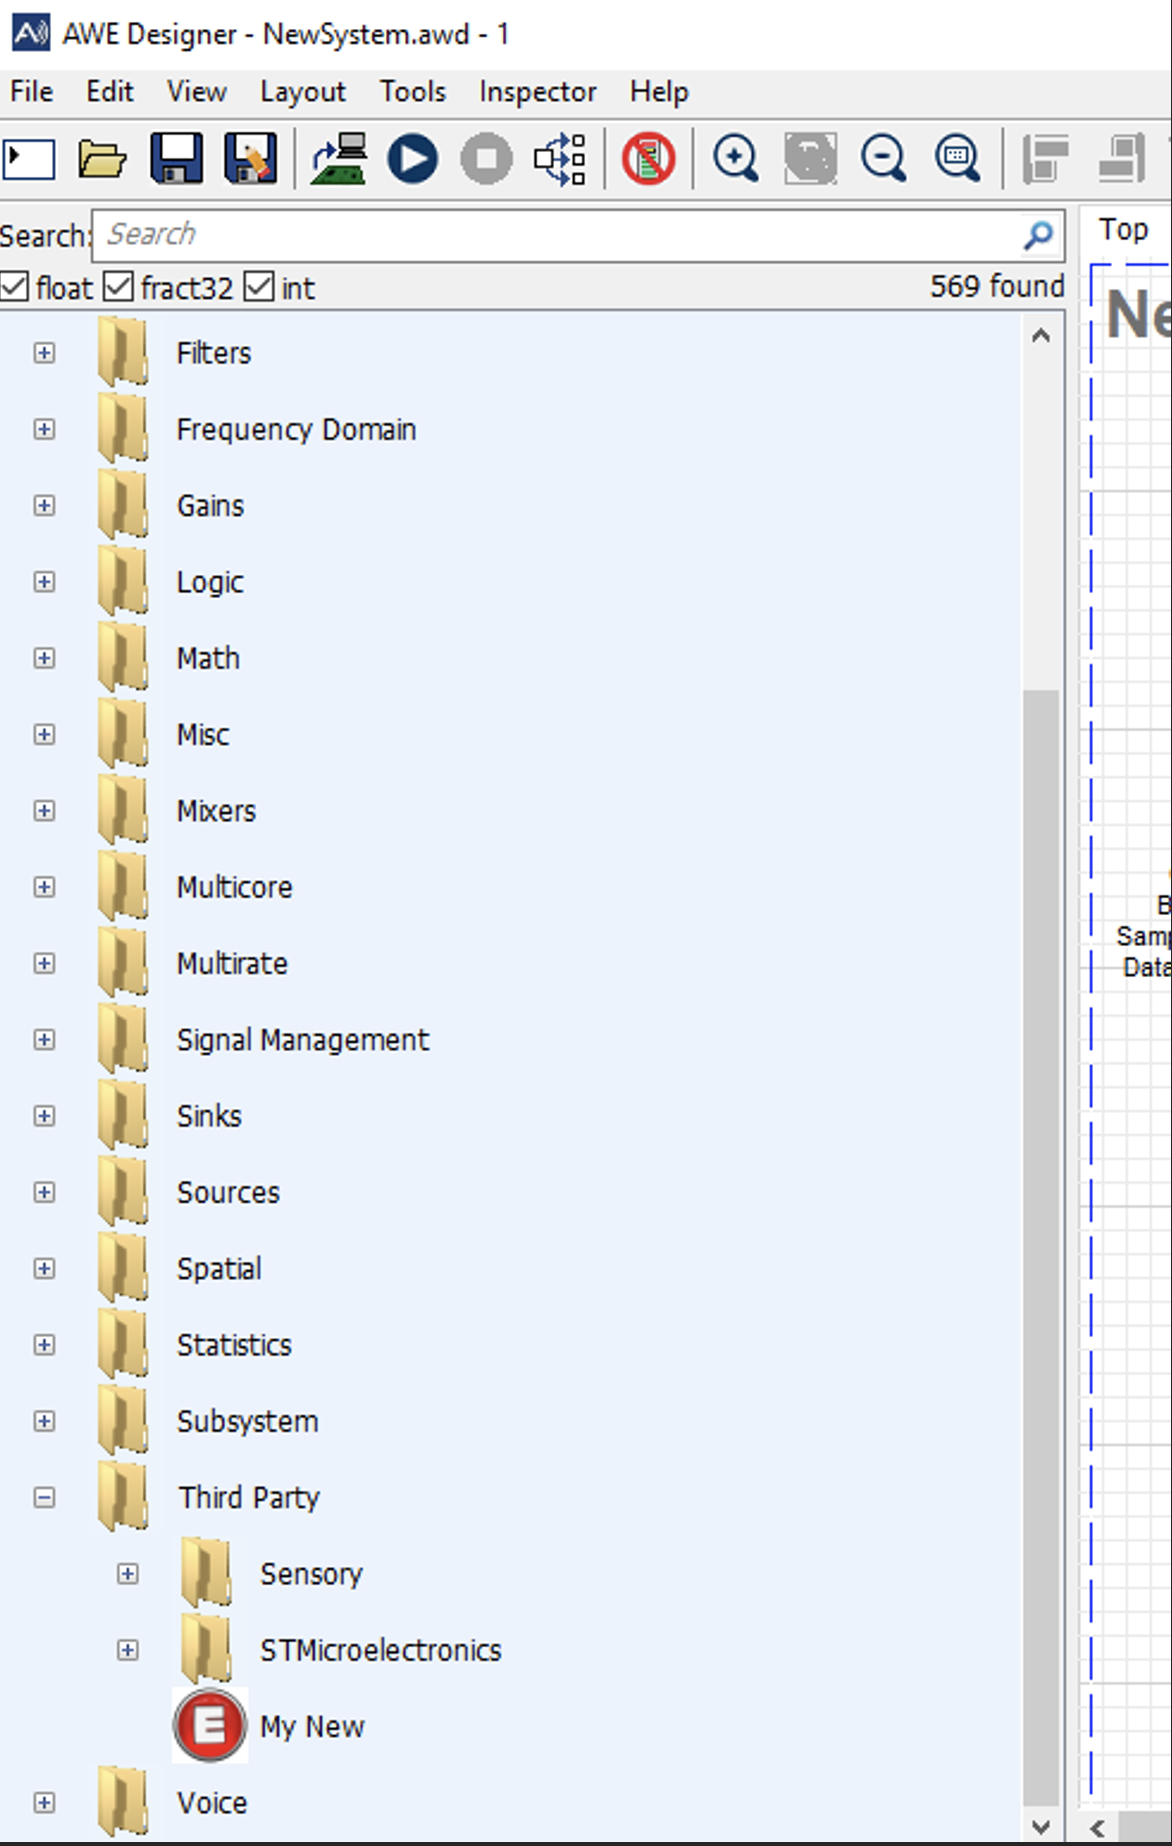
Next, start Designer and expand the “Third Party” category in the module palette on the left hand side. The new module should appear as below if the new module pack directory has been added to the Designer Module Path.
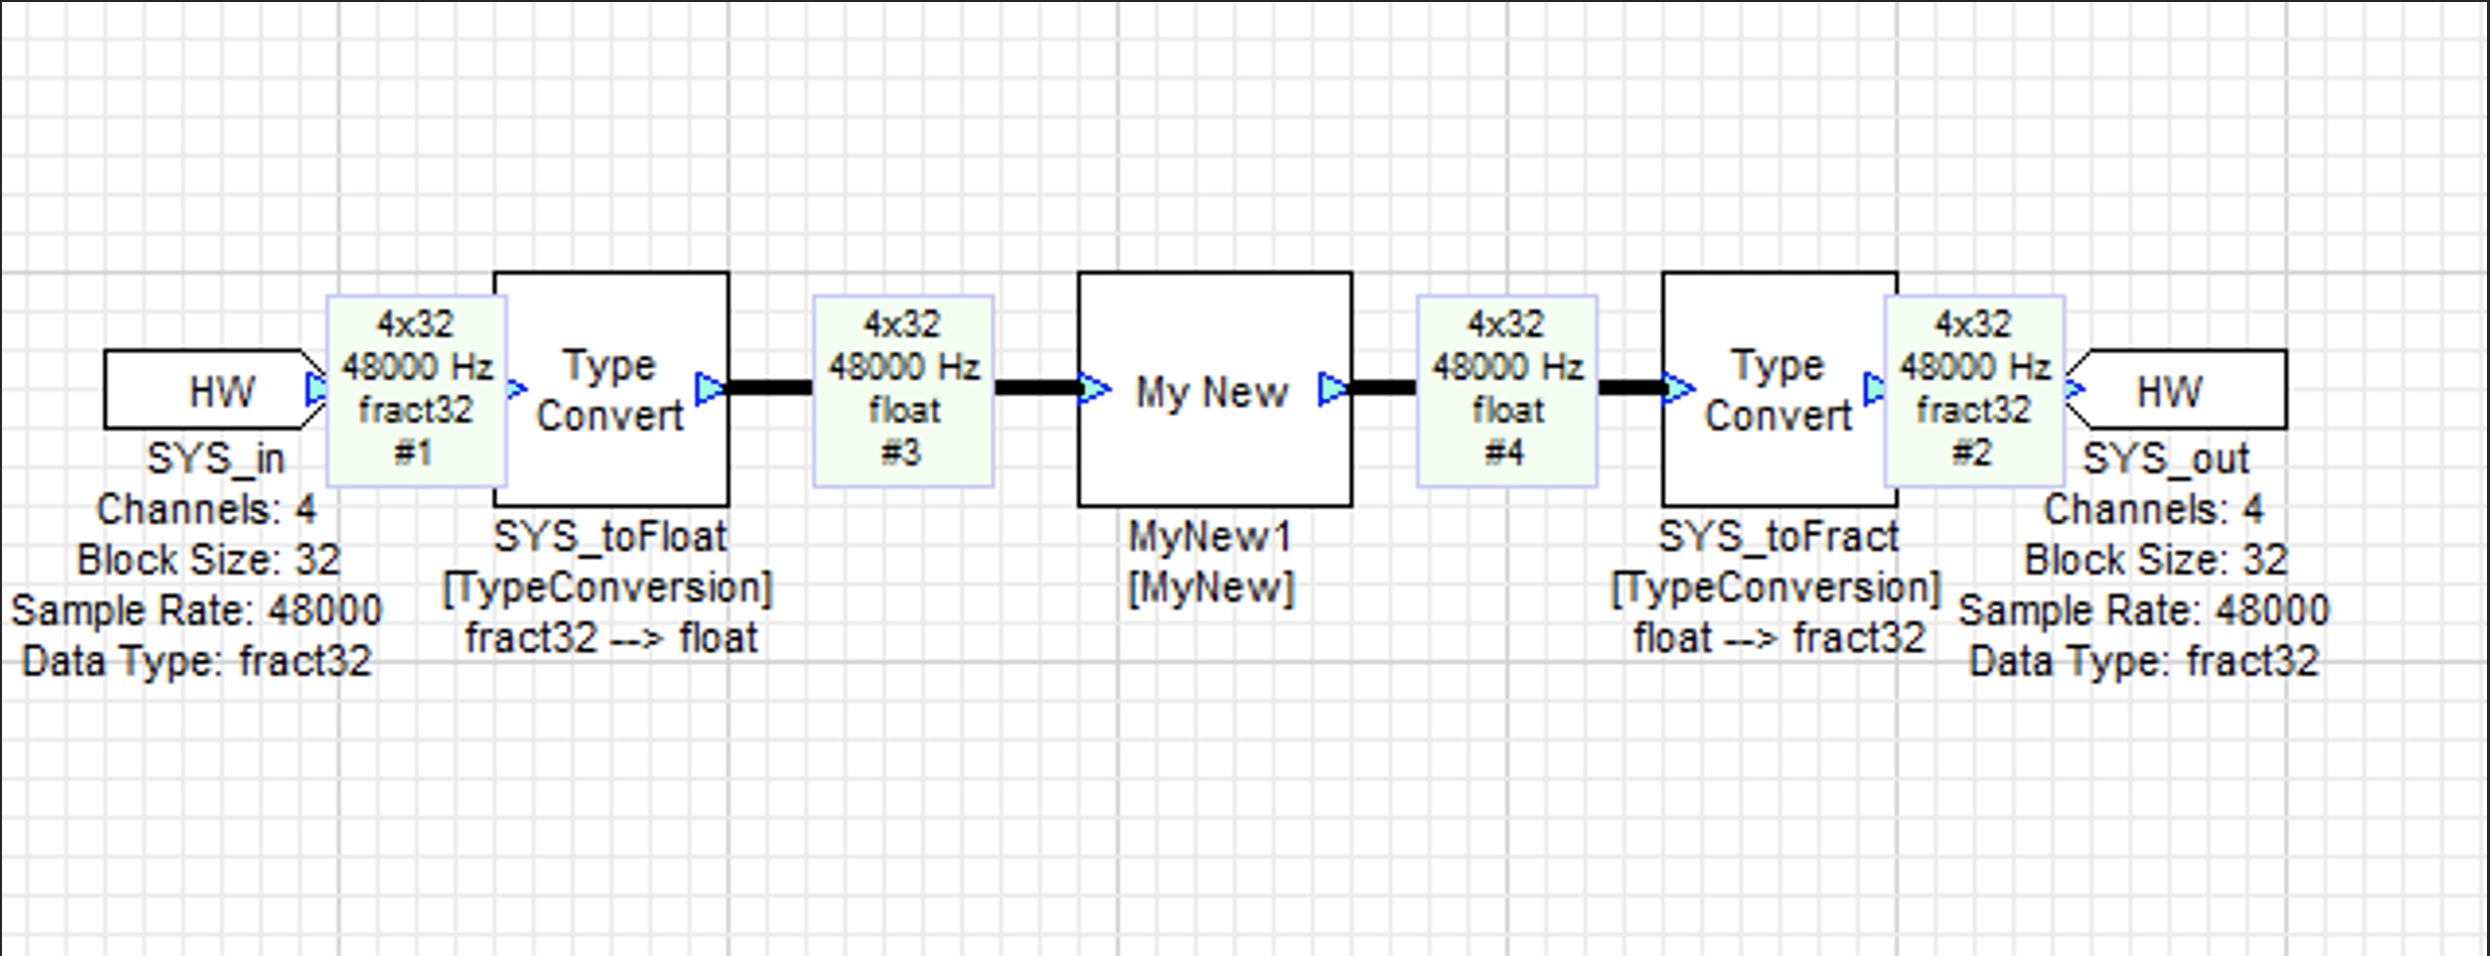
The new module can then be dragged out onto the canvas and tested with a simple layout. Module documentation can be viewed by right clicking the module and selecting ‘Help’.
Adding Module to Embedded Target
Once the new module can be discovered in Designer and run on the Native target, the module can be added to the embedded target by compiling the same Mod*.c code as part of the target’s build project. In addition to adding the new Mod*.c code to the build and making sure the necessary header files are on the project’s include path, a reference to this module class must be added to the build in order to force the linker to include the module code in the final executable. This is typically done by updating the ModuleList.h file included in the AWE Core package or reference BSP to list the new module class in the LISTOFCLASSOBJECTS macro. As an example, for the new module class ‘MyNewClass’, the following lines could be added to ModuleList.h (additions in bold):
extern const int awe_modTableInterpRuntimeClass;
	extern const int awe_modTwoPieceInterpClass;

	// Additional Modules
	extern const int awe_modMyNewClass;

	// Edit this list to prune modules from target
	#define STANDARD_LIST \
	&awe_modAGCCoreClass, \
	…

	#define LISTOFCLASSOBJECTS \
	STANDARD_LIST, \
	ADVANCED_LIST, \
	&awe_modMyNewClass
It is up to the user to determine which compiler flags are appropriate for compiling the module on a particular embedded target, though optimization flags are of course recommended. The only critical preprocessor macro that needs to be defined only for 64-bit architectures is the ‘BUILD64’ macro.
Failure to define BUILD64 in the build project for 64-bit architectures can cause the application to crash while accessing module variables using the control interface.
Once the module is included in the target firmware it will be available in Designer while AWE Server is connected to the target.
Interpreted Modules
Traditionally, custom modules created with AWE Designer Pro Edition could only be shared with other Pro users due to technical limitations. Overcoming these limitations, Interpreted Modules allow custom module authors a way to share their modules with other Designer users regardless of Edition used. By following the creation steps below, a Pro user can create an Interpreted Module using the familiar MATLAB API that will behave similarly to other Audio Weaver modules, but importantly will be installable by Pro and Standard Designer using the Setting Search Paths functionality.
Creating an Interpreted Module
The creation steps below are supplemental to the custom module creation process discussed in Creating Custom Modules.
Start by creating a Traditional Module to get the required files and folder structure of an Audio Weaver Module.
The Custom Module Pack Wizard in Designer is a great starting point for getting started with the required module files and folder structure.
As you edit the module’s MATLAB (.m) file, add the following line of code in the function:
M.isInterpreted = 1;Switching this flag to 0 will force the module to be executed as a typical MATLAB module. While this makes the module inaccessible for Standard Designer users, the Module Author may do this in order to use the MATLAB debugging infrastructure to help resolve issues with their module.
Follow the Module Creation steps as stated to get a properly functioning module, including the Module Generation MATLAB script e.g.,
make_module_pack(1)in Designer Pro Edition.Open the Interpreted Module’s Visual Studio solution and build the project. Make sure the built DLL is successfully created and in the Interpreted Module’s folder.
Share the entire folder of the Interpreted Module (including the DLL) with other Designer users.
Once shared, any user must copy the Interpreted Module’s DLL to the same directory as their AWE_Server.exe
(for example,C:\DSP Concepts\AWE Designer 8.C.2.4 Standard\Bin\win32-vc142-rel\)
Once Designer and Server are running, install the Interpreted Module to the Module Path using the Setting Search Paths functionality.
The Interpreted Module can now be dragged out from the Module Palette to Designer’s canvas, with all the same capabilities as other Audio Weaver modules.
The default location for a new Custom Module is in the “Third Party” folder. This can be changed in the MATLAB script by updating the
M.moduleBrowser.pathvalue.
Known Limitations
To make this feature compatible with both Pro and Standard Designer, there are several limitations that the module author will need to consider if this feature is right for their use case. All these limitations aim to address technical limitations without compromising the important functionality for most users.
The module must not make any references to any MATLAB functions not provided by Designer builds already. This primarily applies to functions that are not on the MATLAB path, function pointers to non-compiled MATLAB files, and external library functions not provided in Designer’s required toolboxes. An exception is made for certain custom module functions that extend the Interpreted Module’s functionality past default module behavior. The supported custom module functions for Interpreted Modules are:
copyVarFuncpreBuildFuncprepareToSaveFuncpropagateChannelNamesFuncpostBuildFuncsetFunctextLabelFunc
Any additional custom module functions available for Audio Weaver modules are not supported for Interpreted Modules at this time. Thus, they must not be defined in the Interpreted Module’s MATLAB file as it will make the whole module unusable in Designer. If you do have unsupported custom module functions in your Interpreted Module (for example, testHarnessFunc), make sure to comment the function assignment before using the module.
Because of internal technical dependencies, an Interpreted Module cannot contain any local, nested, or anonymous functions. This means that the custom module functions mentioned above must be defined in their own file, in the same directory of the module’s main MATLAB file.
An Interpreted Module cannot have any variables that start with IMODAWE_. This is to avoid a potential variable namespace collision when interpreting the module's MATLAB code.
An Interpreted Module’s module definition file or any of its custom function files cannot use variable (with MATLAB’s varargin keyword) nor suppressed (with MATLAB’s ~ syntax) input arguments. These non-standard inputs to Interpreted Modules are not currently supported.
While regular comments that fit on one line of text (starting with the % symbol) are permissible, an Interpreted Module's module definition file cannot contain multiline MATLAB comments (denoted with the %{ and %} symbols). These multiline MATLAB comments are not currently supported for Interpreted Modules.