
Subcanvas - User Guide
Overview
The Subcanvas module allows an entire layout to be embedded into a single module for use within another layout.
Main Uses of Subcanvas Modules
Allow large systems to be subdivided into individual features which can be developed by separate teams and combined by a System Integrator.
Speed up early loading of audio. Audio features can be late loaded if they are in a Subcanvas.
Support late loading of custom modules (via dynamic libraries) on early audio cores. (This is on the Snapdragon only.)
Easily incorporate 3rd party IP
IP is encrypted and the internal details are hidden.
The IP may be fully tuned by the IP developer using a new feature called message “tunneling”.
Switch IP at run-time. The system inside of the Subcanvas can be destroyed and reloaded while the overall signal flow is running. Facilitates over-the-air updates of audio features.
High Level Overview/Key Terminology
Internal IP is stored in a container file (the AWC file with .awc extension). The container file is a text file using a JSON file format. The AWC file contains the requirements of the IP (input and output I/O, heap sizes, module classes required, etc.) and this is checked at build time.
The "Parent Signal Flow" (PSF) is the overall system that contains the Subcanvas, and the PSF can contain multiple Subcanvases.
In the discussion that follows, we use the term “IP Developer” to describe the person creating the Subcanvas and the term “System Integrator” for the person using the Subcanvas.
An example PSF containing 3 Subcanvases is shown below:

Inside each Subcanvas is an entire AWD. For example, the Playback Subcanvas could contain:
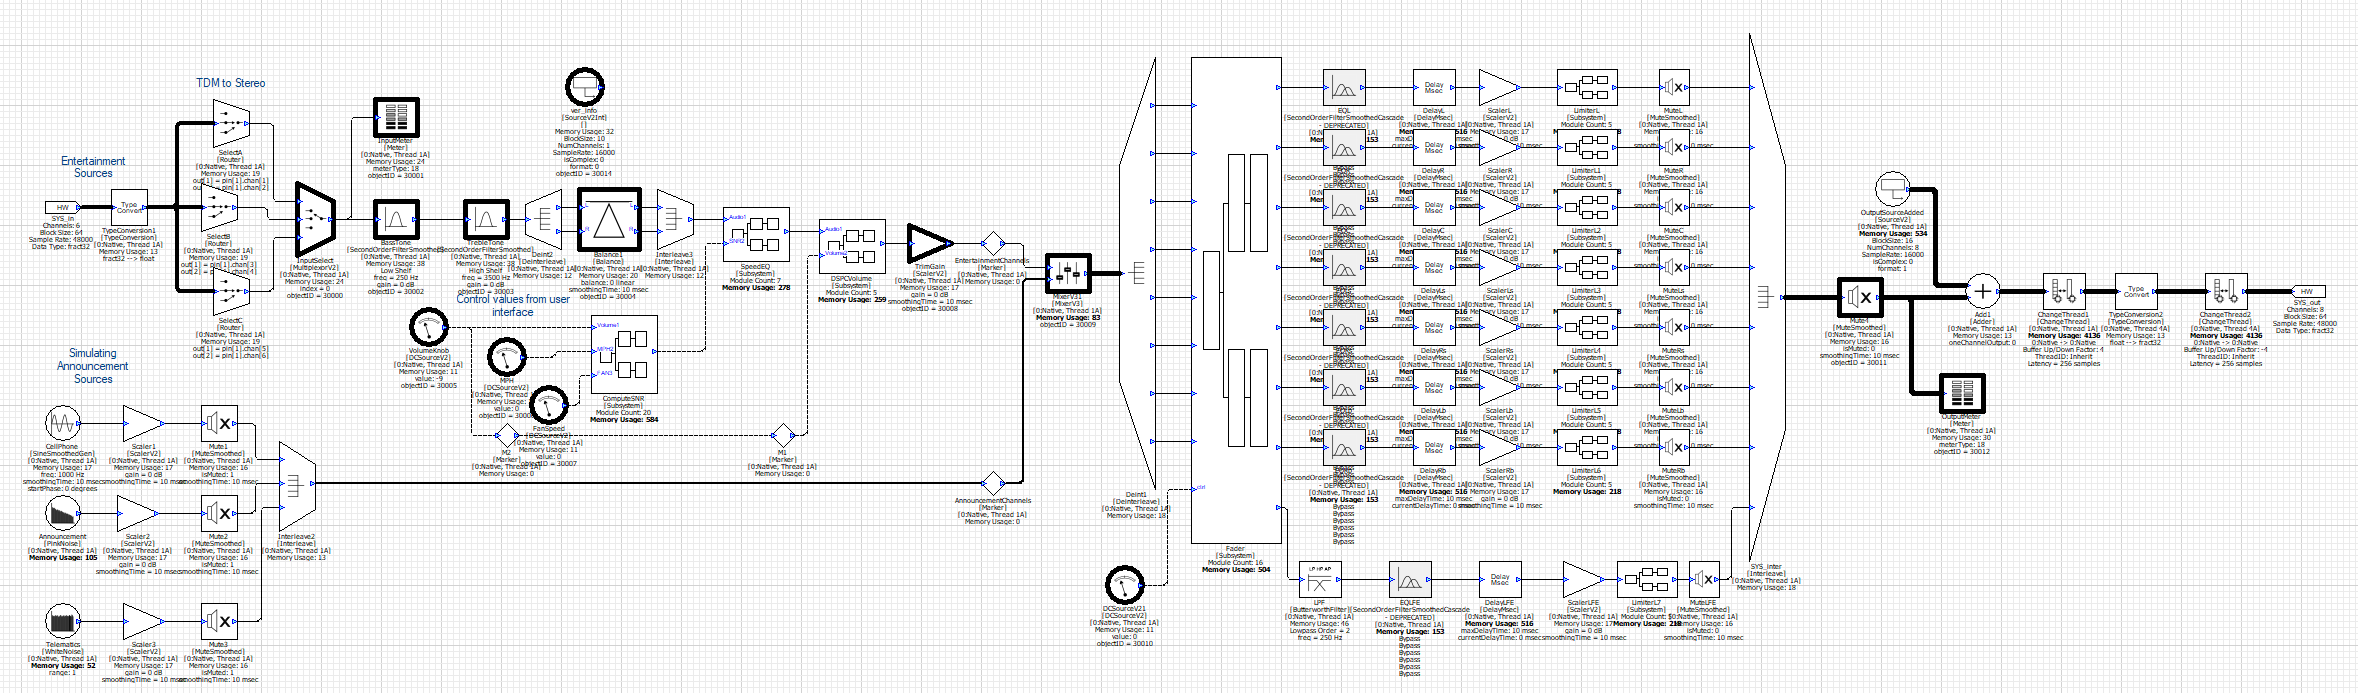
AutoAmp_Example.awd
Additional Subcanvas Features
The IP developer can determine which tunable variables should be exposed. (This variable information is included in the AWC file).
Four new modules are provided for manipulating internal variables: Subcanvas Param Set/Get and Subcanvas Array Set/Get.
The Subcanvas supports multiple threads (clockDividers). This is possible due to the fact that the Subcanvas module is actually a subsystem disguised as a module, containing hidden internal modules, like the SubcanvasWorkerThread module. Additional threads will be pumped by these SubcanvasWorkerThread modules and will appear in the overall profiling information.
Subsystem inspectors can be used to control the IP inside of a Subcanvas. This works in conjunction with the Subcanvas Array/Param Set/Get modules.
Quick Start (Most Basic Usage)
The most basic usage of the Subcanvas feature is as follows.
Create the 'Subcanvas' layout and generate the target files
Design/load a valid layout in AWE Designer. This will be the Subcanvas layout with the "hidden IP". For this example, lets use the Guitar_Tremelo_Example layout that is shipped with every version of Designer.
Generate the Subcanvas output files via Tools->Generate Target Files. Be sure to select the .AWC checkbox. The AWC file is the only required file to load the subcanvas, however an AWB file should also be generated if loading the subcanvas directly on the target
Use the Subcanvas within a Parent Signal Flow
Open another layout in Designer, this will be the PSF.
Drag out a Subcanvas module and wire it in to the PSF. Note; subcanvas IO only supports fract32
In the Subcanvas module's awc file argument, select the Guitar_Tremelo_Example.awc file that you generated in step 1

Creating a Subcanvas
The IP you want to deploy in a subcanvas starts out as a standalone AWD layout. The AWDs hardware input and outputs pins correlate to the subcanvas module’s input and output pins in the PSF. The AWD hardware I/O pins must follow the standard AWE guidelines:
Any number of channels, any block size, and any sample rate.
The input and output pins must have the same block size and sample rate
Fract32 data only
Real data (not complex)
Must have a clockDivider of 1
These restrictions may be relaxed in a future release of Audio Weaver.
The Subcanvas works both in Native mode and on embedded targets. We recommend that the Subcanvas container file is generated in Native Mode, as this enacts fewer restrictions on I/O properties.
Mark the modules you want to expose as tunable by assigning objectIDs. You can also add range information and use object aliases if you want to obscure the hierarchical names of modules and variables. (The object alias is set in the Build Tab of the module’s Property View.)
Versioning
If you want to include version information in the Subcanvas AWB, add a SourceV2Int module configured for 1 channel and a block size of 10 samples. Place the module at the top level of the layout, name it “ver_info”, and assign an objectID. Any objectID is OK.
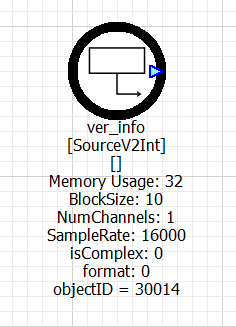

When generating a Subcanvas AWC file, the values entered in the Version Info field are populated into the first eight entries of the ver_info module. The final two entries contain the build date and build time.
Including a ver_info module allows you to validate the version of the AWB that is actually running inside the Subcanvas module. If no ver_info module is included, the version information reported by the Subcanvas module is taken from the AWC file. While this often corresponds to the currently loaded AWB, it is not guaranteed.
A common use case for a Subcanvas is to create it with an Empty layout and have the target system load the required AWB at runtime. In this scenario, the system may destroy and replace the AWB multiple times. As long as the loaded AWB fits within the Subcanvas module’s allocated heaps and I/O dimensions, it will run correctly.
When using this approach, including a ver_info module during AWC generation is the only reliable way to determine the version of the AWB currently loaded inside the Subcanvas.
Generating Subcanvas Files
Then from the Tools menu, select “Generate Target Files…”. This opens up the following dialog window. The highlighted section contains configuration settings for the AWC file.
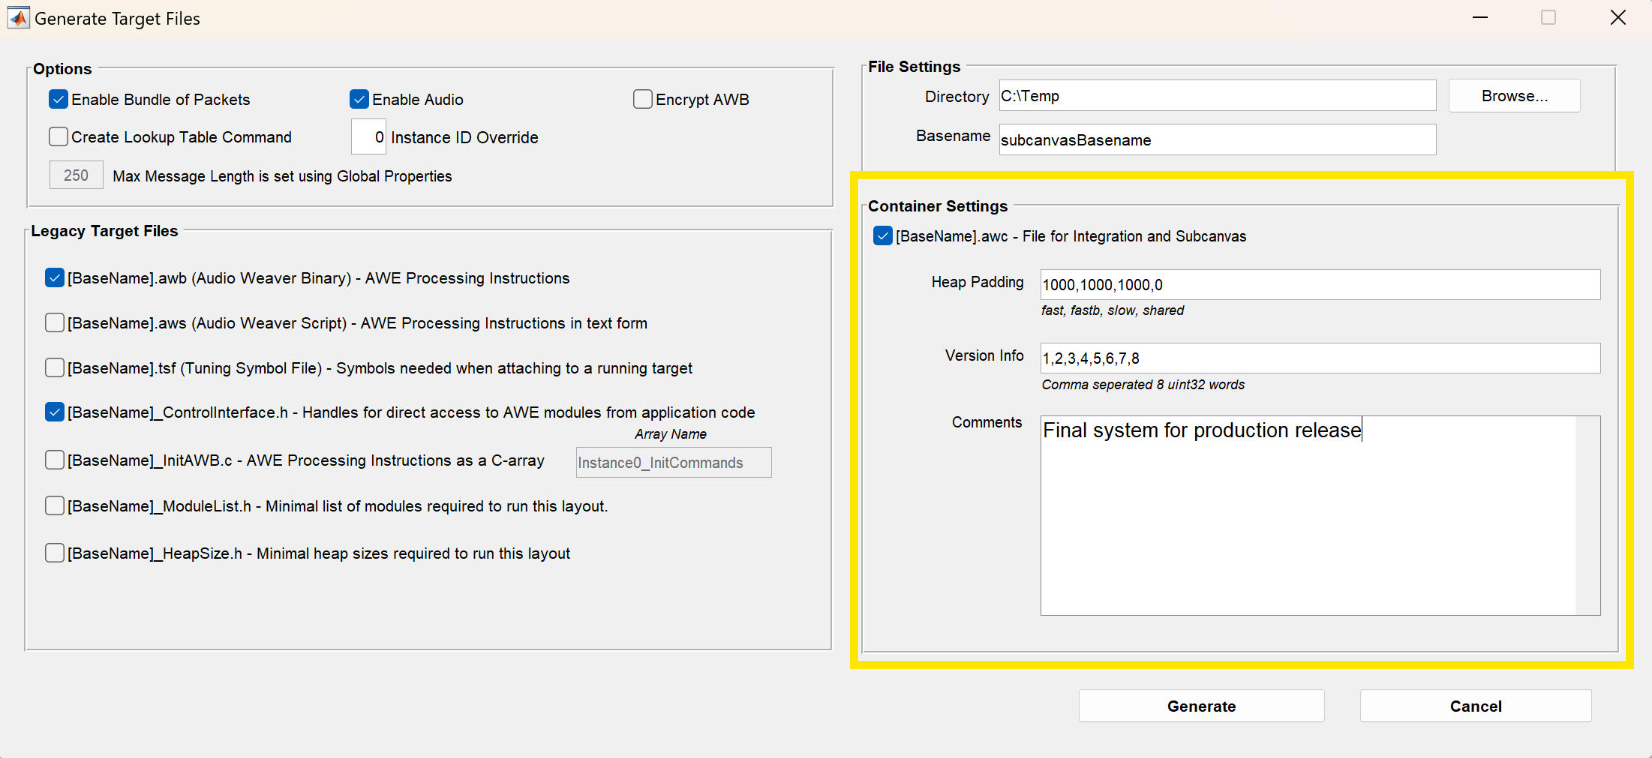
Fill in the following information:
• Heap Padding – Allows you to create the heap sizes beyond what is needed for your IP. You may have to specify padding because Audio Weaver memory allocation varies slightly between Native module and the target you are deploying the IP on. In the edit box, entire a comma separated list of 4 integers: “1000,1000,1000,0”. There are 4 values and they correspond to the Fast A, Fast B, Slow, and Shared heaps. The shared heap is unused for Subcanvases so it should be left as 0 in this case.
• Version – 8 x int32 values which can be used to mark the version information of the AWC. If there is a ver_info module in the layout, this module will be populated with these 8 version values, as well as the build data and time. See the Versioning section above. These version values must be manually updated - they do not update automatically when generating the AWC file.
• Comments – Free text which is incorporated into the generated AWC file
Other settings on this dialog window:
• Enable Bundle of Packets – Setting this to 1 causes the generated AWB to use message bundles to speed up loading of the design. We recommend setting this to 1. See the Bundle Packets page for further details.
• Enable Audio – Enables audio after the Subcanvas is loaded. If not set, no signal will actually pass through the canvas. This is almost always checked.
• Encrypt AWB – Checkbox which indicates if the AWB in the AWC should be encrypted or not. Set this to 1 if you want to protect your IP.
• Create Lookup Table Command – This adds a command instructing the AWECore library to use a lookup table to speed up finding modules based on their objectID. Enabling uses slightly more memory but can speed up loading significantly. We recommend that you always set this to 1.
• Directory – directory in which to place the generated files
• Basename – specifies the base name of the files to generate
Using Subcanvas in a PSF
Subcanvas modules can be loaded with AWE Designer, or directly “late” loaded on the target with the AWE Core and AWE Core OS API’s.
All of the modules needed for this feature are located in the “Subcanvas” module browser:
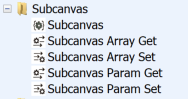
The main module is “Subcanvas” and the other 4 are used for controlling modules within the Subcanvas layout (setting/getting params). See the Runtime Control section of this page for more details on using the Subcanvas controlling module:
Drag out a Subcanvas module and wire it in. Select the AWC file of your desired subcanvas.
Input and Output Wire Properties
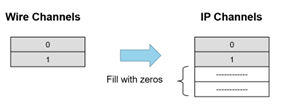
The input pin properties of the Subcanvas module are inherited from the wire that is connected. The input wire must have the sample rate and data type as specified in the AWC file. This is checked when the system is built or when the Propagate Changes button is pressed. The number of channels does not need to match and the Subcanvas performs “channel matching” at run-time as follows. If the input wire has fewer channels then the internal IP, then the unmatched IP channels are filled with zeros:
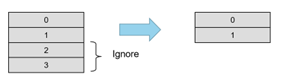
If the input wire has more channels than the internal IP, then the unmatched input channels are ignored:
The properties of the output wire of the Subcanvas are typically taken from the AWC file, or can be specified in by the “OutputIO” module argument.
The Subcanvas provides flexibility when it comes to the block size. Suppose that the internal IP has a block size of N samples. Then the input wire can have a block size of N samples, or any block size that is a multiple KxN samples. If you give it a multiple, then the Subcanvas will pump the inner IP K times for every outer block with KxN samples. This is the first time that Audio Weaver has been able to process audio at a block size smaller than the fundamental block size of the system. In all cases, the output block size of the Subcanvas will equal the input block size.
Early Loading vs. Late Loading
One of the powerful features of the Subcanvas module is the ability to "late load" the subcanvas AWB after the PSF is already running. This is opposed to "early" loading which is when the subcanvas is loaded alongside the PSF.
Early vs late loading behavior can be set with the Subcanvas "loadNow" module variable.
In both cases, all of the memory used by the Subcanvas module is allocated when the PSF is built, with the heap sizes defined in the subcanvas AWC file. Even if the AWB is late loaded, the internal heaps used by the Subcanvas will be allocated from the overall system heaps when the PSF is built. You will see this information when you profile the overall system.
Early Loading
When you early load the AWB, the loading happens as part of the post-build step of the Subcanvas module. This happens at the very end of the build process for the overall signal flow. The AWB commands used to initialize the Subcanvas will be contained in the AWB file of the PSF. This means that the layout inside the Subcanvas will be initialized and will start pumping at the same time as the rest of the PSF.
When early loading a Subcanvas, the post-build function of the Subcanvas module calls the function load_container.m.
Late Loading
The AWB can be late loaded on the target using the AWE Core API’s, or on the PC by using the Matlab script load_subcanvas.m. The syntax is:
load_container(M, AWC_FILE_PATH, VERBOSE)
where M is live Subcanvas module running on the target, AWC_FILE_PATH is the full path to the corresponding AWC file, and VERBOSE is a flag specifying if logging information should be generated. A typical usage is:
% Fetch the overall GSYS object from Designer.
GSYS = get_gsys(‘MyDesign.awd’);
load_container(‘GSYS.SYS.Subcanvas1’, ‘c:\filepath\auto.json’);
The Subcanvas AWB can also be late loaded on the target BSP itself using the subcanvas load API functions. See the AWE Core Embedded Target – Late Loading section below for details.
Subcanvas Presets
Preset AWBs can be applied to a Subcanvas, just like any other layout. Generate the preset AWBs for your Subcanvas, and load them onto the PSF's Subcanvas module with the loader APIs (ex: awe_loadSubcanvasAWBfromArray, etc)
Subcanvas Validation
Designer does internal subcanvas validation to be sure that the custom IP will fit.
Are the I/O pins properly configured?
Are the heaps large enough?
Are all module classes present?
Are the threads properly configured?
Does the AWB file checksum match?
Subcanvas Subblock Support
The Subcanvas has some flexibility with how block sizes are handled. Define:
OBS = Outer block size (of the wire connecting to the Subcanvas module)
IBS = Inner block size (block size of the IP in the container)
If (OBS == IBS), then this is the easy case. The inner instance is pumped once every time that the Subcanvas module’s process function is called.
If (OBS = N x IBS), then the inner instance is pumped N times every time that the Subcanvas module’s process function is called. (We call this Subblock Pumping. It allows processing inside of Audio Weaver at a block size that is smaller than the fundamental block size of the system.)
It is not allowed to have IBS = N x OBS. Use a ChangeThread module to accomplish this.
AWE Core Embedded Target – Late Loading
If late loading is not required, no special actions must be taken when loading the PSF layout on the BSP. The subcanvas layout is loaded into the module in the PSF AWB itself, using the regular awb loader API’s.
If an integrator wishes to late load a subcanvas on the target with the PSF already running (“late-loading”), the AWE Core public API provides the following functions
• awe_loadsubcanvasawbfromarray
• awe_loadsubcanvasawbfromfile
• awe_loadsubcanvasawbfromFlash
With the PSF running, use one of these loader API's to load the subcanvas AWB into a valid subcanvas module classID.
ret = awe_loadSubcanvasAWBfromArray(&aweInstance, AWE_Subcanvas1____SC_ID, AWBCmds , AWBCmds_Len, &position);
Note that the subcanvas module must be set to isTunable, because the classID of the subcanvas module is required for loading.
A running subcanvas can also be destroyed by loading an AWB containing only the PFID_Destroy command into the subcanvas module.See the code excerpt below
UINT32 destroy = AWE_DESTROY_CMD;
ret = awe_loadSubcanvasAWBfromArray(&aweInstance, AWE_Subcanvas1____SC_ID, &destroy , 1U, &position);
The ControlApp example also demonstrates late loading, subcanvas destruction, and value set/getting.
See the ControlApp Example for usage.
Runtime Control
The Subcanvas feature contains four modules for controlling the internal IP at run-time. These modules are similar to existing Audio Weaver modules (like Array Set, Param Set, etc.) but manipulate the modules running inside of the Subcanvas.
SubcanvasParamSet
This module sets a single value inside of the Subcanvas. The value can be a scalar or a single value of an array.
SubcanvasParamGet
This module reads variables from the internal system contained in the Subcanvas and writes them to a control pin.
SubcanvasArraySet
This module is used when you want to write multiple array values from a wire into an array variable inside of the Subcanvas.
SubcanvasArrayGet
Reads values from an array inside the Subcanvas.
Tunneling and Attaching
Suppose that the IP contained in the Subcanvas module needs to be tuned. Or maybe it doesn’t sound right and needs to be debugged. This can be achieved using a new feature called “tunnelling”. Assume that the Server is attached to the running target and that the top-level Parent Signal Flow containing the Subcanvas is loaded. First, to Tools->Detach from Target in the PSF layout in Designer. Then in the AWE Server, select the File🡪SubCanvas Tunneling menu item. This will bring up the tunneling dialog shown below:
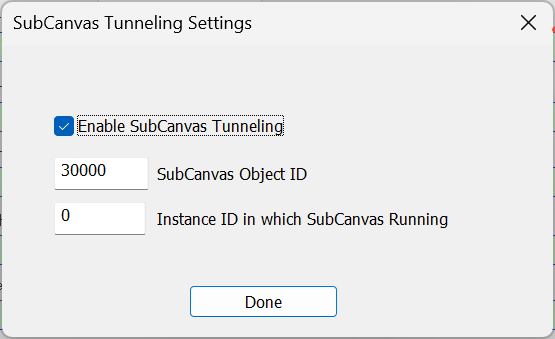
Check “Enable Subcanvas Tunneling” and enter the objectID of the Subcanvas module (this equals the objectID of the Subcanvas Subsystem module shown in the Designer canvas). Also specify the Instance ID if the Subcanvas where the Subcanvas is executing. Click “Done” to finish.
At this point, all tuning messages from the Server (and Designer) will sent to the AWEInstance which is in the SubcanvasInternal module. You now have complete control of the processing in the Subcanvas and could for example:
• Attach to the running instance without disturbing it. (This requires that you have the TSF file corresponding to your Subcanvas).
• Tune variables and examine level meters
• Update the signal flow and build and run without changing the PSF.
• Obtain detailed profiling information
Sample Table | Sample Column | Column 2 |
|---|---|---|
here’s some text | more text | lots more text |
al;sdkfj | q;slkdfjklj | ;laskdfj;lksdf |