
AWE Designer Tools
Generate Target Files
Audio Weaver can generate “Target Files” that can be used with an AWE Core integration. For example, you can compile your Audio Weaver layout to an AWS file which will be a list of all the Server commands that make up a design.
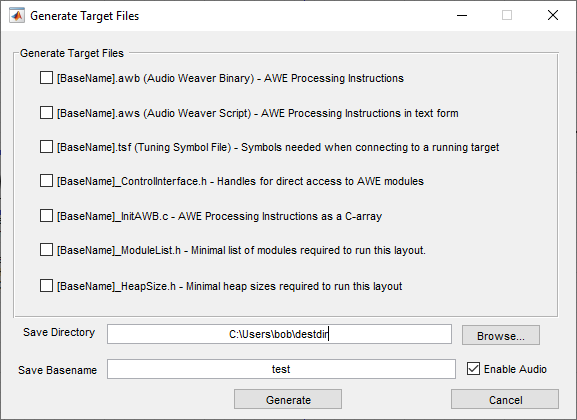
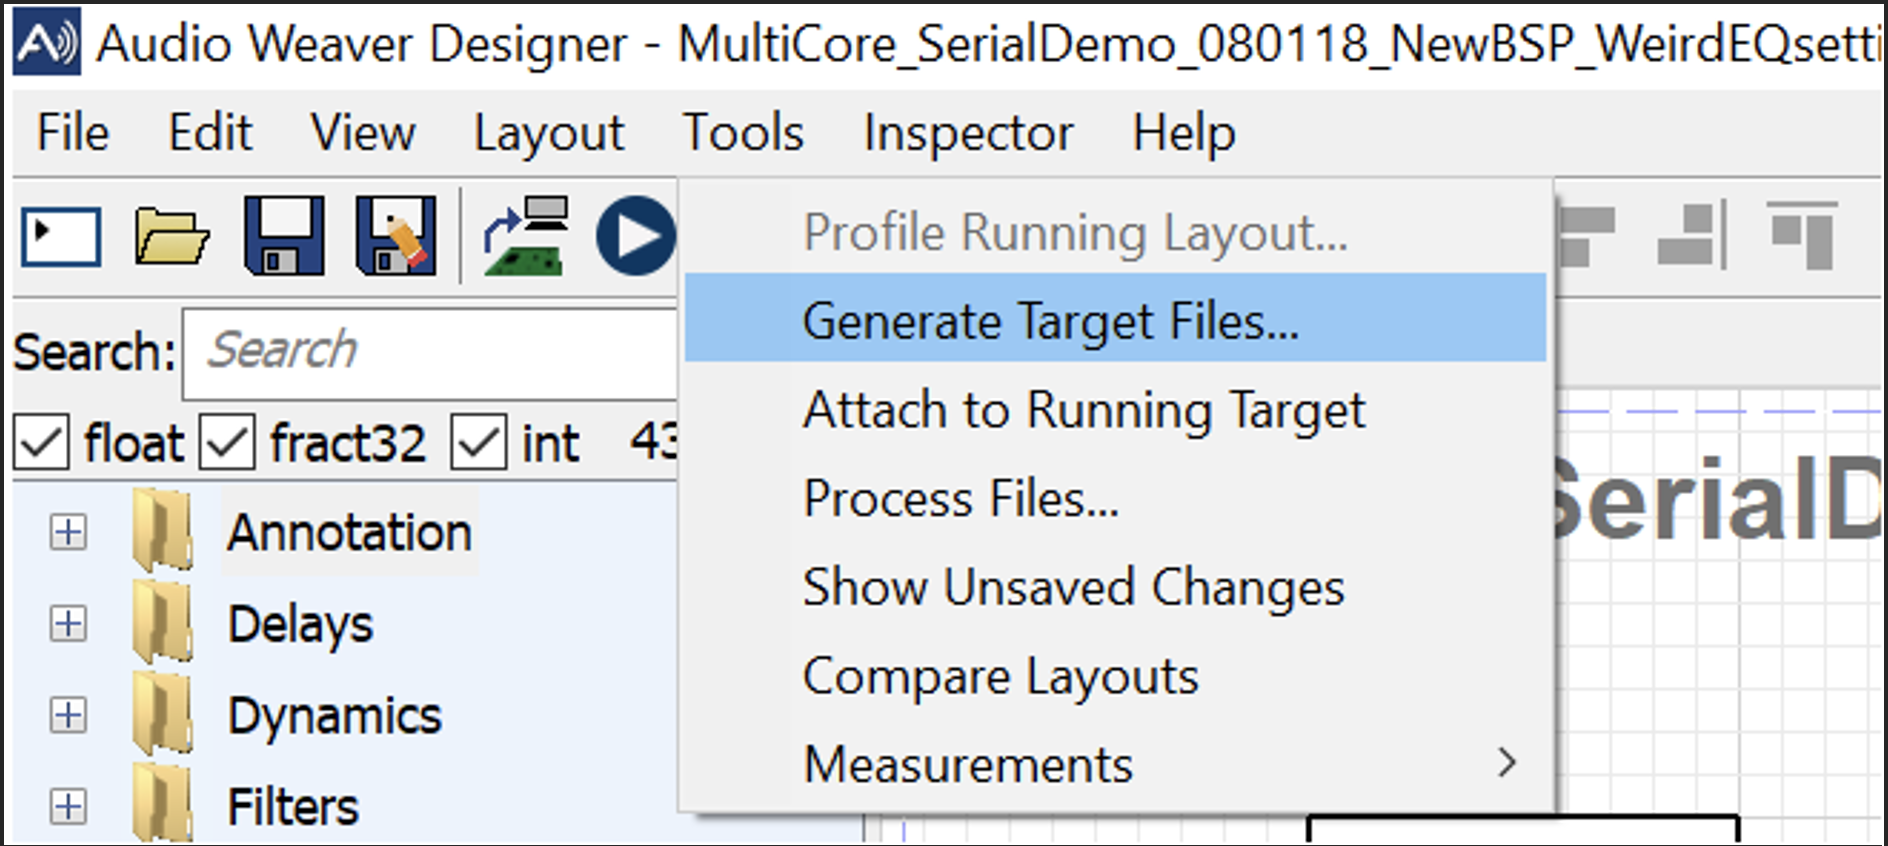
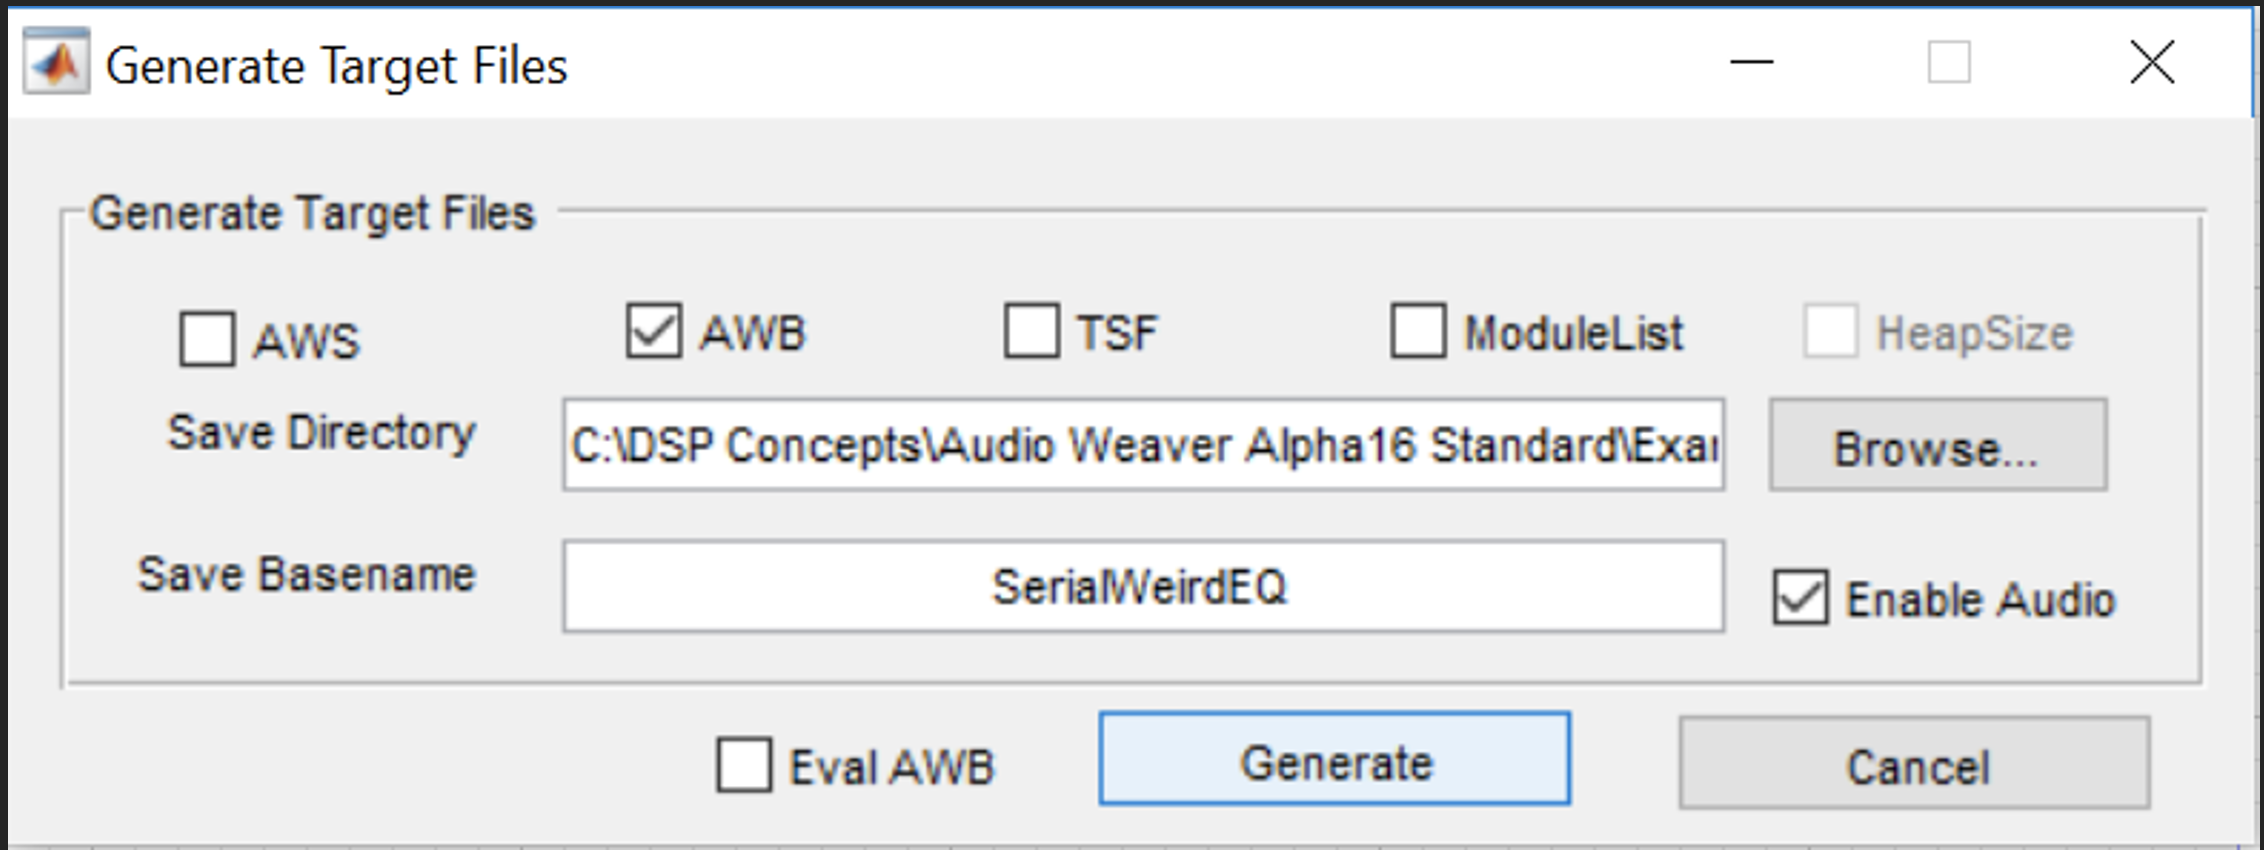
To generate target files, first create a valid design and then select the ‘Tools → Generate Target Files’ menu item. A dialog box will appear and prompt you to choose which files you would like to generate, and where you would like to put them. The “Enable Audio” checkbox will append an audio_pump command to your AWB and AWS in case you want to load the design but start the audio processing with a separate server command (for example, start the audio when a button is pressed).
Target File | Description |
|---|---|
[BaseName].awb | AWB stands for Audio Weaver Binary. An AWB is a compiled binary version of a layout and can be loaded directly on-target. AWB’s are most commonly used in production, as they can live directly on the target without any interaction with the PC. |
[BaseName.aws] | .AWS stands for Audio Weaver Script. The AWS is the set of plain text commands that makes up an Audio Weaver layout. An AWS can be compiled into an AWB, or can be executed through the Audio Weaver Server. |
[Basename].tsf (Tuning Symbol File) | TSF stands for Tuning Symbol File. TSF Files contain the symbols needed when connecting to a running target. See the “Attach to Running Target” section for more details. |
[Basename]_ControlInterface.h | The Control Interface file contains handles for direct access to AWE modules via the AWE Core Control Interface API’s. Note that symbols are only generated for modules with assigned custom objectIDs. See the “Control Interface” section of the AWE Core API for more detail. |
[Basename]_InitAWB.c | The InitAWB file is the AWB represented as a C array. Two files will be generated (H file and C file). The AWB C array can be loaded directly on target via the AWE Core API. |
[Basename]_ModuleList.h | The ModuleList.h file contains a list of modules used in a layout. This allows a BSP author to build an AWE Core target with only the minimum set of modules required by a production layout (greatly reducing the memory footprint from unused modules) |
[Basename]_HeapSize.h | Minimum heap sizes required to run this layout. This allows a BSP author to build an AWE Core target with the exact amount of heap memory for a given layout. Due to potential differences in memory requirements for each platform, HeapSize.h may not be portable between targets. |
For more information about how to use these target files, please see the AWE Core 8 API Quick Start.
Attach to Running Target
If a target BSP uses AWE Core to locally load an AWB, Designer can still connect to the target and manipulate that layout without interrupting the ongoing processing. This can be extremely useful for troubleshooting, and is referred to as “Attach(ing) to a Running Target”
In order to “Attach to a Running Target”, the following conditions must be met
A tuning interface must be correctly implemented on the target BSP. (Some production-state BSPs will load a static AWB, but omit the tuning interface…this would preclude attachment)
A user must have corresponding AWD and TSF files for the exact AWB loaded on the target. This means that the AWB and TSF files must be generated from the exact same AWD/AWJ. Any differences in TSF/AWB/AWD files will cause unexpected behavior.
To Attach to Running Target,
Load the AWD and generate the TSF and AWB (or AWB array) files using Designer’s “Tools/Generate Target File” menu item. Minimize/close designer.
Load the generated AWB on the target via the AWE Core API loader functions.
With the layout successfully running, open AWE Server and connect to the target’s tuning interface.
Reopen the AWD in Designer, but do not run the layout. Instead, select “Attach to Running Target” from the Tools menu. The dialog will prompt for tsf file. Select the tsf generated from step 1. Remember, all these files must come from the same original AWD.
The layout on the target can now be tuned as if you had loaded it via Designer.
When you are done tuning, the target can be detached by selecting Designer’s “Tools/Detach from Target” menu item.
Module Testing
The Module Tests are used to verify that modules are properly implemented on a connected target. There are two types of tests that can be run from the Tools -> Module Tests menu: Regression Tests and System Tests.
Regression Tests are used to validate the implementation of each module on the target by processing generated input data and comparing it to a known output, usually generated by MATLAB. By selecting any of the “Module Pack” options, the regression tests can be run on the connected target for all the selected modules.
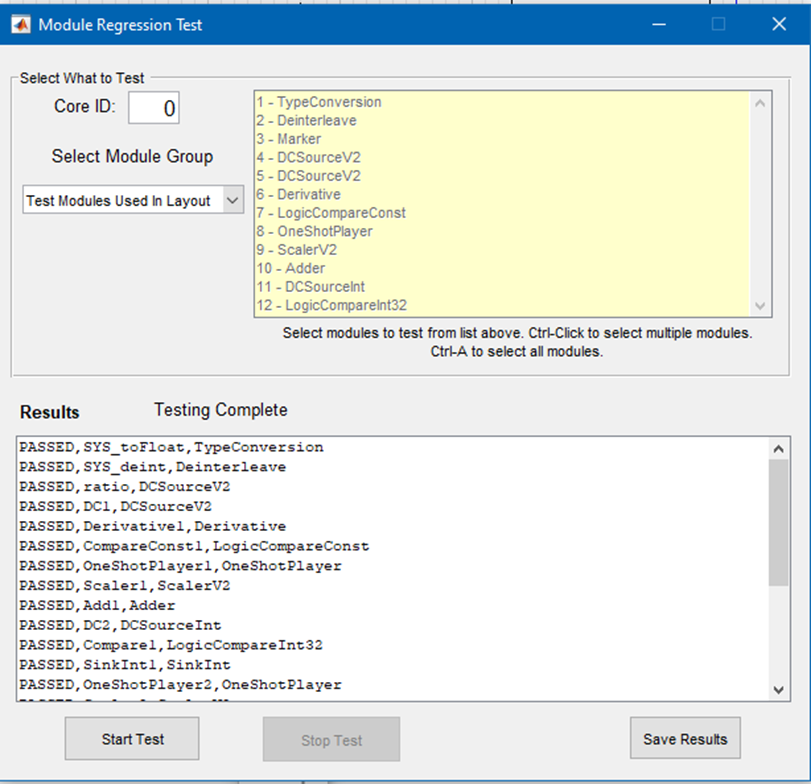
System Tests are used to validate that each module behaves as expected on the target, as configured in the layout. To run the system tests, select “Test Modules Used In Layout” from the menu.
The “Select Module Group” dropdown is used to choose the type of test or group of modules to run, and specific modules can be selected or de-selected using the generated table in the tool.
For multi-instance targets, the ‘Core ID’ (aka Instance ID) field can be used to select which AWE Core instance to run the tests on.
After selecting the “Start Test” button, the tests will be executed and the results will appear in the “Results” pane. The results can be saved to a CSV file using the ‘Save Results’ button.
Real-Time Profiling
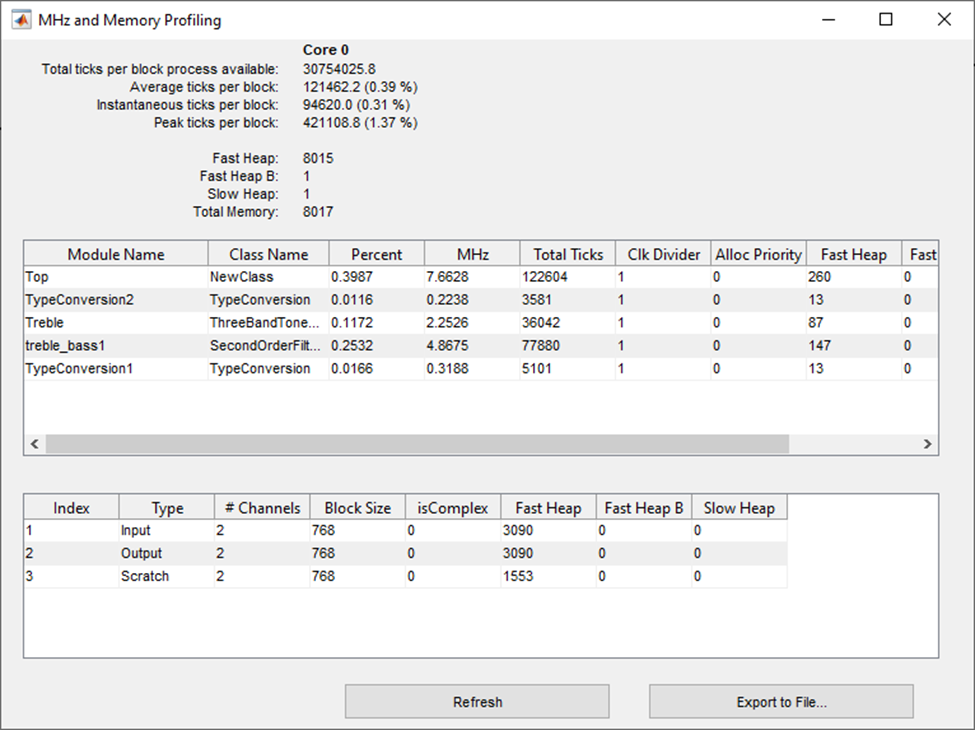
When a layout is running, its computation and memory usage can be measured by selecting the ‘Tools 🡪 Profile Running Layout’ menu item. This will pop up a dialog displaying fine grained profiling information for the entire layout and for each module.
Manual Profiling
In addition to the real-time profiling offered by Profile Running Layout menu, Designer also provides the ‘Tools 🡪 Manual Profile Layout’ tool. The Manual Profiling tool manually pumps each sublayout in a design with tuning commands, which does not rely on any real-time audio interrupts. Collecting data in this way allows for more accurate profiling in certain situations:
Multi-rate Layouts (multiple clockdividers). Because each clockdivided sublayout is typically called in its own thread, the pre-emption of lower priority threads can introduce double-counting while profiling a multi-rate layouts in real time. This can lead to over-estimates of CPU load for sublayouts. Manual profiling pumps each sublayout independently so no pre-emption can occur.
If a layout is exceeding 100% CPU load. Traditional profiling can be inaccurate in this case since audio frames are being missed and not counted towards overall cycles. Since there is no timing requirement when manually pumping layouts, manual profiling can provide accurate CPU loads greater than 100%.
If real-time audio is not available on the connected target. This happens most often when the firmware for the target is still under development, but the CPU load required by a layout needs to be known. Only a tuning interface is required on the target for the Manual Profiling tool to measure CPU load.
Additionally, the Manual Profiling tool allows the user to input an audio file in order to profile the layout under specific scenarios. Both real-time and manual profiling results can be saved to file for later use using the ‘Export to File’ button. Results will be refreshed using the ‘Refresh’ button.
Show Unsaved Changes
To see all the changes since the last save, select ‘Tools Show Unsaved Changes’ for a display using the diff tool the you set in the ‘Global Preferences’ Dialog.
Compare Layouts
Two layouts can be compared by selecting the ‘Tools → Compare Layouts’ menu item and selecting the AWD files associated with the layouts.
Diffing Systems
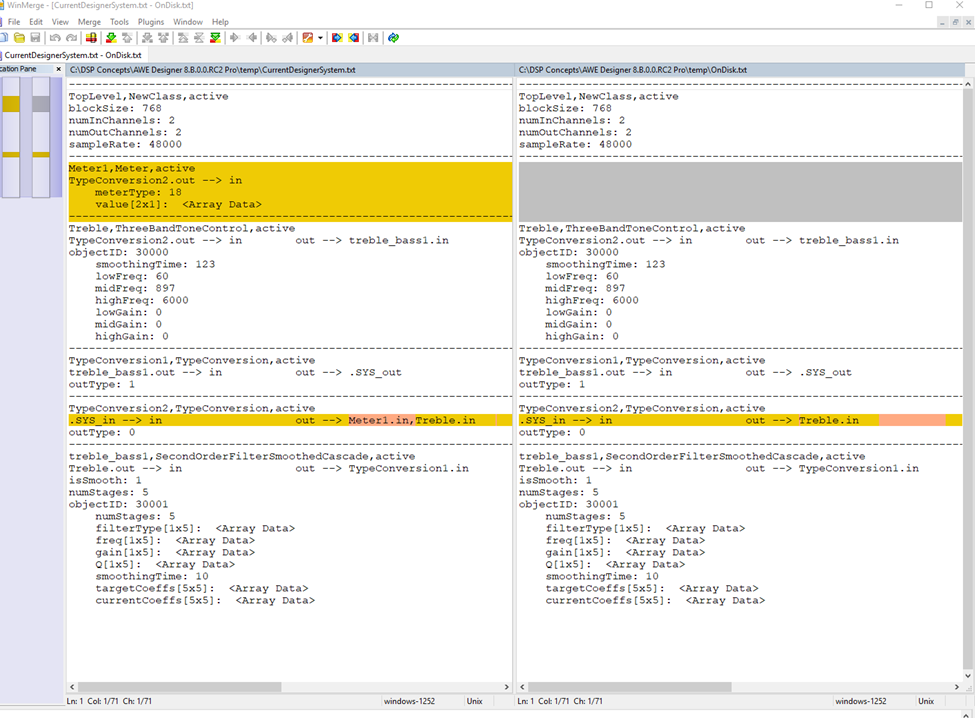
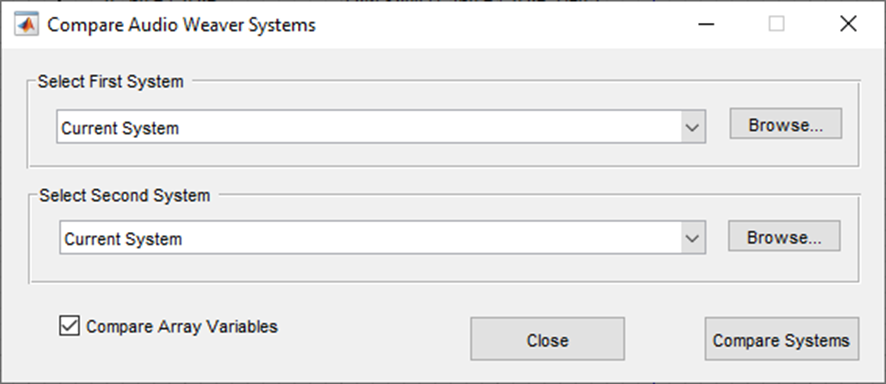
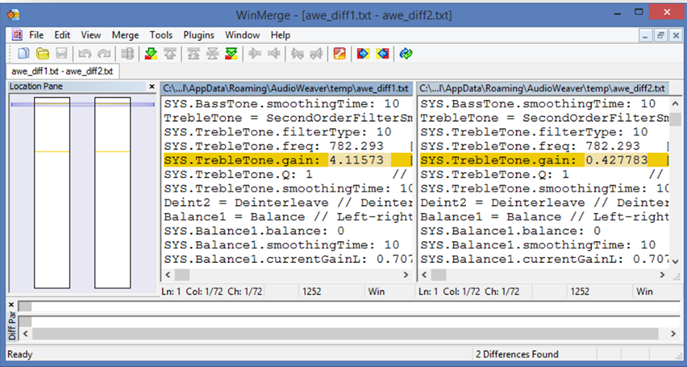
Audio Weaver layouts can also be compared using a ‘diffing’ capability. This can be useful for example to figure out changes between different versions of a layout during the design and tuning process. This functionality requires a Diff tool like WinMerge, to be installed. First specify your Diff tool under the ‘File → Global Preferences’ menu item, then use the menu item ‘File → Compare Systems’ to make the comparison between two different layouts.
Another way to diff systems is to save the layouts in AWJ format. Because AWJs are plaintext JSON representations of a layout, any diff tool or text editor can be used to spot the delta between systems.
For quick diffing, LST files can also be generated / compared.
Measurements
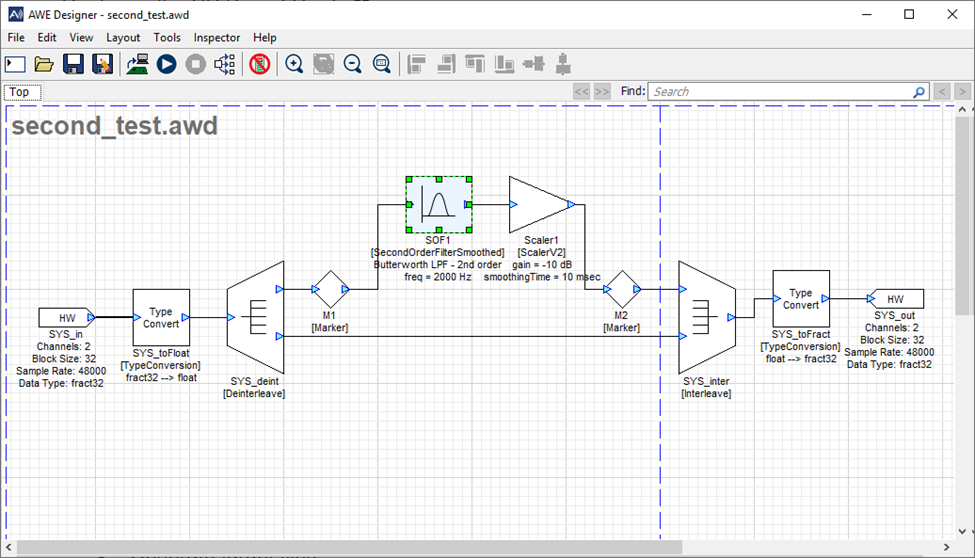
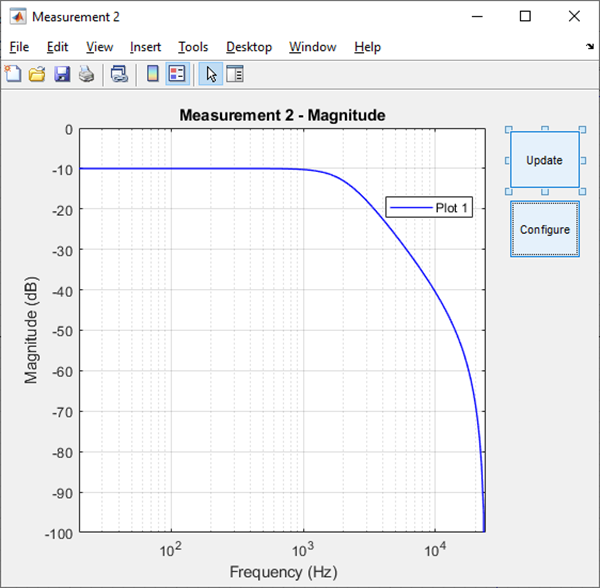
Many modules have associated frequency responses. The measurement dialog measures the composite frequency response between two points in your signal processing layout. To set up a measurement, first place marker modules at the beginning and end points of the desired measurement path in the layout.
Then select the ‘Tools Measurement New Measurement’ menu item to get to the measurement dialog.
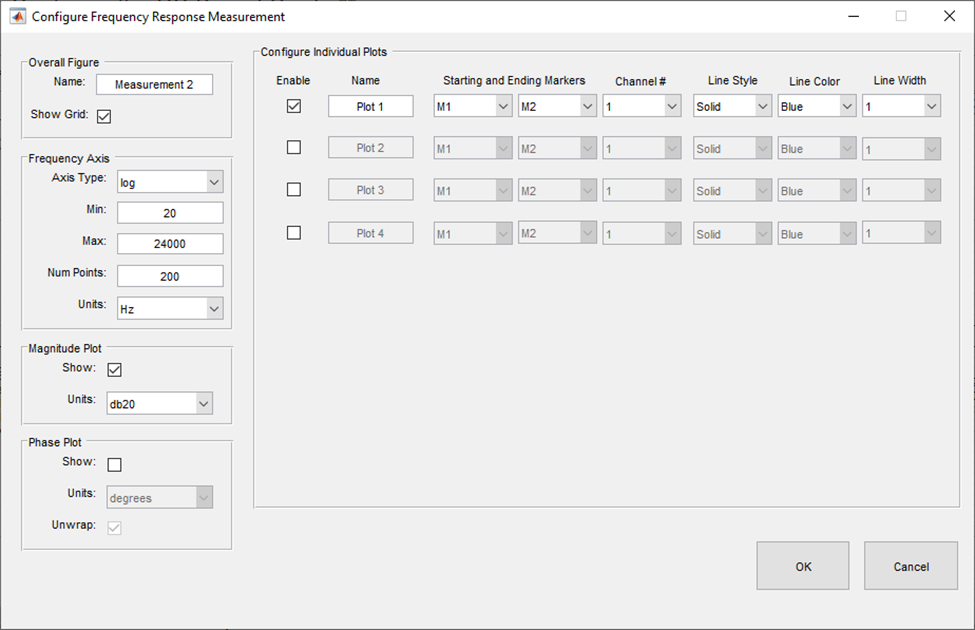
Here you can select all the properties of the measurement display. When you push the OK button, an editable measurement graph will be displayed.
Tuning Interface Test
This function performs diagnostic measurements on a connected tuning interface, and is handy to have when developing an AWE Core BSP, or while troubleshooting a tuning interface implementation. The functionality can be accessed via the ‘Tools Tuning Interface Test’ menu item. Test results indicate the interface speed under various conditions, defined by the user in the Test window.
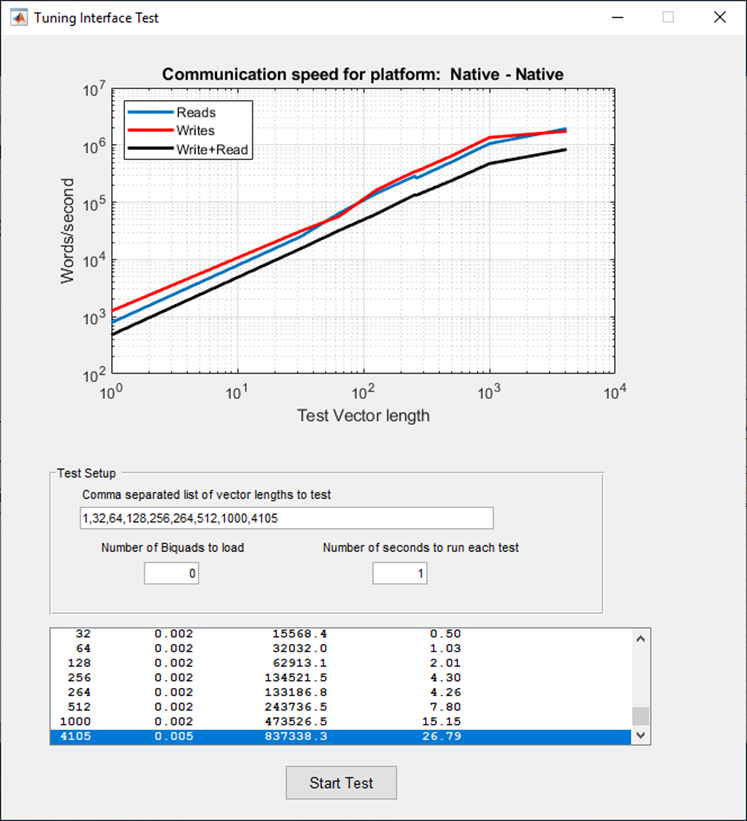
The test performs a series of Read, Write, and Read/Write commands over the tuning interface, with test configurations specified by the user. These configurations are modified in the Test Setup section, and are as follows;
Comma separated list of vector lengths to test
Number of Biquads to load
Number of seconds to run each test.
Flash Manager Tool
The Flash Manager tool, which is delivered as part of the AWE Server, enables users to easily add and remove Audio Weaver Binary files (AWB) on targets that support flash file systems. Once added to flash, the AWB file will be loaded by the AWE Core at boot-time and the target can run in stand-alone operation. See the next section ‘Using the Flash Manager’ for instructions on how to do this.
Note that another alternative for stand-alone operation is to store the AWB contents in a C array and compile it into an application directly. This method can be used on targets with or without a flash file system. For more information on this, see Standalone Operation.
Using the Flash Manager Tool
Generate an AWB file for your desired Audio Weaver design (AWD ) in Designer by going to ‘Tools -> Generate Target Files’.
Select ‘AWB’ target file type and choose the directory to which the AWB file will be saved. Change the ‘Save Basename’ field to a name that is less the 16 characters, then hit the “Generate” button. It will then start compiling the system for creation of the AWB file.
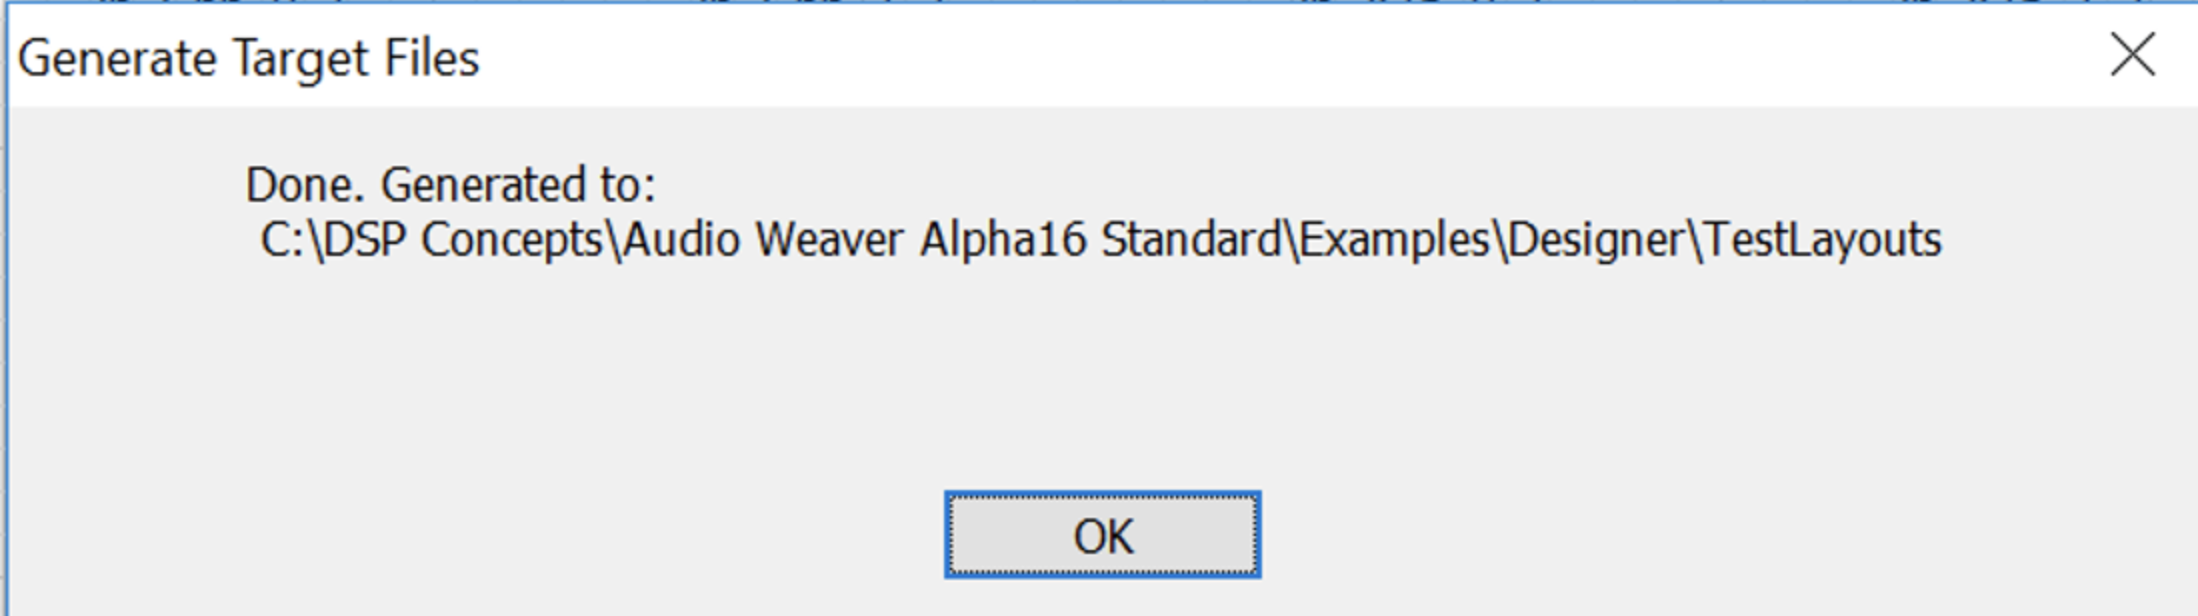
Once the AWB file has been successfully generated, the following window will appear:
In AWE Server, select ‘Target -> Change Connection’ and connect to your target with the appropriate option.
In AWE Server, select ‘Flash -> Flash Manager’. Then press “Add File” button.
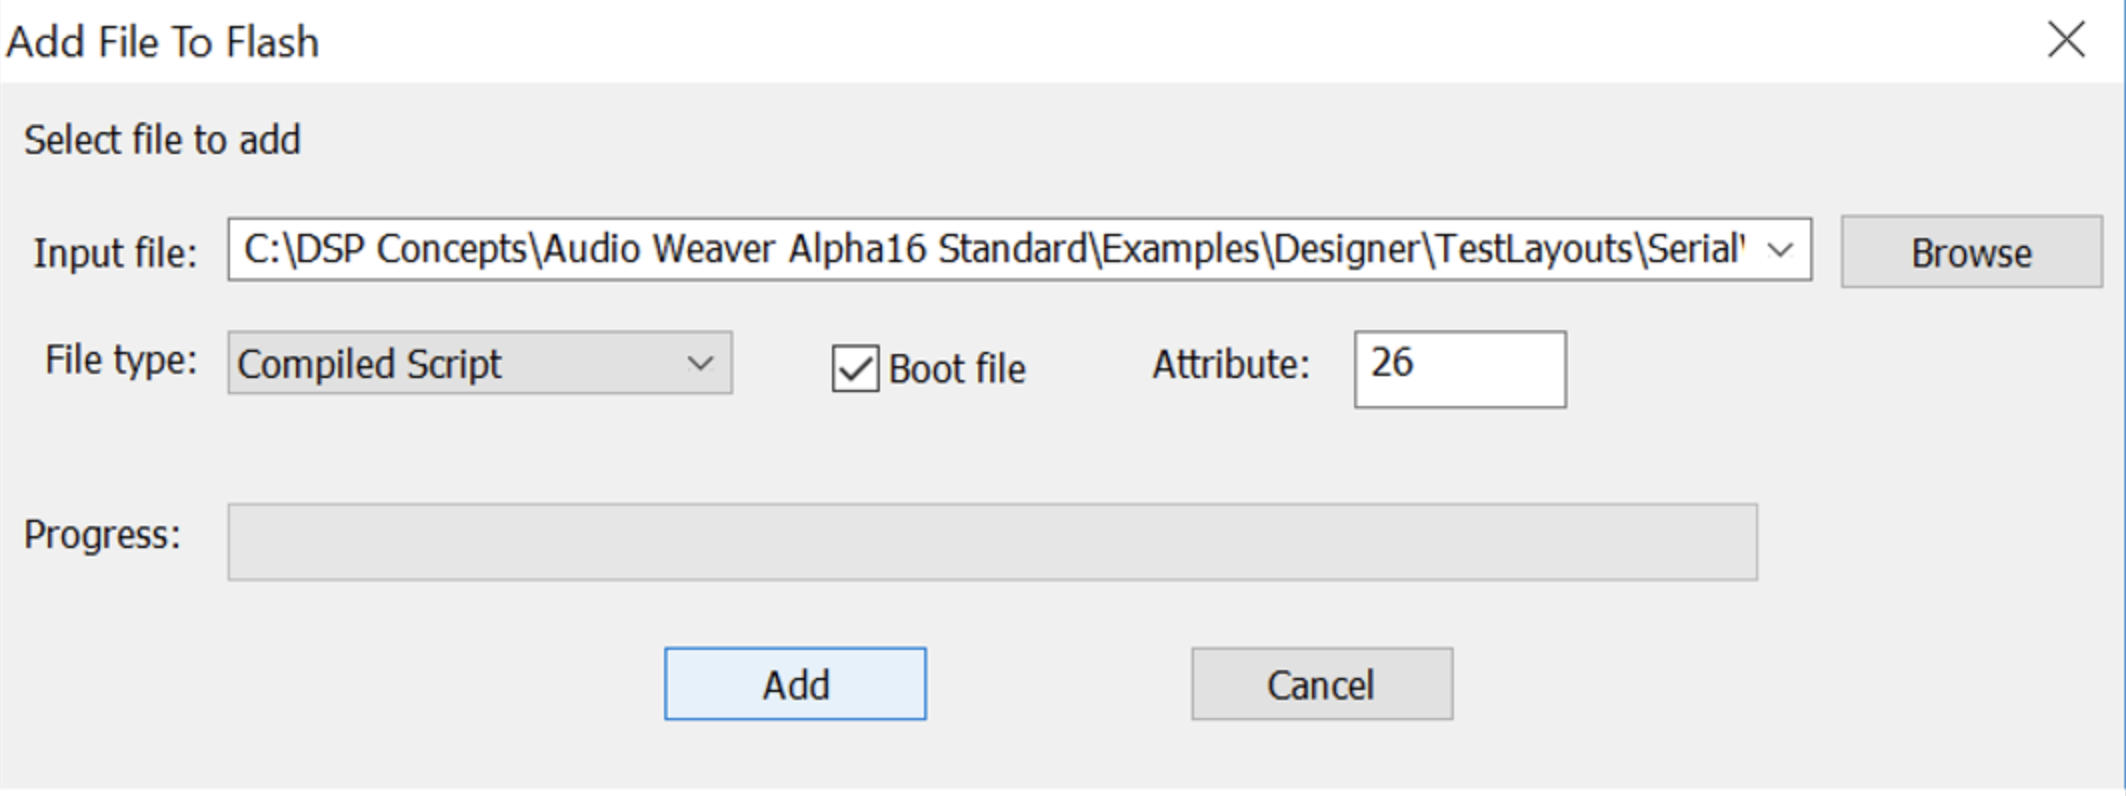
Browse to the previously-created AWB file and select it as the input file. Ensure that the file type is “Compiled Script” and check the box next to “Boot file” to designate this file to be used at boot-up (attribute = 26). Click the “Add” button to load the file into memory.
Once the progress completes, click “OK”.

After the file has been added, it will show up in the list “Flash file system on target” in the Flash Manager window. When you reset your target hardware and reconnect AWE Server to it, you should see a non-zero CPU % and heap allocated in the AWE Server, which indicates that the layout is indeed running.

Overflow Detection
On certain targets, AWE Core will detect any overflow conditions while a layout is running and present this information in AWE Server. An “overflow” occurs when the previous pump is not completed before attempting to schedule the next pump. The overflow logic is capable of detecting overflows in any of the sublayouts in a multi-rate layout.
When an overflow is detected, the AWE server is notified through the tuning interface, and the following indicators are updated in AWE Server.
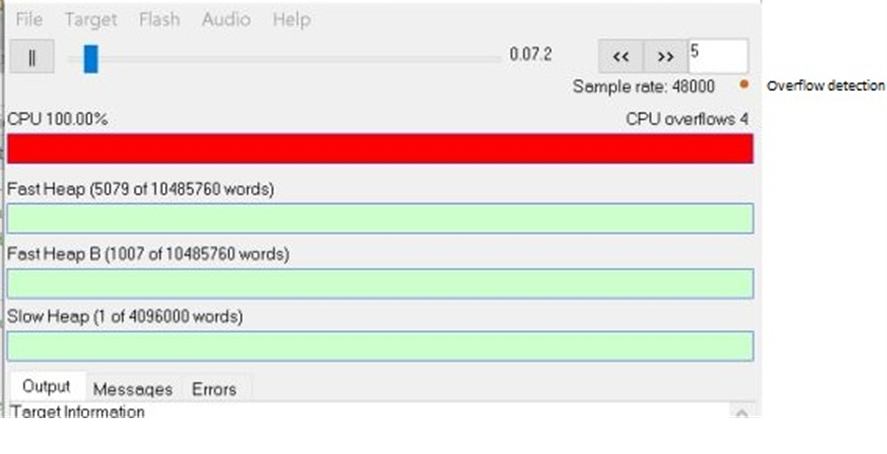
The CPU usage progress bar will turn Red, indicating that the CPU usage has exceeded 100 %. If the overflow condition is transient in nature, it is possible that the cpu bar may not show this condition.
The overflow detection LED (red dot) in the top right corner turns ON. The LED will stay ON until the Design is stopped, thus alerting the user of the overflow in the current run.
The CPU overflows counter on the top right corner counts the number of overflows detected across the layout (including clock divided sublayouts) until the Design is stopped. This count indicates that one or more overflows happened since the last time AWE Server queried the target for profiling values (by default this is done at 10 Hz). In theory the server could have missed some overflow events occurring at the target between the last query and the current query. As a result, this counter may not reflect the exact number of overflows occurring on the target.
Note: This feature is currently supported only for AWE Core based targets and is not supported on Native or AWE Core OS targets.
Process Files Tool
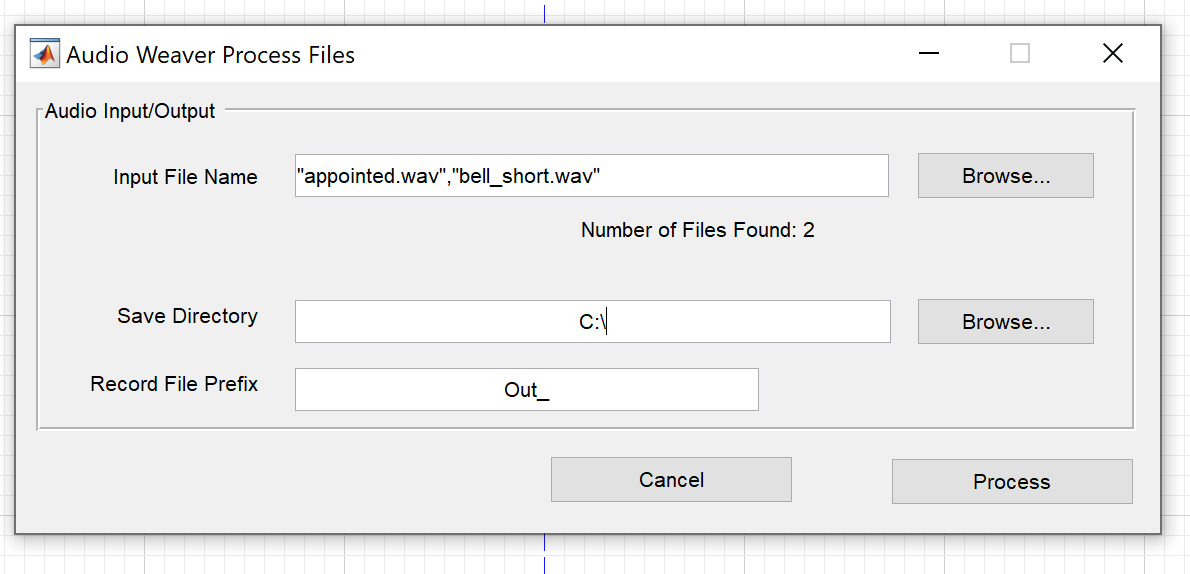
The Process Files tool can be used to process audio files through a layout and record the output as WAV files. The tool accepts MP3 and WAV files as input, but always generates a WAV file as output (even if an MP3 file is provided).
The tool is opened with the Audio Weaver Designer Tools->Process Files menu item.
Note: The Process Files tool cannot be used when connected to an external target, and is only supported in Native mode.
The tool accepts multiple audio files as input, and is thus useful for batch processing audio files. The tool is designed to process data faster than in real-time, making it convenient for verifying the output of larger layouts/many files.